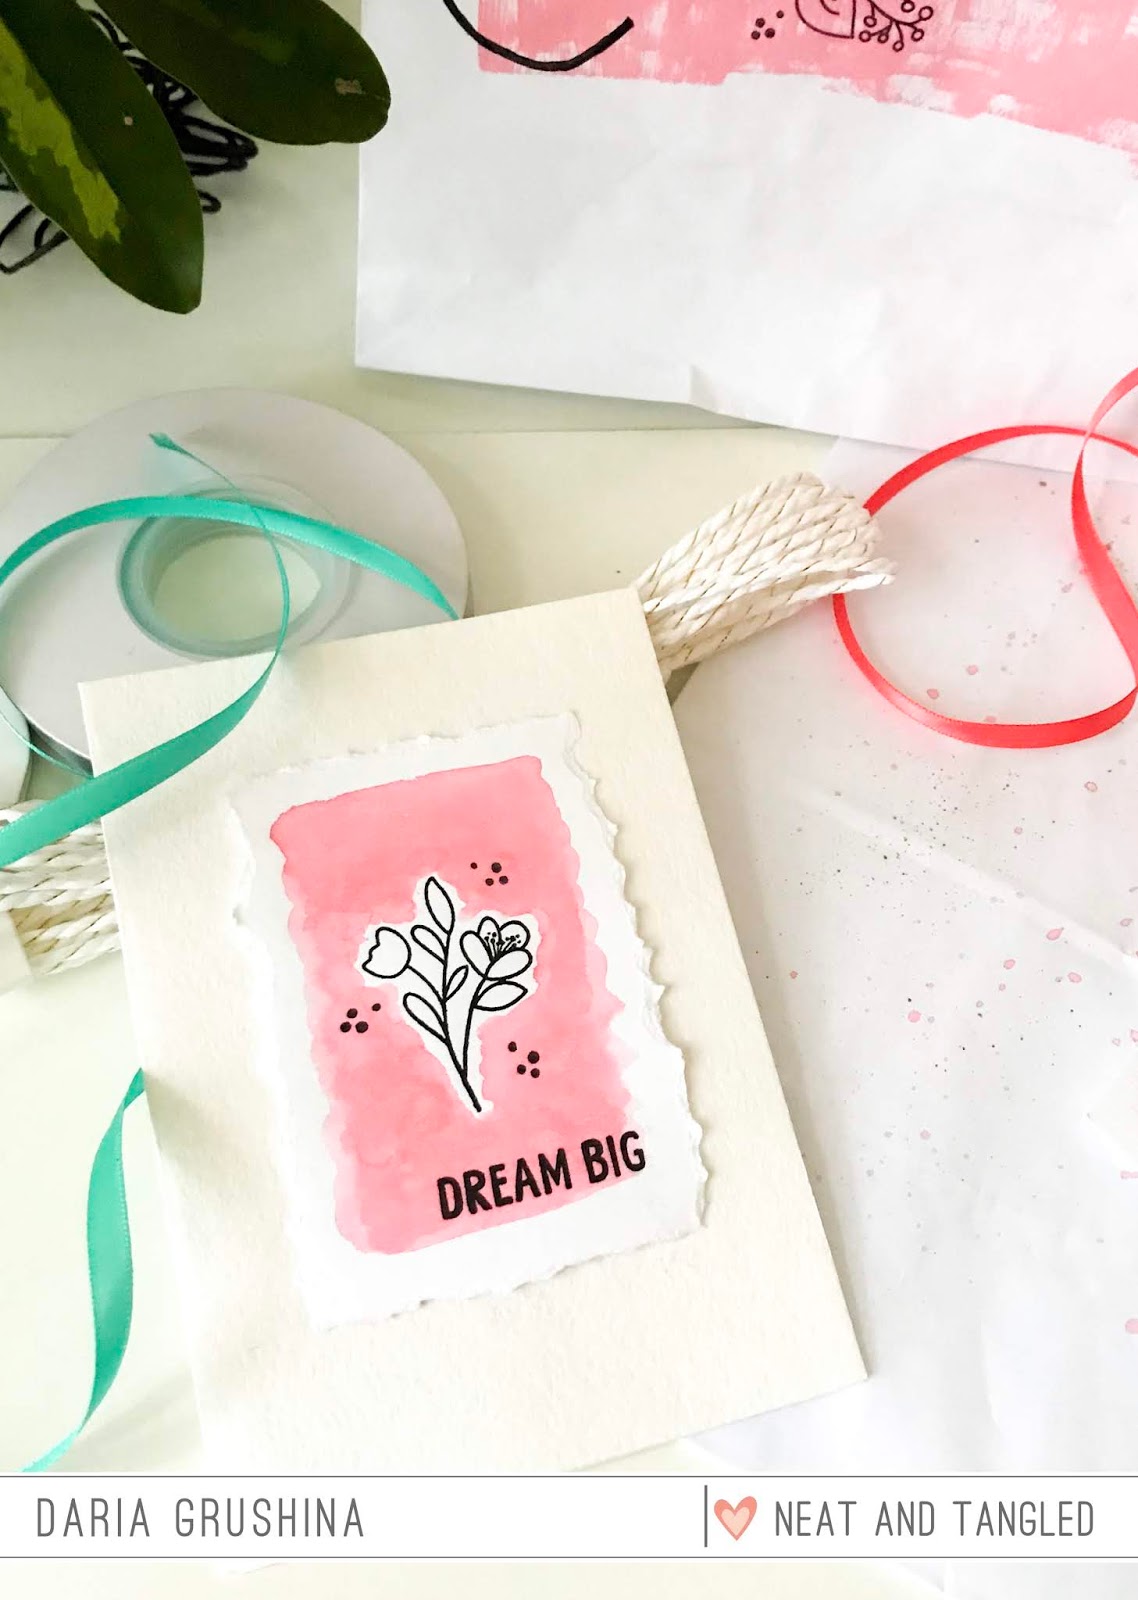
Daria here, and I have for you very fast, simple, yet pretty idea to wrap you presents.
I always have on hand white paper bags to wrap those last minute presents, and little gifts. For my today’s projects, I have decided to use those.
I did have a minimal list of supplies: couple of white paper bags, black ink, card-base, brush, some scraps of watercolor paper, only one ink pad - Worn Lipstick Distress Oxide Ink, and one stamp set - Friendly Florals. Plus, I took a sentiment from So Many Sentiments stamp set. That’s literally all.
For the card, I stamped a flower image at the center of a watercolor paper. Then, I added a little bit of color with distress oxide ink and a brush. I stamped the sentiment in the right corner and adhere the panel to a card base. I also distress the paper edges for more dimensional look.
For one of the two bags, I splatter some inks for some texture. I also made a panel with a wash of color and simple stamping. I will either adhere it to the bag, or use as a tag.
For the second paper bag, I applied ink directly to paper. And then added a beautiful flower cluster and a sentiment. That’s basically it. I am going to use twine or ribbons to finish my presents’ wrapping.
Hope you likes those simple ideas and will give them a try. Be sure to tag us, so we know what you create.
Hi there crafty friends, it's Cheiron here with my monthly post. I sure hope you are not tired of Halloween cards yet. Today I have a sweet little card with the You're a Treat set. This is the perfect set to make any friend a card for Halloween.
To create my card, I have the background a few layers of Black Soot Distress ink watercolor. Onece it was completely dry, I stamped and embossed the sentiment and stars with white embossing powder. It almost gives the card a chalkboard look. Once that was done I cut out a hill from the Stitched Slopes Dies and a frame from Scalloped Dies and assembled my little scene within. I then used a white gel pen to draw in the spinning web coming down from the spider.
I hope you and your families have a great Halloween and only get the good candy :)
Mayuri here to share a card using a stencil, a die and a stamp set!
I began by creating a colourful background using the Cubic stencil and some ZIG Clean Color Real Brush Pens. I simple laid the stencil down onto a piece of white cardstock, coloured through the stencil and onto the card with the brush pens, and then liberally spritzed with water!
Too much water can result in a muddy mess, but not enough water means the colours don't blend - either way, add the amount of water you feel most comfortable with! I removed the stencil and the heat set the panel quickly before trimming it down to the size of my card base.
I adhered the panel straight down to my card based and moved onto the sentiment. I die-cut the diamond shape using the diamond shaped die from Gift Card Box Die Additions and then stamped a sentiment from the Thanks So Much set. I brushed some gold ink all the way around the edges of the die-cut piece before foam mounting to the card front.
To finish, I embellished with a mixture of sequins.
It's been so much fun having Ardyth Percy-Robb as this month's guest designer! Her projects have inspired us each week, and we think you're going to really like what she's prepared today. Here she is with all the details:
Today is my final post as the October Guest Designer. I've had so much fun this month, and I want to say a big thank you to Danielle and the team for inviting me!
This week, I used a leaf stamp from Medallion Flower Builder to create a snowflake. I started by creating a mask using the 6 petal flower in the set. I placed it onto a white panel and used it as a placeholder and guide for stamping the 6 arms of the snowflake. (And that just saved me a whole lot of math! LOL!)
I used a rock-n-roll inking technique with 3 blue inks to create some visual interest and then finally I over-stamped each image with embossing ink before sprinkling sparkly embossing powder over.
I used the darkest blue ink and a sentiment from Beary Merry and embossed it as well.
I blended the lightest blue ink around the edges of the card to complete the frosty look.
You can see how it all came together in the below video:
I hope you've been inspired by something I've done this month! Thanks again, Neat & Tangled, it's been a blast!
Hi friends! How's it going? Have you started crafting for the holidays yet? It's almost November, and soon December will crawl up behind you! It's always to great to start early, but if you're not quite ready, hope my project today will spark some inspiration for the future!
With the new Nativity Play, Darling Dreidels, and Angel Wings released this recent October Release, I was reminded of how much I loved the stamp set that started it all, Christmas Pageant! So I decided to dust it off and use it for today's project.
I stamped the snowman and a few snowflakes in dark brown hybrid ink and colored them with copic markers. I die cut the images with the coordinating dies.
I created a quick blended background with Mermand Lagoon and Tumbled Glass distress oxide inks, and added some Mermaid Lagoon splatter and white paint splatter. I also die cut a ground level that was gently blended with Tumbled Glass.
I picked out a pattern paper that I die cut with the A2 rectangle, and then with the larger oval from Card Front Design dies. With the frame, I was able to position my sentiment and the hanging strings for the snowflakes, which I stamped in the same dark brown ink.
Finally, I added the snowflakes to the background, and then the frame over foam tape, and lastly my cute little snowman with some foam squares!
Every year at about this time I vow to myself that I'm not going to leave my Christmas crafting until the last minute and that I'll get organised early. I often make these starts with really good intentions... what eventuates is another story!
Certainly what I do know is that if I want to get ahead I need to be making 'batches' of cards rather than single detailed projects. Bonus points if it's quick and easy, messy and fun, and looks unique when it's done!
So this week I started playing around with some mixed-media techniques with the Neat and Tangled Radiating Star stencil. This detailed stencil makes a great background that steals the show without needing to add much else to finish it off.
Mixed media techniques really lend themselves well to experimentation and I dove headfirst into this project without clear goals in mind. I simply wanted to try a few things out and see what the results might be. I discovered that using different mediums create vastly different results, for example the pastel version here uses Gesso as a base, whilst the darker coloured ones use Texture Paste.
My video takes you through the whole process of creating these cards, and it's really a 'warts and all' view. I wanted to keep this as 'real life' as possible and I've kept in all the experiments-gone-wrong, all the mistakes and all the victories as well. I hope it inspires you and maybe encourages you to try something new today!
Hello everyone!
Sveta is here and I'm going to share with you my new card with super cute angel from the October 2018 Release. The stamp set is calling Angel Wings, it's a mini one but has all you need for a card.
I stamped and die cut the angel image and colored it with watercolor markers. Then I used a blue one and draw rays of light around the angel on the background.
I also added a few stars and the sentiment that I colored with yellow marker.
To compliment the yellow color I placed the card on a yellow cardstock base.
Hope you liked today's card and want to wish you a great week!
Happy Friday! We're welcoming back our October guest designer Ardyth Percy-Robb today, and wait until you see what she's created, we love the thought and planning and execution of this card! Here's Ardyth with all the details:
Good morning! It's Ardyth here, and I'm excited to be back with my second post as the October Guest Designer!
I started by creating a rough 'sketch' of my card on a scrap piece of paper, by stamping the images where I wanted them - no masking, just quick layout planning. I worked out in my mind which images were in front and which were behind and numbered them, in the order I would need to stamp and mask them.
Then I had to cut out all those masks! Once I had that all finished, I stamped the images, in the correct order and placed their masks over top.
When the scene was completely masked, I created snowdrifts with some post it tape and blue Catherine Pooler ink. Then I blended more ink over the top of the card to create a bright blue sky.
Then came the big reveal - I've been doing it for years, but it's still magic when all the masks come off!
Next was a whole lot of Copic colouring. I kept it simple - a bit of shading for dimension and a limited colour scheme. I added details with a white gel pen and some glitter glue for sparkle!
I started by stenciling the background with the Radiating Star Stencil. I used yellow dye ink with a little bit of red in the center, on Bristol Board Card stock. I then stamped the sentiment from the Joyful Sentiments a little to the right of the star.
The adorable little images were colored with Copic markers, cut out with the coordinating dies, and adhered with foam tape.
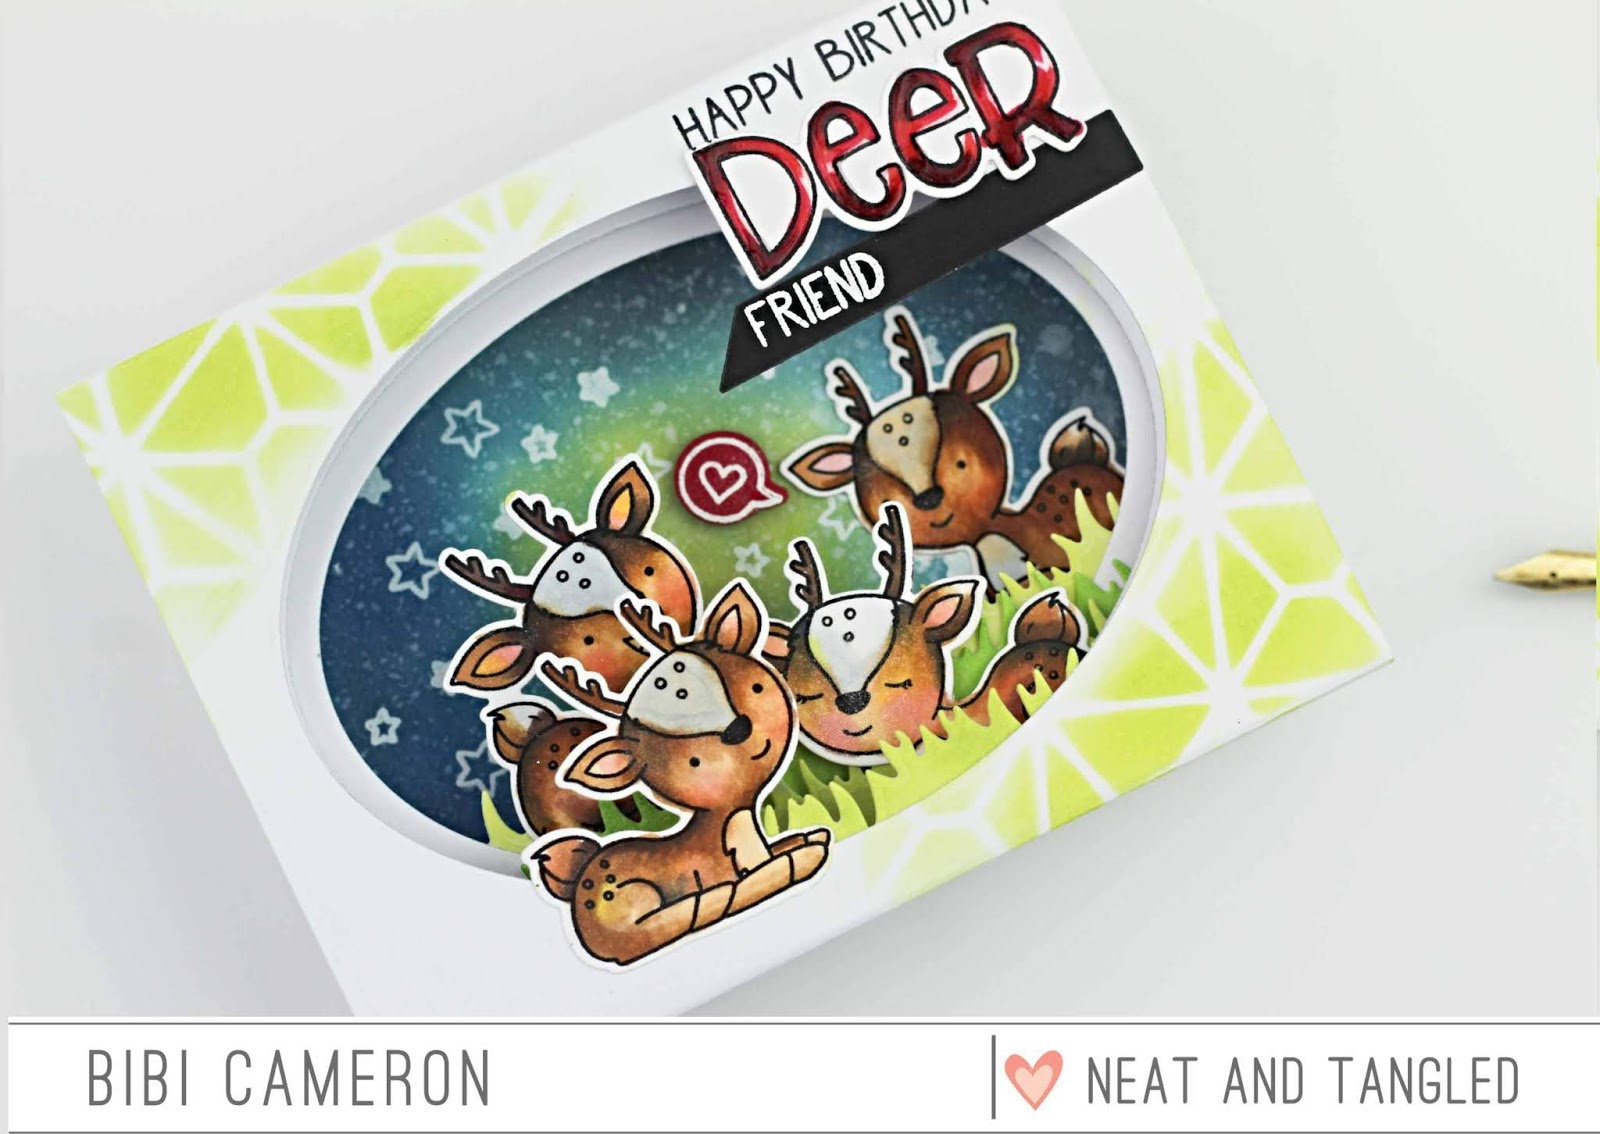
Hello from Scotland, it's Bibi Cameron and today I have loads of pictures and ideas to create extra cute diorama/shadow box cards using beautiful Neat and Tangled supplies from the latest releases.
In the video below I'm sharing the card making process, some tips and a formula to create this kind of cards in any size.
As I mentioned in the video. I used 300 grams and 240 grams paper to make these cards.
I thought that 300 grams paper could be to thick for this projects but you can make your own mind about what kind of paper you would prefer to use after watching my video. I'm still not sure what it is the best. I'm Ok with 300grams but I found easier to work with 240 grams or 270 grams paper for this kind of project. Just because the thick cardstock is very stubborn!
For the card above I used 240 grams paper. The front of this car measures 6"x6" inches and the card folded measures 7" width so that the envelope was customized to fit a 6"x7" inches card. I used an envelope punch board to make the envelope. it only takes 30 secs. This is my fav card size to create a nativity scene with images from Nativity Play and Angel Wings. I just feel I have more room to lay out elements.
I added colours to all the images in this post using Ciao Copic Markers ( Set B) and I added shimmer with a Nuvo Shimmer Pen.
You won't have any trouble to fit the cards inside the envelopes. They will be just a bit bulky I think that using 300 grams paper for cards that will be mailed could be a better option.
Here you can see how the card lay flat on the envelope and yes! This card is big. I love it!
Here is a card that will fit a C6 American standard envelope. Folded it measures 5-1/2 " x 4-1/4" inches. However, to fit the angels and Balthazar the card might need a larger envelope so I used a UK British standard C6 envelope but this was only because some of the die cuts are out of the frame. I used 300 grams cardstock to make this card. The 3rd layer of cardstock is made out of 240 grams cardstock.
Below another card idea, the layout is not vertical but horizontal also using 300 grams. You don't need to do anything different to put this card together, just turn around the paper and stick your images as they fit better or in any orientation.
I also used Cubic Simply Stencil and Distress Oxide Inks to add interest to front panels of the cards.
The front if this card measures 5-1/2 " x 4-1/4" inches and folded it measures 5-1/2 " x 5-1/4" inches. It will fit in a 6"x6" envelope or you can customize envelope to perfect size using an envelope punch board.
So here is the formula for a 4 layers Shadow Box Card - Diorama Card FRONT AND BACK PANELS PAPER SIZE
WIDTH:
To calculate the width of the paper you need to add the envelope / or card front width + desired box depth. If you want your shadowbox to be 1" deep you need to score the paper 1" from both ends. If you want a slim shadow box card e/g. 1/2"inch you should apply formula above and score the paper 1/2" from both sides.
LENGHT:
For a square or rectangular card, you can choose your desired length... any length is ok but keeping proportions.
INSIDE PANELS OR INSERTS SIZE
When you add layers of paper into your shadowbox, the walls of your box became thicker and thicker so that the inserts should be slightly narrower and when you adhere them into your card they will keep straight and they won't bend inside so that the card will fold flat.
Off course, this is not something I read in a book. It is just my own personal formula to make the job easy. Although I have to accept that I can easily skip any of the steps and my cards will be wonky.. it is fine tho.. perfection and handmade sometimes are not a good match :) lol.
The inside panels or inserts pieces do not need to have the same width and depth than the exterior box but they can have the same length as the box if you want to. I like it that way but depending on what you are planning to do you can do different staff with shorter inserts... e.g. add stripes of grass, clouds etc into your cards.
1. To calculate the size of the insert that goes behind the front panel you need the next formula: Envelope /card front width - minus 1/8" inches To calculate where to score folding lines at both ends of your panels, you need to divide the depth of your box by two (2).
2. To calculate the size of a second panel behind the front panel of the box you need the next formula: Envelope / or card front width - minus 1/2 of the box depth measurement - minus 1/8" inches To calculate where to score the folding lines at the end of your panels you need to divide the depth of your box by four 4.
I explain all this a bit better in the video . Soundss a bit confusing but that's the math to create a perfectly shaped shadowbox or diorama card.
There were so many great entries - you all made it very difficult to choose! But the winner for this challenge was Mindy Eggen! Congratulations, Mindy!
She had great photos, and her video tutorial was amazing! She did a great job of walking us through the creation of her card, giving lots of detail and tips along the way! Be sure to check it out HERE :)
Thank you so much to everyone that entered! Look for our next challenge in December!
There are so many possibilities with this set, and I've found for cards like this, one of the easiest and quickest ways to work is to settle on an ink family and just mix and match the tones.
I penciled in a ground line, and then stamped the trees varying the shades and combinations. I did mock this up on some scrap paper to find the combination I liked best.
I usually stamp my sentiments in black, but decided to stay with the color scheme and stamp with the darkest shade of ink in the set.
To add a little bit of sparkle and texture, I added a thin line of liquid adhesive and then dropped glitter over top.
Once you figure out the combination of trees you want to use, this is really a quick and easy card, perfect for mass producing and nice and flat for mailing.
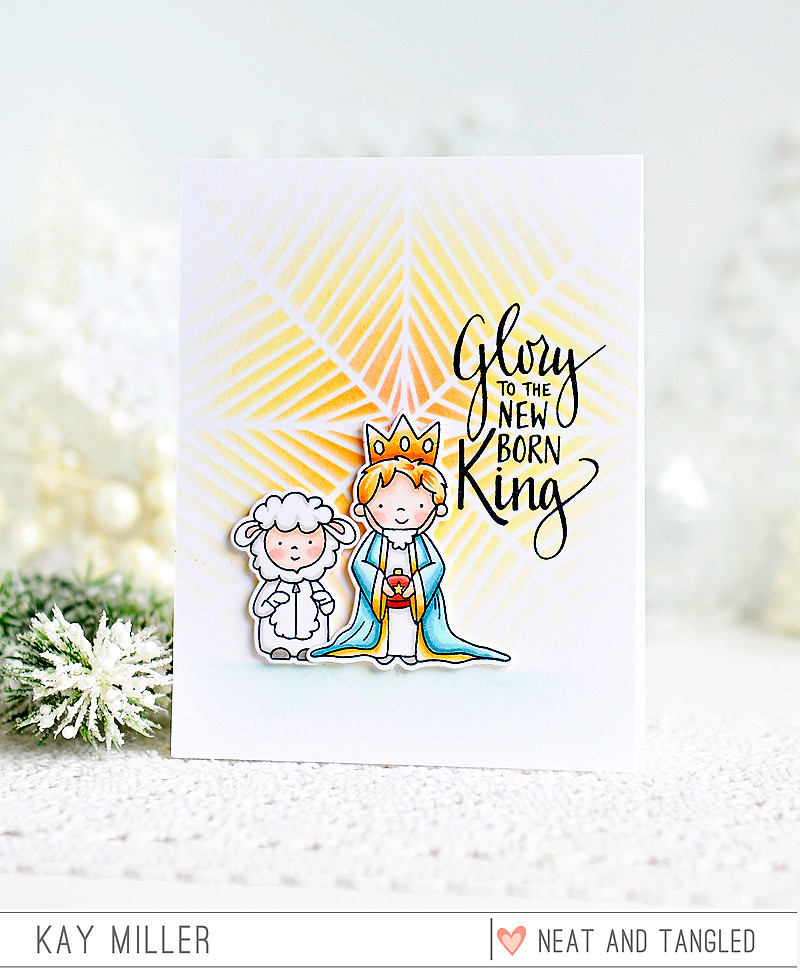
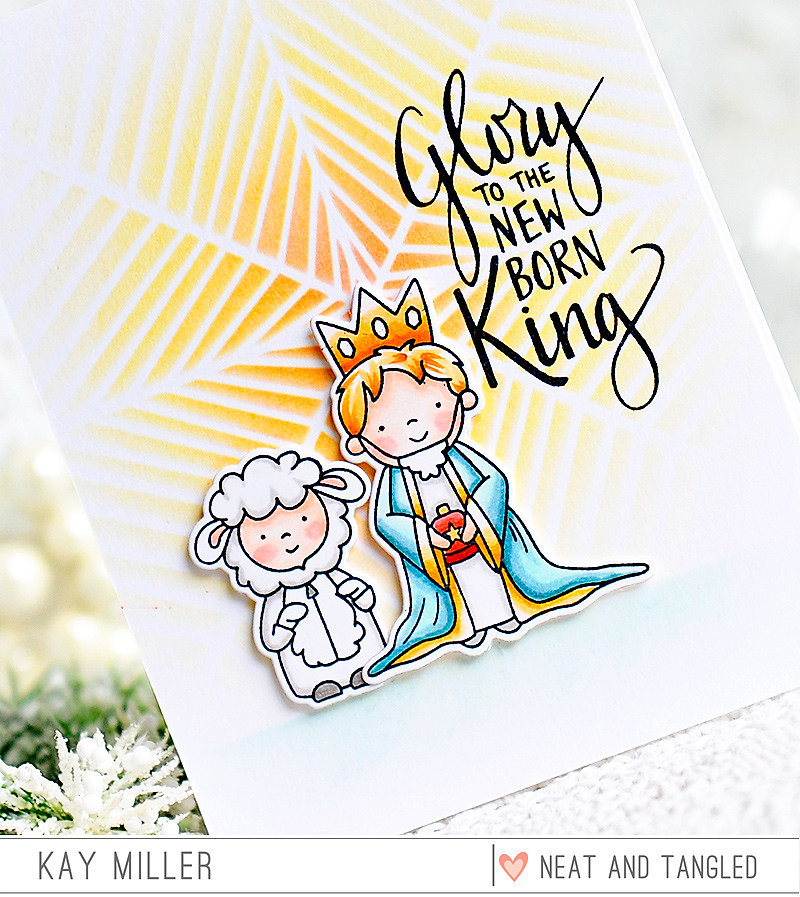
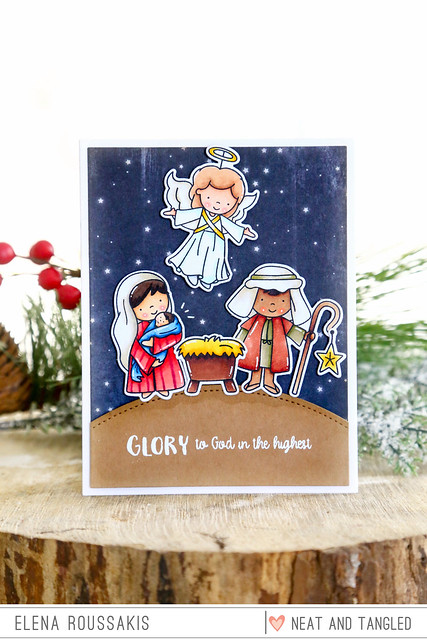
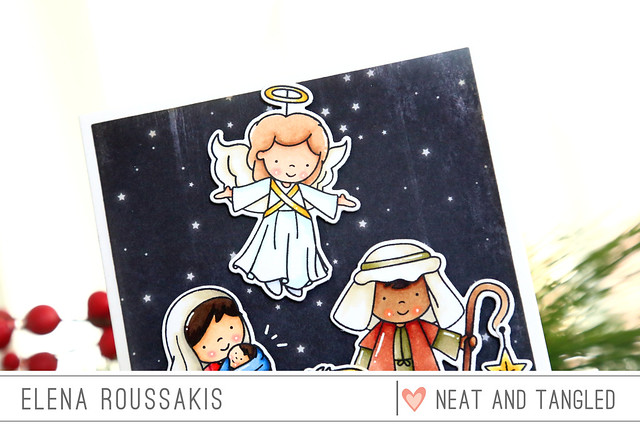
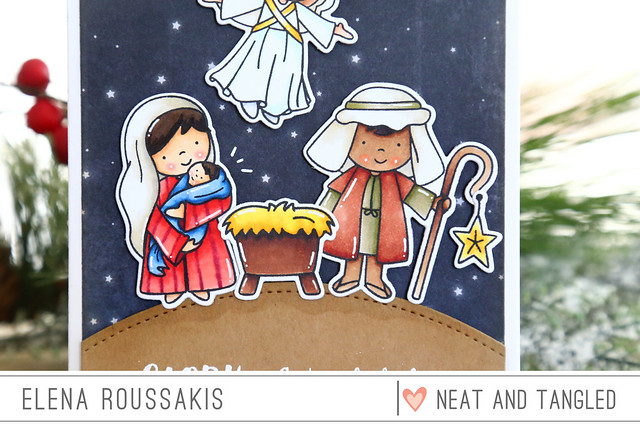
Elena here, with a card combining 2 of the sets from our latest release: Nativity Play and Angel Wings.
I am so happy to have a nativity set for my Christmas cards this year! I stamped out Mary and Joseph and colored them with copic markers. I created stripes in Mary's tunic with a darker red marker, and gave Joseph a darker skin color. I just love the way Mary is looking down at baby Jesus!
The angel has come to give them good news! I know the angels come to tell the shepherds, but still. Maybe I'll create another card with a few shepherds and sheep! Joseph could definitely stand in for a shepherd and the sheep in Nativity Play kills me, he's so cute.
I set the images against a patterned paper of night sky, and the sentiment was heat-embossed onto a kraft-colored hill. With a W1 copic marker, I added some shading below the images. I love how this adds dimension and grounds Mary and Joseph.
I hope you like it! If you create anything with any of these new sets, we'd love to see! Be sure to tag us #neatandtangled on instagram!
Hello friends! I can't believe release week is over already - they always go too fast!
Thank you all so much for the excitement and positivity over our new release! Our designers shared some truly amazing projects with you, and I hope you are feeling inspired. All new items are now available in the shop!
We are so happy to offer a October 2018 release bundle this month - were you can purchase all new October items with one click at a discounted rate - 15% off!
Natalie is also sharing a great video walking you through each of the new products included in this release - be sure to check it out, and subscribe to our YouTube channel if you don't already!
Here is one more look at all the amazing new products:
Angel Wings Stamps + Dies
Nativity Play Stamps + Dies
Darling Dreidels Stamps + Dies
Lovely Lotus Stamps + Dies
Card Front Designs Dies
Cubic Cover Plate Die
Cubic Stencil
Can't wait to see what you all make with these new products! Be sure to share your creations on Instagram using #neatandtangled and on our Facebook page!


