Cozy Christmas card using patterned paper with Sveta Fotinia

Hello! It's Sveta here again and I'm going to share one more idea of using Classic Christmas Stamp Set.
For me classic Christmas looks just like this: deep colors, tartans and snowflakes. I chose the most light pattern sheets for the flowers and the darkest for the background,

I stamped and die cut poinsettia flowers twice and put them into a composition on a card. I also used a tartan pattern for the sentiment strip.

 So that's how I made one more very simple and quick card for the holiday season!

Thanks for stopping by! Don't miss Neat & Tangled Black Friday Deals - more info here!
2

Blue and white Christmas card with Sveta Fotinia

Hello everyone!

Today I want to share with you my new clean & simple card in blue and white colors. I used only one Classic Christmas Stamp Set for this card.
First I heat embossed the poinsettia image, then added the sentiment and used Tombow Glue Pen to make a frame around the card. It's a one layer card so with this trick I added a vision volume.

I also added a few sequins  from Crystal Clear  Sequins Mix in the center of the flower.


Hope you enjoyed my card today!
Thanks for stopping by!
0

Happy Thanksgiving! Sales All Weekend Long!

Hello friends!

I hope all of our US friends have a wonderful Thanksgiving, filled with lots of love, laughter, and yummy food!

It is hard to believe another year has passed, and my heart is filled with gratitude! I am especially grateful for you, the wonderful Neat and Tangled community. Our crafty friends truly make Neat and Tangled a special place - without your involvement, positivity, and creativity it would be meaningless. 

I would love to be able to write each of you a handwritten thank you, to express what you mean to me, but hopefully this is the next best thing! 


These codes can be applied to items already marked down in the SALE section of the shop!  The only products excluded are the new November products which are in the NEWEST PRODUCTS section. Once an item is sold out, it is sold out, we cannot take special requests. The promo code will not be applied to new November release products. It cannot be applied to previous orders. It cannot be combined with other coupon codes.

Please keep in mind we experience a high volume of orders during this sale, so we will be unable to combine orders, and we ask you to please allow 5 business days to receive your shipping confirmation email! We will begin shipping orders Monday, December 2nd. 

Thank you so much again for all you do for the crafting community! I hope you have a wonderful weekend!
Danielle

1

Two cards with Lots of Foliage with Daria

Hello-hello Awesome People! 

Daria here. And I have for you quite spring feel cards. Don't know what happened in the middle of Christmas cardmaking, but, here they are: 


I had a little bit of time, and a lot of scraps from coloured cardstock. So, I took my big-shot and Foliage Frame die set and cut looooots of foliage. 


I had two card-bases, that were stamped with Delicate Dots rubber background stamp: one in black and one being heat-embossed in gold. 


It took some time to arrange all the leaves. Here is a little tip: adhere your elements in sections. When there is so much little elements, it's much easier to control the position of every single one. 


For both of the cards, I added sentiments from  Typed Sentiments stamp set  and So Many Sentiments stamp set. I stamped them onto colourful banners made with Skinny Stripes dies.  A few enamel dots  from Sophisticated Enamel Dots set became a perfect finishing touch.


Thanks so much for stopping by,
Have a wonderful day,

D.

ps: I have a video footage for these cards, let me know if you'd like to see a process video. xoxo

1

Classic Christmas Wreath Card


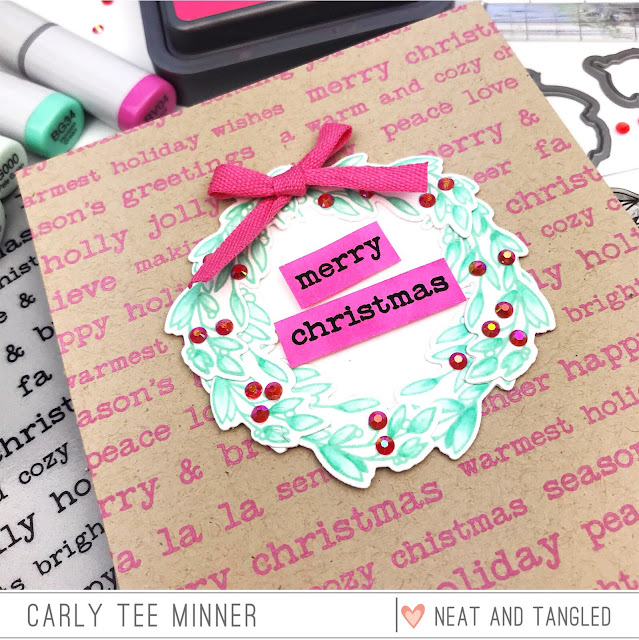
Hi Friends! I love the little holly branches in the Classic Christmas stamp set! They are so delicate & sweet and are easy to turn into a holiday wreath!

To create this card, I started by stamping the Holiday Wishes background in Picked Raspberry Distress Oxide on kraft cardstock.

I stamped the holly branches in a minty green ink because I love pairing colored lines with Copic coloring.

After coloring the branches, I adhered them to a cardstock ring to achieve the wreath shape. (And later I added a circle behind the wreath so really I could have glued the branches to the circle, LOL!)
To finish the wreath, I added some tiny rhinestones and a bow.

To put the whole thing together, I adhered the wreath to the kraft card but added a white cardstock circle underneath first. Then  stamped the "merry christmas" on a little strip that I colored pink with a Copic marker.


Hope you are getting time to make some cards today and maybe even one with a wreath! Thanks for stopping by!
Carly

Supplies:
Classic Christmas Stamps
Classic Christmas Dies
Holiday Wishes Stamp
Distress Oxide Picked Raspberry Ink
Archival Viridian Ink
Copic Markers G0000, G000, BG34 & RV04
Kraft Cardstock
White Cardstock
Rhinestones
1

Circular Ornaments with Koren Wiskman


Hello everyone. Koren here with a fun card to celebrate the holidays. I created some ornaments using the Circular stamp set that was new last month. 

To make this card, I started with a piece of black cardstock cut to 3 1/2 by 4 3/4. I loaded it into my mini MISTI and arranged the smallest of the circles from the Neat & Tangled Circular stamp set to make the background. I stamped them individually using clear sticky ink and heat embossed them using white embossing powder. 

To make the lines or strings to hang from I used a ruler and an embossing ink pen to make a straight line using sticky ink. I also heat embossed these lines. 

I also took this time to stamp my sentiment. I used the "happy holidays" from the NEW Classic Christmas stamp set from Neat & Tangled. I stamped it using the same sticky ink and heat embossed it with white embossing powder directly to the black panel in the lower right hand corner. 

The splatter was then added using white gouache and a small round paint brush. I placed the panel into my splat box to prevent making a huge mess accomplishing this. I mixed a small amount of the white gouache with a small amount of water and in a small dish. I then tapped the loaded paint brush on the side of the dish aiming it in the direction of the panel trying to concentrate the majority of the splatter to the left hand side of the panel. 


For the gold foil ornaments in the foreground, I cut the three larger sizes from the Circular coordinating dies out of gold foil cardstock. I added gold sewing thread to the back of each circle using regular Scotch tape. The circles themselves were added to the card front using Scotch 3M foam tape. I then ran the thread up the front of the card and adhered it to the back of the panel using the same transparent tape. 

The entire panel was then added to a neutral gray card base cut to size A2 and scored in a top folding portrait orientation. I added the panel to some craft foam to give it dimension. I used tear tape adhesive to do this. 

I hope that I've inspired you to create something a little different with your basic dies this holiday season. 

Koren 


3

Acrylic Paint On Acetate - Featuring Holiday Wishes By Carissa Wiley

Today I’m sharing a background technique featuring acrylic paint on acetate. It's Carissa Wiley here with you today and I can't wait to share the card that I've created featuring this technique. I love this technique.


I’ll be featuring the brand new Holiday Wishes background stamp from Neat & Tangled. I love this background. You can use this to create a background, or cut the background apart to make a ton of adorable Christmas sentiment strips.


I'll also be using the brand new Classic Christmas stamp set. Layering these stamps together makes for a beautiful Christmas card.


Since I’m dreaming of a PINK Christmas this year, I decided to feature some beautiful pink shades combined with a bright yellow green. I love this color combination. It’s also perfect for spring cards.
I’ll show you exactly how I created this embossed and painted background in today’s video. Be sure to check it out!


If you want to watch today’s video in HD on my YouTube channel, be sure to click HERE to head over there now. While you’re there, don’t forget to like this video, subscribe and turn on the notifications so you won’t miss any of the Neat & Tangled paper crafting and card making video tutorials. ❤︎

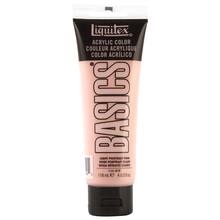
For this card, I used Liquitex Acrylic Paint from Michaels in the colors Light Portrait Pink and Brilliant Yellow Green and Hobby Lobby's Master's Touch Acrylic Paint in Pink and Ocean Green.


Thanks for stopping by today. I hope you enjoyed this project. Until next time, I hope you have a fabulous day!

XOXO
Carissa

Watch The Video

Supplies

*affiliate links may be used*

Holiday Wishes Red Rubber Cling...
[ N&T ]
Classic Christmas | Neat and Tangled
[ N&T ]
Classic Christmas - Nice and Neat...
[ N&T ]
Crystal Clear Mix | Neat and Tangled
[ N&T ]
Lawn Fawn Glue Tube | Neat and Tangled
[ N&T ]
String by the Spool - Metallic Gold,...
[ ELH ]
WOW Embossing Powder, Regular 160ml -...
[ ELH ]
Acetate Pack 8 X 11, Crafter's...
[ ELH | SSS ]
3 Pack Blending Brushes, The Stamp...
[ ELH | SBC ]
Liquitex BASICS® Acrylic Paint 4oz. -...
[ MCH ]
Ocean Green Master's Touch Acrylic...
[ HBL ]
Pink Master's Touch Acrylic Paint -...
[ HBL ]
Solar White Heavyweight 110 lb - 25...
[ ELH | MFT | SSS ]
VersaFine Clair Ink Pad, Nocturne
[ ELH | SSS ]
Twilight, Catherine Pooler Ink Pad -...
[ ELH | SBC ]
Twilight, Catherine Pooler Reinker
[ ELH | SBC ]
VersaMark Ink Pad
[ ELH | MFT | SBC | SSS | AMZUS ]
Embossing Magic Bag, Inkadinkado
[ ELH | SSS | AMZUS ]
Embossing Gun (Wagner), Hero Arts
[ ELH | SSS | SBC ]
Dual Speed Heat Tool, WOW
[ ELH | SSS ]
Deluxe 12 Inch Paper Trimmer with...
[ ELH | SSS ]
Reinforced Trimmer Blades, Fiskars
[ ELH | SSS ]
Precision 5 Inch Scissors with...
[ ELH | MFT | SBC | SSS | AMZUS ]
Tim Holtz Tonic Non-Stick Micro...
[ ELH | SSS ]
Craft Tweezers, EK Success
[ ELH | MFT | SBC | SSS | AMZUS ]
Teflon Bone Folder, Essentials by Ellen
[ ELH | SSS ]
We R Memory Keepers Mini Score Board
[ ELH | SBC | SSS ]
Crafter's Companion Gemini Junior
[ ELH ]
Crafter's Companion Gemini Junior...
[ ELH ]
Crafter's Companion Gemini Junior...
[ ELH ]
Crafter's Companion Gemini Junior...
[ ELH ]
Crafter's Companion Gemini Junior...
[ ELH ]
Crafter's Companion Gemini Junior...
[ ELH ]
Crafter's Companion Gemini Junior...
[ ELH ]
Scotch Double-Sided Foam Mounting Tape
[ ELH | SSS | AMZUS ]
MISTI Laser Etched Stamping Tool...
[ ELH | MFT | SBC | SSS ]
Mini MISTI Laser Etched Stamping Tool...
[ ELH | MFT | SBC | SSS ]
Bar Magnet, My Sweet Petunia
[ ELH | MFT | SSS ]


3
Back to Top