Guest Designer JJ Bolton


We've so enjoyed having JJ Bolton as a guest designer this month, and she's wrapping up the month for us today with not one, not two, but THREE gorgeous cards!


Isn't this first card amazing?  JJ used watercolor powders to create that stunning background, and then stamped our Origami Map image over top.  The sentiment is also from Origami map and a few cabochon embellishments finished it off.

For this next card, JJ die cut our Tiny Triangles Die and then used it as a stencil to create the bright colorful and graphic pattern on the left side of the card.  The sentiment is another from our Origami Map set.


When she was done creating this card, she had a beautifully colored die cut piece.  What to do?  Back it with some gold cardstock and and use it as the focal point on another card!  Don't you love it when you get two cards for the price of one?


A big thanks to JJ for sharing her work with us all month!  I hope you were as inspired as we are!
3

Noticed By Neat and Tangled

We've been out and about checking out your work and love what we're seeing!

If you've been noticed, please proudly display this badge!

Hello Summer! This card by Judy using our free digital stamps is pure perfection!

 Yukari created this sweet card using our Paris stamp set! I love the soft colors and touch of sequins!
"Bonjour" Card featuring Neat & Tangled

Get ready to party with Jeni! Who would love this birthday card using Tiny Triangles and Just for You?
april-15

Shelly linked this up for our last Little Tangle challenge.  Can't go wrong with Send Pretty Mail and Hello There die!
IMG_4557

Lynnda's card using Gifts for You and Birthday Tag dies is party ready! I love all the little elements that add so much interest!
Happy Birthday

The colors on this card by Virginia are some of my favorites! Love how she built her own little flower garden using our Scandinavian Flower set!
true friends

 Shona framed our sentiment from Kindness Matters perfectly with those florals!


Thank you so much for using Neat and Tangled for your projects!

If you use Neat and Tangled and would like to be noticed make sure to play along with our Little Tangles challenges, add cards to our Flickr group, or share on our Facebook page!
6

Guest Designer: Kathy Racoosin

We made it to Friday! Yay!

We've got a colorful card for you today from our super sweet and incredibly talented friend, Kathy Racoosin! She used our Paris stamp set and worked her marker magic!


If that didn't brighten up your day I don't know what will! :) And now I'm off to grab a cup of tea!

Hope you all have a great weekend!
Danielle
3

Ink smooshed background with black ink stamping

Hello there!
Mayuri here to share a card that uses one stamp to create a pattern, one die to create an aperture and one sentiment to tie them all together ;-)
©Candles in the Garden. Neat and Tangled Monthly Post JUN2015. Ink smooshed backgrounds.

But, like a lot of the cards I make, I need a background to work with! So, I used my failsafe technique of creating one with Distress Inks - smoosh them onto a craft mat, spritz with water and lay down a panel of white cardstock into the inky puddles. You may have to jiggle the panel around a little to get more coverage, but when you're happy, lift it out and heat set.

©Candles in the Garden. Neat and Tangled Monthly Post JUN2015. Ink smooshed backgrounds.


Repeat the process a few times until you get something that you're happy with. I then stamped one of the wreath images from Simple Christmas to create a pattern with black dye ink for a bit of contrast.

©Candles in the Garden. Neat and Tangled Monthly Post JUN2015. Ink smooshed backgrounds.


I trimmed the panel down to slightly smaller than my card base and then die-cut the smaller Dala Horse from the centre to create an aperture, and the beginnings of a shaker card. I adhered a piece of acetate behind the aperture, and foam pads all the way around to seal in the sequins.

©Candles in the Garden. Neat and Tangled Monthly Post JUN2015. Ink smooshed backgrounds.

The sentiment comes from Gardenia Blooms Journaling card and to finish, I dotted a few of the sequins on the card front.
I hope you'll have a go at creating your own background and then stamping with black dye ink for a dramatic look!
Thanks for stopping by ;-)
5

Quick & Simple Birthday Card

Hey Neat & Tangled fans! Rachel here today with a super simple birthday card when you need something in a hurry (story of my life!). Patterned paper is my favorite go-to when I'm short on time.

I love a clean and simple card, but gorgeous papers add a touch of whimsy and interesting detail in no time at all. I knew I wanted some free-flying balloons for this card, so I chose a cloud patterned paper to provide a subtle background. To make life even easier, I kept all the paper accents from the same paper pad (Hello Sunshine from Pink Paislee).

Celebrate_24.6.15

Using the Just For You stamp set, I fussy cut 3 balloons - 1 from solid grey and 2 from coordinating papers. I layered them on the card at different heights and adhered them with foam tape. I added some twine bows and left the strings long and loose to give them card a bit of movement. I stamped the sentiment, also from Just For You, onto another sheet of paper from the same paper pad and created a banner along the bottom of the card.

There you have it - a professional looking card sure to brighten someone's birthday - ready in less than 10 minutes! Thanks for stopping by today - be sure to visit again tomorrow for more inspiration from the design team!

4

Masculine Birthday Card featuring A Long Time Ago with Taheerah

Hey everybody! Happy Tuesday! It's Taheerah here with you today to share a card!

I recently had to pull together a masculine birthday card, and I couldn't think of anything more perfect than to use A Long Time Ago - one of my most favourite sets! Creating a galaxy themed background is fun and can give spectacular results, allowing the design to really shine with only a simple sentiment!

Here's what I came up with:


I love how this turned out!


I used some white cardstock and a variety of Distress Paints and some Black Soot Distress Ink to create that background - isn't is stellar?! I heat embossed my sentiments with black embossing powder for a little bit of pop but in an understated (and Dark Side) way! *wink*


You may not be able to spot it, but I added a few stars from some of the embellishment mixes too!


I hope this card brought some fun to your day! Thanks for stopping by!
9

N&T / Freckled Fawn Hop Winner

Hey everyone, we hope you enjoyed the hop with Freckled Fawn last week!

The winner of a $25 credit to the Neat & Tangled store came from Day 2, Comment #20......

Christine!

Congratulations Christine!

Please email:  danielle@neatandtangled.com to claim your prize!
3

Neat & Tangled / Freckled Fawn Collaboration Day 5

Can you believe it's our last day with Freckled Fawn?  We hope you have been inspired this week, we have loved working with Freckled Fawn this week!

Both blogs have been sharing projects all week.  Be sure to check back each day and leave comments as there are prizes up for grabs.  Freckled Fawn is giving away a June OHDEERME Embellishment Kit on their blog and Neat & Tangled is giving away a $25 credit from one of the comments left this week.

Taheerah's card:


I used Planner Blocks (the square made of two solid rectangles) and created an ombre/striped background, then adhered some wood chips from the June OHDEERME kit, and a white glitter resin cloud.


I finished with a partially inked sentiment from the Sparkle and Shine set. Love this fun, cheery Summery card!

Amy's card:


I made a tall skinny card (3.5 x 5.5 inches).  Check out the fun Freckled Fawn Wood Chips ❘ Birthday Shapes.  I thought that cupcake would be so fun popping out of the Nice and Neat Box die.  The word bubble and sentiment are from the coordinating Out of the Box stamp set.  I finished off the sentiment bubble with a Freckled Fawn Star Paper Clip.

I even decorated the interior of the card:


The tape and sticker are from the Freckled Fawn November kit.    Sadly, I see that it is now sold out but be sure to check out the other FABulous kits that are still available!

Be sure to leave comments on all our collaboration posts this week.  We'll leave commenting open through Sunday evening and post a winner on Monday. 

And don't forget to head on over to the Freckled Fawn Blog to see what their team created.  You won't be disappointed!
27

Neat & Tangled / Freckled Fawn Collaboration Day 4

We're back with more Neat & Tangled/Freckled Fawn projects.

Both blogs will be sharing projects and inspiration every day this week.  Be sure to check back each day and leave comments as there are prizes up for grabs.  Freckled Fawn is giving away a June OHDEERME Embellishment Kit on their blog and Neat & Tangled is giving away a $25 credit from one of the comments left this week.

Today we have a stunner from Mayuri to share with you:

Hey there,
Mayuri here to share a card for the Neat & Tangled collaboration with Freckled Fawn and their awesome range of embellishments. 

The Classic White Doilies from Freckled Fawn are crying out for some inkage (is that a word?!) and I couldn't wait to try out one of my favourite techniques on them. Basically, smoosh a couple of Distress Ink colours onto a craft mat, spritz with water and then lay the doily into the inky puddles.

I heat set the doily and repeated the process a few times until I achieved the desired result - I didn't want all of it covered with ink but just enough to give me a base for the sentiment.

I thought the large sentiment from Be Full was just the right size and stamped it with black dye ink onto the doily and also onto a square card base. I did this because the holes in the doily made it slightly harder to read the sentiment but by adhering it to the card with a couple of glue dots, I was able to match up the stamped impressions and make it appear more complete (hope that makes sense!).

I adhered a small twine bow to the top of the doily and added a cork star with another glue dot.

To finish, I adhered a couple of sequins from the Sunset Shimmer mix.
OK, head on over to the Freckled Fawn Blog to see what their team created and check back each day this week. You won't be disappointed!
27

Neat & Tangled / Freckled Fawn Collaboration Day 3

We're halfway through our week-long hop with Freckled Fawn.

Both blogs will be sharing projects and inspiration every day this week.  Be sure to check back each day and leave comments as there are prizes up for grabs.  Freckled Fawn is giving away a June OHDEERME Embellishment Kit on their blog and Neat & Tangled is giving away a $25 credit from one of the comments left this week.

Hi there! Rachel here today sharing a card for the amazing Freckled Fawn collaboration week. I adore Freckled Fawn and their style matches up perfectly with the Neat & Tangled look. I chose to work with the April 2015 kit - so many lovely sherbet colors and a roll of extra wide washi tape, which I can never resist.


I started off with a white card base and adhered a strip of the washi along the bottom. Next, I cut a panel to 4 1/4" x 4 3/4" and stamped a large focal point using the petal shape in You + Me. I use this motif a lot - I just love how easy it is to create a big flower with variations in the ink color thanks to the overlapping. I stamped the sentiment from Kindness Matters - another one of my go-to stamp sets for thank you cards. I placed a flair circle from the Freckled Fawn kit in the center to pull in the blue from the washi tape. I adhered a thin strip of the washi to this panel as well to pull it all together and mounted it on the card base with foam adhesive. 


That is all for today - I hope you're enjoying this amazing week so far! Check back tomorrow for more fun projects from the Design Team and be sure to head over the Freckled Fawn blog to see what their team has created!
22

Neat & Tangled / Freckled Fawn Collaboration Day 2

Welcome back for Day 2 of our hop with Freckled Fawn!

Founded in 2012, Freckled Fawn specializes in designing and manufacturing scrapbook embellishments as well as curating and a monthly Embellishment Kit Club.   Both blogs will be sharing projects and inspiration each day this week.  Be sure to check back each day and leave comments as there are prizes up for grabs.  Freckled Fawn is giving away a June OHDEERME Embellishment Kit on their blog and Neat & Tangled is giving away a $25 credit from one of the comments left this week.

First up today we have May:


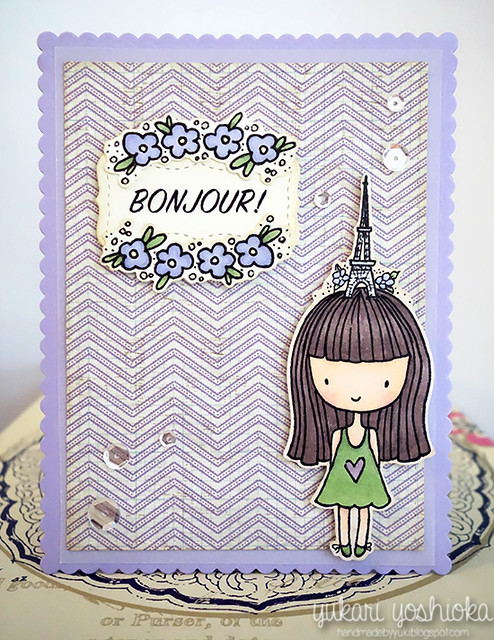
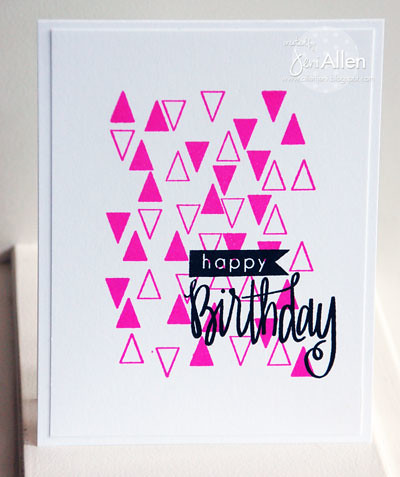
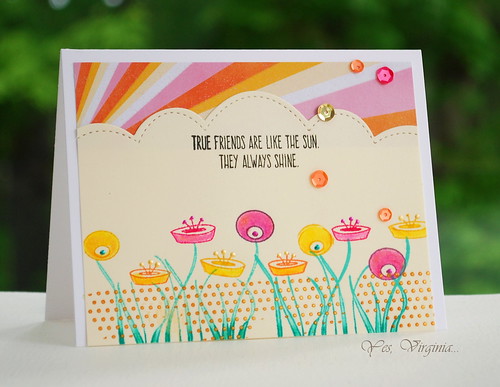
I created a geometric one layer card inspired by this book cover. I started by inking the left side of my card front using some blue ink and a blending tool.


Next, I masked off the center and inked area with sticky notes as a mask, and I stamped triangle background image from Tiny Triangles four times with black ink. Then I removed the masks. After stamping the sentiment from Kindness Matters, I colored some of the triangles and tiny heart with Copic markers. 


I finished off my card with some Blue Dew Drops to embellish the card. That's all I have today. Hope you like my card and get some inspiration. 

Next we have Miriam:

As soon as I saw these 
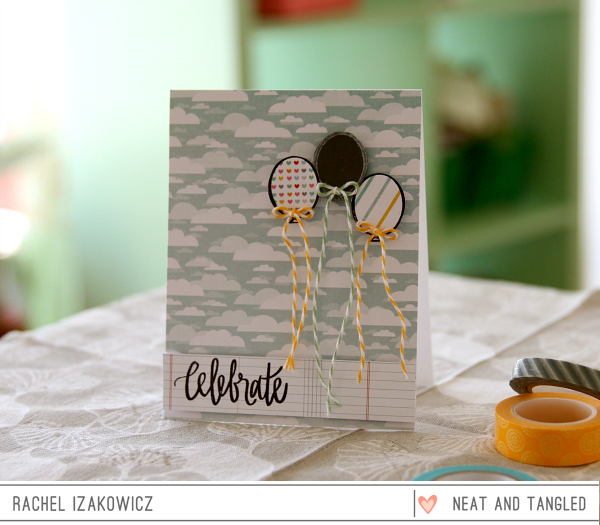
Grey & White Glitter Clouds, I knew I was going to make a card with them using our Clouds stamp set.  I wanted to keep the card very soft, so I stamped three of the clouds with Versamark, doing a bit of masking, and then adding Perfect Pearls.


After determining where my cloud would sit, I added just a bit of this thin pink/gold washi where the heart opening was.


At the top of the card I added some of that same pink/gold washi, a bit of a classic white doily and some thin strips of patterned/glittered vellum which were stitched down with some silver thread.

Another thin strip of vellum was added at the bottom of the panel.  The resin cloud was added using Glossy Accents, which I also spread over the washi to give it that glossy look and deepen the color a bit.

I stamped/embossed the sentiment with Liquid Platinum embossing powder and added a few Crystal Clear sequins to finish things off.

I couldn't resist making another card, my first Christmas card of the year.


I saw these 
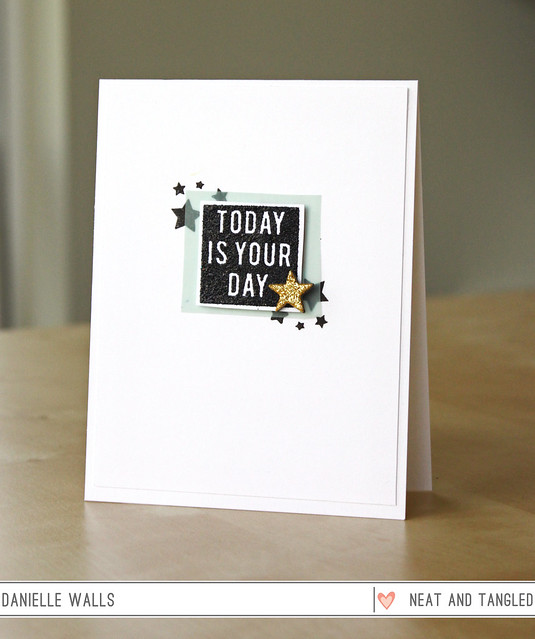
Rhinestone Star stickers, and at just $1.00, they were too good a deal to pass up.  I thought they would be perfect with the Time Warp background, which was stamped with Versamark and then dusted with Perfect Pearls.


The sentiment is from Winter Trees, and embossed, and then it was just a matter of adding the stars.  The stars are the perfect size for card making and add some great sparkle!

OK, head on over to the Freckled Fawn Blog to see what their team created and check back each day this week. You won't be disappointed!
30

Neat & Tangled / Freckled Fawn Collaboration Day 1


Hey everyone!

We're so excited to be hopping with Freckled Fawn this week. Founded in 2012, Freckled Fawn specializes in designing and manufacturing scrapbook embellishments as well as curating and a monthly Embellishment Kit Club.

Both blogs will be sharing projects and inspiration each day this week.  Be sure to check back each day and leave comments as there are prizes up for grabs.  Freckled Fawn is giving away a June OHDEERME Embellishment Kit on their blog and Neat & Tangled is giving away a $25 credit from one of the comments left this week.

First up today is Danielle:

todayisyourday

For my card I paired up our Planner Blocks stamp set with Freckled Fawn's Glitter Chipboard Stars for the perfect encouragement card.

Some things never change, I still love a lot of white space, vellum and gold!   I black heat embossed the "today is your day" sentiment and cut it out. Then I stamped those little star clusters on my card base.  I cut a small square of aqua vellum just larger than my sentiment and adhered it all to the card.  That perfect gold glitter star finished it off!

Next up is Yana:


I used a Paris stamp set from Neat & Tangled to stamp this adorable little girl. I heat embossed her using gold embossing powder and lightly colored using Copic markers. 


I added a fun star-shaped paper clip to this project and a few enamel dots from Freckled Fawn.


Gorgeous projects right?  Be sure to stop by the Freckled Fawn Blog to see what their team created and check back each day this week. You won't be disappointed!
42

Gardenia Blooms with JJ Bolton


It's Friday and JJ Bolton is back with us again sharing a gorgeous card featuring both the Gardenia Blooms Journaling Card stamp set and Gardenia Blooms Die Nice and Neat Die.

JJ started by die cutting a couple gardenia blooms die cuts.  Then she fussy cut the die cut blooms and backed them with vellum.

The base of the card has blended ink with some white ink splatter, and she also added some clear cabochons and sequins.

The sentiment is from the Gardenia Blooms Journaling Card stamp set.

We love how JJ really stretched the die here giving it a whole different look!

JJ will be back with us again in a couple weeks.  Next week we have an exciting collaboration that you don't want to miss!
3

Hello Hoop


Hey everyone!  Miriam here today.  I pulled out a bunch of newer N&T dies to create today's card.

The background was created using the Graduated Stripes Cover Plate.  I cut it in white as well as that delicate geometric pattern and then inlaid the patterned pieces.  When I do this for cover plates, I will cut a piece of printer paper just under A2 size, run it through my Xyron 5" machine, and use that as my base.

The Hoop and Hello There dies were cut from black cardstock.  I adhered the hoop to a piece of vellum and then trimmed around the hoop to remove the excess, the Hello There die was then adhered to the vellum, and the entire piece was popped up with some foam tape.


Then it was just a matter of adding the sequins.  I really wanted to do a straight black and white card, but I couldn't resist adding those Magenta sequins.  In fact I think I used up my very last three....I had to scrounge around at the bottom of the container I keep my sequins in to find some that fell out of the bag in order to come up with these three!

That's all for today, short and sweet!  Hope you are having a great week!
6

*SHIPPING NOTICE*

Hello friends!

Popping in with an important update!

Since Neat and Tangled has been growing so much it's time for us to do a complete check of our inventory as well as implement a new office system to make us more efficient.

In order to do this (and keep my sanity haha!) any orders placed from June 13 - June 21 will not begin shipping until June 22nd. 

I know it's super inconvenient - who really wants to wait a week for an order to ship?! But it will truly help me to focus on getting the warehouse space in order. In the long run it will be a good thing! I'm super excited about it!

Thank you in advance for your patience!
Danielle
1

Guest Designer: Heather Campbell

We have LOVED having Heather pop in and join us for the past few months!  Today will be her last post with us and we sure are sad to see her go! Thank you so much Heather!
_ _ _ _ _ _ _ _ _ _ _ 
Hi all!  It's my last post guest designing for Neat & Tangled and it's been such a joy!  For my last card, I wanted to play with the new Send Pretty Mail and Hello There stamps and dies again.  I cannot stop using this beautiful hello die!  It's so versatile! 
To create this card, I first started stamping the flowers in various inks, then I added the leaves and berries.  Once I had it all  stamped, I colored them in very lightly!  When I'm stamping flowers like this, I tend to try and cluster them about on card and turn the images before I stamp them so that each bouquet is slightly different but still has the same color balance. 

I had intended to place the sentiment right on top of the flowers but ultimately I liked them hanging over top!  To create the border, I ran a strip of washi tape along the bottom!   

Thanks so much for stopping by and sharing part of your day with me.  Thank you to Danielle and the entire Neat & Tangled team for having me this past month too!  I hope you have a great day!  
Heather
5
Back to Top