Be Inspired Cards Class Winners!

Happy Friday!

Just announcing the winners for the Be Inspired Cards Class! Ladies please email me danielle@neatandtangled.com so I can get you set up!


If you didn't win you can still sign up! I just had a peek at Day 1 and you will not be disappointed!

3

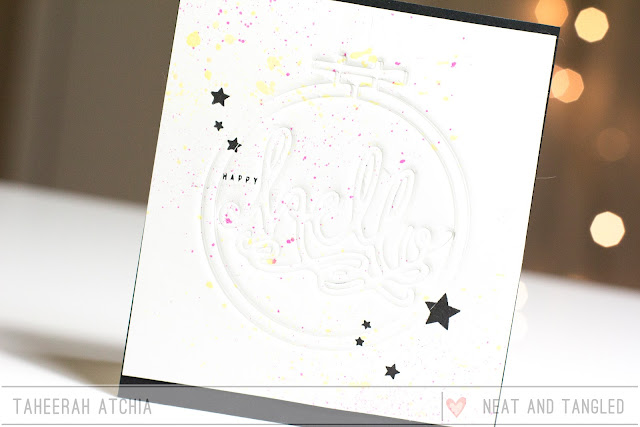
Minimalist Hello Card with Taheerah

Hey everybody! Happy Thursday! It's Taheerah here with you today to share a card!

I've so loved the dies from the most recent Neat & Tangled release - particularly the Hello There die and the awesome Embroidery Hoop die! Today I'm bringing them both together but with a minimalist look!

Here's what I came up with:


I love how this turned out!


I impressed both dies into my white cardstock for a totally minimal look that still packs a punch! I then stamped the stars from Planner Blocks and selectively inked the sentiment from Little Santa Girl for some contrast. I added some splatter for a punch of colour to complete the look!


I hope this card brought some fun to your day! Thanks for stopping by!
4

Be Inspired Cards: Neat and Tangled May 2015 Release Class Giveaway!

Hello friends!

I am so excited to announce that Nicole Picadura, from Be Inspired Cards, is offering two new online cardclasses! And one of them is focused on Neat and Tangled's May 2015 release!
Class will start on May 29th and ends June 7th. However, you can register for the class whenever you’d like since these are independent classes. And you will get lifetime access to all materials!
There’s more!
If you sign up for the class between May 29th and June 7th, you will also receive exclusive product discounts to online shops. And there will be fun giveaways too! You won’t want to miss it. To see more details for these classes, please visit Be Inspired Cards and register today!
She will be offering other classes in June, July, so on so forth so you will always have new classes to take! You also will see other companies’ release in the upcoming classes.
**And I have 2 spots to giveaway!  Just leave me a comment below!**

25

Warm Wishes / combining stamp sets

Hello there!
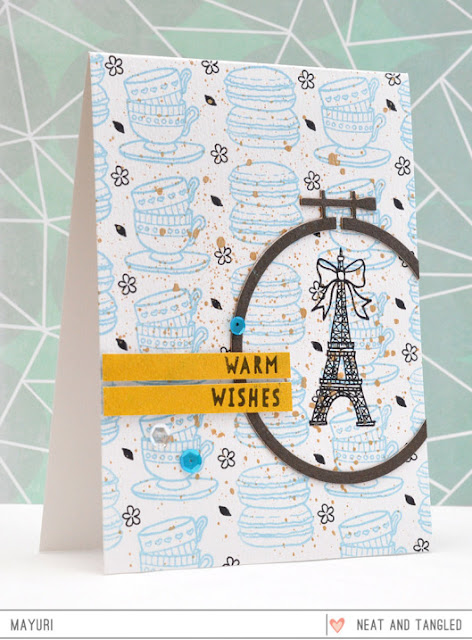
Mayuri here to share a card that uses the whimsical images from a couple of stamp sets combined with the versatile sentiments from another. This is such a fun way to truly stretch your stamps!
©Candles in the Garden. Neat and Tangled Monthly Post MAY2015. Warm Wishes and combining Stamp Sets.

I began by stamping the macarons and the teacups from 
Paris with a pale blue pigment ink straight onto a white card base. I then stamped the Eiffel Tower image and some of the smaller images from Dala Horse with black dye ink for a bit of contrast.
©Candles in the Garden. Neat and Tangled Monthly Post MAY2015. Warm Wishes and combining Stamp Sets.

I also flicked some Tarnished Brass Distress Stain over the card base for some interest. I die-cut the embroidery hoops using the Hoop die first from some dark brown pattern paper, and then from some kraft cardstock for stability. I adhered the two pieces together to create a thicker embellishment and then adhered that onto the card front around the Eiffel Tower, trimming off the excess.

©Candles in the Garden. Neat and Tangled Monthly Post MAY2015. Warm Wishes and combining Stamp Sets.

For the sentiment, I turned to another versatile stamp set - Winter Wishes. I partially stamped a sentiment with black dye ink onto some scrap pattern paper and then trimmed into two strips before foam mounting to the card.


©Candles in the Garden. Neat and Tangled Monthly Post MAY2015. Warm Wishes and combining Stamp Sets.

To finish, I embellished with a few sequins from the Mermaid Tail mix. I hope you'll have a go at combining stamp sets that you own to see how far you can stretch them!

Thanks for stopping by ;-)
4

hello there.


Hello there!  It's Amy sharing a clean & simple card:


I'm a big fan of using color when I design cards, how about you?

This particular project uses the Falling Hearts stamp.  This is definitely not just for Valentine's Day!  I love it heat embossed in white!

I ADORE the new Hello There Nice and Neat Die:


Isn't it simply pretty?  I die cut the sentiment using a pale green card stock and black craft foam and layered them together.  It gives the card a bit of BAM♡

I'm linking up over at the Little Tangles Challenge Blog:


The colors were inspired by Colour Me Challenge, which I missed the deadline but wanted to do a shout out on the awesome colors!

Thanks so much for stoppin' by!


17

Be Joyful Always

Hello! Anna is here to share my card 'Be Joyful Always'. I like white color in cardmaking, I like, when card is done almost of only whate cardstock. It feels so soft and light. And I like some touches of bright spots on such cards, so I wanted to create something like it this time.


Another idea was to use cover plate die cut, but only partially. I cut off the top and bottom parts of the die cut such way that it has become the height of four and a quarter inches. And than sticked with the foam tape on the white background. Alsomst ready! Just need some final details, that gived the pretty look to the card.


I stamped the sentiment from the Gardenia Blooms Journaling card on one of the negative parts from the die cut and pur it on the foam tape too. And as colored details - some flowers and sequins.


Supplies:


2

May Guest Designer: Kathy Racoosin!

Our May guest designer, Kathy Racoosin, is back today with two more jaw dropping cards! For today she used our Scandinavian Flowers set to show two ways to use part of a stamp set, in this case the grasses.
For her first card, she stamped the grasses with some dye ink from simon says stamp and colored with copic markers. stamped the sentiments and added some white dots. 
For the second card, she layered the grass using memento black ink. Colored the flowers with copic markers. Then she used some “sea glass” ink from SSS and inked up the “festive chevron stencil” using a dauber. Stamped the sentiment in black dye ink and layerd up my card. 


Simply stunning!  Thank you so much, Kathy!

Hope you all have an awesome weekend! See you next week :)


6

SImple Floral Backgound with Send Pretty Mail

Hello, Rachel here today sharing a super simple project with you. I adore the small floral images in Send Pretty Mail - they are perfect for a large focal point image or creating a subtle background with all the little elements.
I grabbed some spring colors and just started stamping away without much thought or planning! The nice thing about this set is that the images are small enough that you can always fill in gaps with teeny tiny dots, leaf sprigs or the tulip - it makes creating backgrounds really easy and fun. I made sure to alternate the direction of the stamps as I repeated them down my white rectangle, but other than that it was just relaxing and fun stamping.
I wrapped a piece of seam binding around the stamped panel (remember that stuff from about a year ago? I have hoards still!) and mounted it on a lime green card base with foam adhesive.  I also embellished a few of the circles with glitter. The sentiment is from another favorite, Paper Cut Flowers.

That is all for me today. Make sure to stop back again this week for more incredible inspiration from the design team and have a great day!
2

CAS One-layer Kitty Cards by May

Hey everybody! It's May here today sharing a couple of clean and simple cards. I wanted to create fun scenes using a kitty image from Meowwwww along with some other stamps. Here are what I came up with: 


For my ladder, I stamped a part of film strip image from Photo Booth and added two lines with black marker. Then I stamped a kitty and colored it with Copic markers. After stamping the stars from Planner Blocks: You Got This, I finished it off with the sentiment from Sparkle and Shine

Can you guess what story I made up? The kitty is using his magic to light up the sky by making stars with a magic stick. :)


For the second card, my inspiration came from dried fish in the sun which you can easily find in a fishing village in South Korea. By the way, I used the clothespins from Jumpstart My Heart and the sentiment from For the Record.   

That's all I have for today. Hope my kitty cards brought some fun to your day. Thanks so much for stopping by. Happy crafting! 
16

Just Wanted To Say Hello

Hello, hello, crafty friends! How's your week going? I'm totally obsessing with gold! Gold patterned paper, gold foil, gold embossing, gold cardstock. Is there anything else gold? Please, don't tell me, lol!


If you've seen my last video tutorial for Neat & Tangled you might have noticed my other love - the Hello die. I just adore that scripty handwriting! 

For my card today I die cut the Hello die out of Gold Mirror cardstock, heat embossed a Just Wanted To Say sentiment in gold embossing powder onto a strip of white paper and adhered the die behind the sentiment. 

Since I knew I wanted to use this gold polka dot paper for my card I needed to come up with something that would help the die cut to stand out from the peach and gold background. I used a piece a vellum and simply layered that under the Hello. I intentionally placed it at an angle for a fun and dynamic look.


Peach and gold screams a girly card so I just had to add a couple of small flowers to this project. I heat embossed a few from the Paris set in gold, colored with Copics, cut out and adhered onto my card. Super simple but super fun!

Thanks for stopping by today!
Hope you have a fabulous day! 
23

For the Record, Heather Campbell Loves Gardenia Blooms


Today we have Heather Campbell sharing, we were so lucky to have her helping out with our release this month and she's back with a couple more cards today!
_______________

Hello! I'm thrilled to be here today on the Neat & Tangled blog helping out for a few weeks! I've been a huge Neat & Tangled fan from the beginning and it's been so fun to play with the product for this last release!


Today, I have two cards to share with you today. My first card uses the new Gardenia Blooms Journaling Card stamp set.

To create this card, I stamped the journaling card and a sentiment on white card stock and then I colored the gardenias in with Copics very lightly using dots to create the depth and interest. Then, I fussy cut out the journaling card and mounted it on a card base with a patterned paper front. I love the simplicity and boldness of this card so much! 


Next up, I used the new For the Record stamp set.

When I saw this set, I knew I had to do something like this eventually and I'm so glad I finally went and executed just what I had envisioned! First I stamped the record player on watercolor card stock. Then I went in and got it wet and brought the watercolors to the paper in spectrum of rainbow colors. I had lots of fun flicking the watercolors around to create splatter too! Once it was dry I added a heat embossed sentiment and some gold sequins from Sunset Shimmer.


Thanks so much for stopping by and sharing part of your day with me! I hope you have a great day!
XOXO,
Heather

N&T Products Used:

   
2

May Guest Designer: Kathy Racoosin

Hey everyone!  We're so excited to be welcoming Kathy Racoosin as our guest designer this month.  Kathy is an AMAZING cardmaker and colorer.  In fact, she hosted a 30 day coloring challenge back in March and is gearing up to it again in June.  We're so glad she was willing to join us this month, you are going to love her projects!

Kathy worked with our Dala Horse stamps and dies this week.


She started by stamping the Dala Horse with Memento Black ink and coloring it with Copics.  Then she used a white gel pen to add all those great accents to the image, and added an enamel dot for the eye.

For the background, Kathy stamped the circles in Memento Ink and colored them with some Copic markers. She then die cut a circle from the center of the panel, added some foam tape to the circle and the horse, and adhered the layers.


Kathy also created this adorable set of shaped mini cards. 


She first die cut and stamped the horses using blue ink and colored them with markers.

Then she die cut another set of horses, folding over part of the top of the die cuts and attaching them to the the colored horses with some glossy accents to form a shaped card.


As in the first card, Kathy finished these off with some white accents.  Aren't they so cute?


We're so glad Kathy is joining us this month.  Please be sure to leave her some love and come back next Friday to see what else she has to share!

Neat & Tangled Products Used:

https://neatandtangled.refersion.com/l/441.34429   https://neatandtangled.refersion.com/l/811.34430 


7

Noticed by Neat & Tangled

We've been out and about checking out your work and love what we're seeing.

If you've been noticed, please proudly display this badge!


We love this light, bright color combination from Yuki using the Tiny Triangles die.


Jenny's galaxy looks amazing!  We love her iron off embossing technique using the Time Warp background and the gold embossed sentiments from A Long Time Ago.


Heather created this bright and colorful card using our Origami Map set and coordinating die.  We love the word stickers that she used to frame the map images and the sprinkle of sequins and stitching.


Virginia used our free digi with some scrap wrapping paper to create this unique, trendy card.


This cute scene by Emily using our Meowwwww set is just purrrfect.  ;)


Tessa created the sweetest set of cards using our Sunday School Songs set.  We also love how she used our Clouds set to create that soft background.


Thank you so much for using Neat and Tangled for your projects!

If you use Neat and Tangled and would like to be noticed make sure to play along with our Little Tangles challenges, add cards to our Flickr group, or share on our Facebook page!

8
Back to Top