Lots of Flowers Card with Daria [VIDEO]

Hello-hello Awesome People!

Daria here. I can't believe June is over. Somehow, summer flies much faster for me then winter months... Anyhow, I still have a card to share with you this month. I was playing with Floral Frame Stamp and die set. And there is a video too. 


Here, you may find the process:


Only after making this card, filming a video and making a voice-over, I've realised that I've already made a similar project, that is to use little flowers for creating patterns.

That is to say, you may use one idea to come up with different results. For example, you may choose to use another flower to stamp, another colouring medium to add colour, or even just take geometric shapes instead of flowers and you are going to have a totally different look. 


For today's project, I took scraps of coloured paper left from Over The Rainbow Assorted Cardstock Pack and stamped them with a flower from Floral Frame Stamp set and die-cut all of them using coordinating die. 

I also stamped Delicate Dots Rubber Background stamp directly to the cardbase. Love those dots, but you already know it (wink).  

The sentiment is from Butterfly Beauties stamp set and stamped over a banner from Skinny Strips die set. That is again available in the shop, yay. Don't forget, there is still a sale going on, and lots of awesome product at amazing price. 


Thanks so much for stopping by, and see you next time,
xoxo,
D.

0

A Shaker Card Just Because with Koren Wiskman


Hello everyone, Koren here breaking out the old Fuse Tool for a DIY shaker pocket. I'm using the Just Because stamp set and coordinating dies to create this card today. I am also using one of my favorite die sets of all time, the Little Bits die set from Neat & Tangled. Both the Just Because stamp set and the Little Bits die set are both on sale in the N&T online shop if you don't already own them. 

To shop all of the retiring items now on sale (CLICK HERE!) to visit the online store or blog for more information. 

To create this card, I started with some We R Memory Keepers Fuse-sable sheets. These are clear sheets of 12 x 12 material used in conjunction with the We R Memory Keepers Fuse Tool to create your own pockets. This can be used for a number of projects ranging from creating your own memory keeping pocket pages to making your own shaker card, like I'm doing today. 

I started with two pieces of fusible material cut to 3 1/2 by 4 3/4. I needed to line these two pieces together so that I can fuse them using the perforated-looking tip that comes with your Fuse Tool. To help me line them up I used the Ranger Make Art Stay-tion by Wendy Vecchi. This magnetic mat was unbelievably helpful for lining the material up and keeping it in place. The magnets kept my materials in place while I used the Fuse Tool ruler to make a perfectly straight seal. The metal composition of the mat also allows me to use the tool directly onto the surface without damage occurring from the heated tip. I now store my Fuse Tool and Make Art Stay-tion together, as they are now forever friends. 


I sealed the material on only three sides, then I stopped in order to fill the inside with shaker bits. Insert Neat & Tangled Little Bits die set. This die set is so awesome, it comes with all of these tiny little dies that I often reach for to spruce up any project I'm working on. Today, I pulled out the two heart shapes that come in the set to make my shaker bits. I also used the heart dies that come with the Just Because coordinating die set also by Neat & Tangled. The combination of these elements made up the contents of my pouch. I cut these little guys using an assortment of cardstock in complementary colors. Including gold foiled cardstock, which brings me to my next tip. Before you seal the fourth and final side to your shaker pouch, make sure the elements inside the pouch are facing the right way. My gold elements shifted and now that it's sealed, I can't turn them back around. So, to make sure your flashy gold elements can be seen, make sure they are facing toward the observer. Most of the cardstock pieces look the same on both sides, except that the foiled cardstock I chose has white on the reverse. 

Once your DIY shaker pouch is sealed on four sides, it's time to add a sentiment. I cut my sentiment from the Just Because coordinating die set, but this same look can be achieved by stamping the "love you" in gold embossing powder or gold foil. I cut mine from the same gold cardstock I used on the interior elements and I cut its shadow from vellum to maintain the see- through appearance of the card. I hid the liquid adhesive used to attach the word die and its shadow behind the letters so that you don't see it when looking at the card. I also stamped the "just because" sub sentiment, from the same Just Because stamp set, with watermark ink and heat embossed using white embossing powder. I cut it down into a strip using my cut line paper trimmer. I popped it up onto the shaker panel using foam tape. 


I added a decorative banner from an older Neat & Tangled die set called Card Front designs, but again, it's so easy to replicate this element. I used the smallest heart die from the Little Bits set to cut a heart out as another see through element. 

I cut a piece of Neenah 110 lb. cardstock to 4 3/4 by 3 1/2 and used it as a background to make my shaker bits pop a bit more. I adhered the shaker pouch to the white panel using liquid adhesive being sure to hide the adhesive once again. 

All of this was added to an A2 size card base cut and scored in a top folding portrait orientation using my favorite light gray cardstock. 

I hope you have enjoyed my project today and I've inspired you to create something using your paper crafting supplies. 

Koren 

1

Fractal clouds and Cotton Candy Skies with Cheiron


Hi there crafty friends. It's Cheiron here and today I have a card featuring another throwback Neat and Tangled set (that is on sale now!) the Fractal Cloud stamp set. I thought it would be fun to pair it with a colorful sparkly sky and I was inspired by the images of "cotton candy skies" on Pinterest. This card takes a little extra time to make because of the ink blending and masking, but believe me the end result of crisp white clouds is so worth it.


To begin, I stamped the Fractal Clouds in Versamark ink and embossed them with Hero Arts Gold Embossing Powder. I also stamped them onto masking paper and cut them out and masked the embossed clouds.


Once the masks were on, I began the ink blending, starting lightly and then building up my layers until I had the "sky" that I wanted. I used Distress Inks in Worn Lipstick, Spun Sugar, Squeezed Lemonade, Wild Honey, Shaded Lilac and Wilted Violet.


When the panel was inked how I liked it, I sprayed the entire panel with a generous spraying of Tsukineko Sheer Shimmer Spritz in Sparkle and dried it with a heat tool. Once it was dry, I stamped the sentiment with Black Soot Archival Distress Ink. I love the look of the sparkly sky on this card and hope it will put a smile on the face of whoever receives it!


SUPPLIES:
1

Moon Magic in Pencils with Mindy Eggen

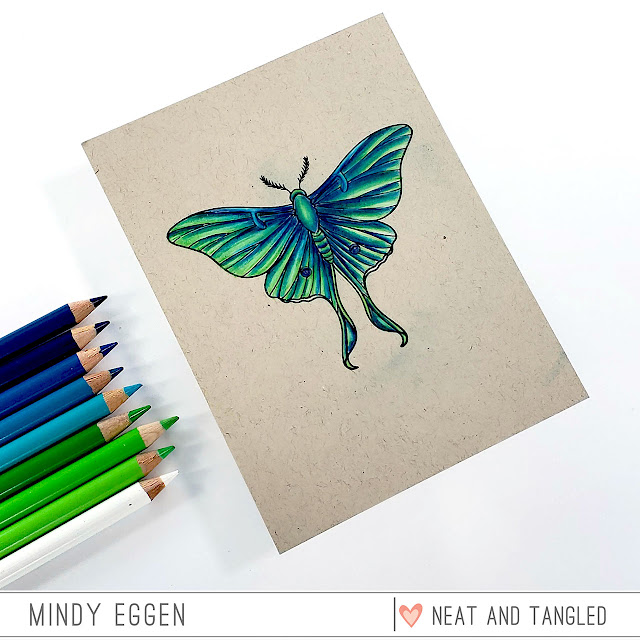
Welcome everyone! It's Mindy Eggen here with you today. I'm sharing something a little different. Today's card is actually a work-in-progress. One thing I hardly ever do is use colored pencils. I normally don't use them because they take so long to color an image but it's an area I want to explore a little more. We all have to start somewhere and I wanted to share with you the start of my journey.


I am coloring the image from Moon Magic with blues/greens Polychromos pencils onto Kraft card stock. You actually should use a card stock with a little more tooth to it so the pencil has something to grab onto but I wanted to experiment with Kraft.

I finished the image itself after a couple layers of coloring but I still want to add in color around.


I just wanted to share because coloring in any medium takes time and practice. The more you do it, the more you understand how the colors work. One thing I really do love about colored pencils is how you can get into the tiniest of areas. You also don't have to worry about bleeding outside of the lines or through the card stock. 

I hope you enjoyed my work-in-progress and it encourages you to try something new ! 


4

Rainbow Medallion Flower Builder with Cheiron Brandon


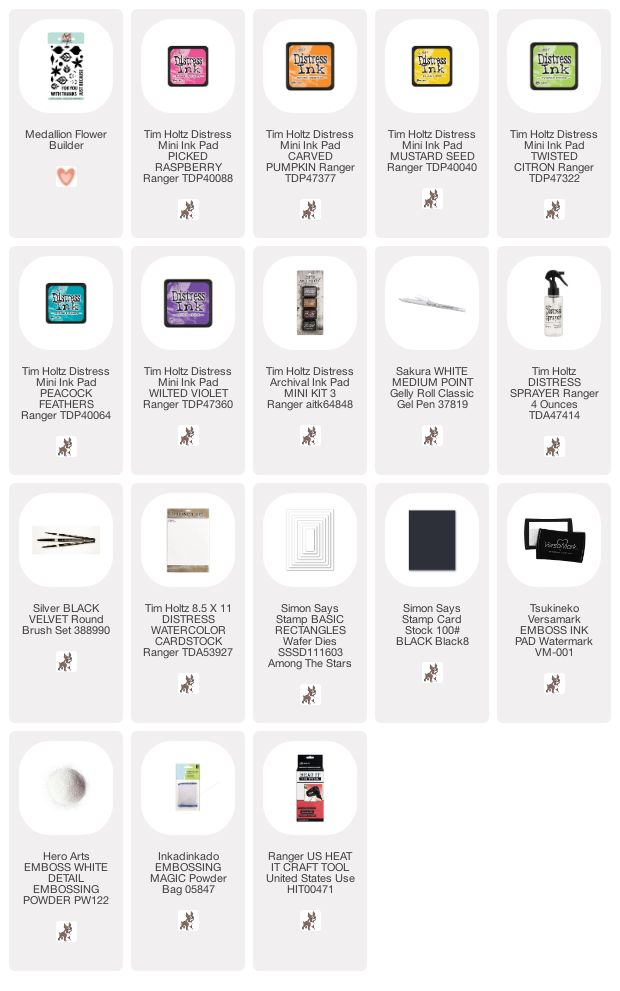
Hi there crafty friends! It's Cheiron here and today I have a card for you using one of my favorite sets, the Flower Medallion Builder (that is on sale!! right now) and my favorite rainbow colors of Distress Inks.

I love making repeat patterns with with stamps, I find it super meditative and I hope you will try it out and see for yourself :) To make this card, stamp your center and small points in Distress Archival Ink onto Distress Watercolor cardstock. I am using Archival Inks for this part because the ink is waterproof and you don't want these center points to react with the water when you spray the colored petals. Stamp the petals around the center points in rainbow order, cleaning your stamp between each color, and go around until you have completed the rainbow twice.


Once you have completed stamping the rainbow of petals, lightly spray around the stamped petals with a Distress Sprayer filled with water and the ink will begin to react with water. Go slow at first, and add more water as needed. I used a Ranger Heat It tool to speed up the drying time. 


Once the petals have reacted to your liking, add some splatter around each petal. I did this by pressing the inks onto my glass mat and picking them up with a paint brush. I splattered each color next to the same color petals. I dried the splatter with the heat tool as well.


To complete this card, I added foam tape to the back of the watercolor panel and mounted it onto a white card base. I stamped the 'just because' sentiment from the set onto a black strip of cardstock and heat embossed it in white. As a last step, I added some dots with a white gel pen to the the dots in the center.


Hope you enjoyed this card and the fun, watery splatter look!!

SUPPLIES:

2

Stretching Your Christmas Stamps with Kelly Latevola


Hello Crafters! 

Do you have a bunch of really beautiful holiday stamps you feel like you can only use during the "season?"
Guess what? You can totally use them anytime. 
Yes! Anytime! 

By changing up the color scheme and pairing my Christmas Poinsettia with an encouraging Love You sentiment it completely changes the feel of the stamped image. You would never know it was originally intended to celebrate the holidays. 


I used a soft gray ink to stamp my poinsettia all over my background. It's like creating your own pattern paper! Using a softer color won't detract from my focal point but it adds just enough to make it interesting.


 I set the background aside and pulled out a fresh piece of white cardstock to stamp my flowers on. I used a copic safe black ink since that's the medium I chose to work with. 

I decided it would be fun to do a little bit of multi-color blending for a bright almost tropical look. I blended V04, RV04, and YR38 for my petals. Now normally I would tell you to match your last number (like Vo4 and RV04) but yellows and a little different. My suggestion there is to keep trying out color combinations until you find one that works with what you have. Don't be afraid to try it. Saturation is key to the blending. 


I stamped my sentiment in Versamark and heat set in white on black cardstock. A few crystal clear sequins finished the card off. 

You can watch the entire process in the video below. 


Thanks so much for joining me! 
I hope you are having a wonderful week :) 


 Supplies:
 Affiliate links are used
Neat & Tangled JUST BECAUSE
Shop at:
SSS | EH | NT
LOVE YOU - NICE AND NEAT DIES
Shop at:
NT
Neat & Tangled Classic Christmas
Shop at:
SSS | EH | NT
Classic Christmas NICE AND NEAT DIES
Shop at:
SSS | EH | NT
OVER THE RAINBOW ASSORTED CARDSTOCK PACK
Shop at:
NT
Neat and Tangled CRYSTAL CLEAR SEQUIN MIX
Shop at:
SSS | SB | NT
Memento TUXEDO BLACK MARKER Dual Tip Tsukineko
Shop at:
SSS
Sakura WHITE GELLY ROLL Medium Point Pens Set
Shop at:
SSS | HB
EK Success WRITING PEN FINE TIP
Shop at:
SSS
Neenah Classic Crest 80 LB REAM Smooth Solar White Paper Pack 250 Sheets
Shop at:
SSS
Fiskars PREMIUM CUT LINE Paper Trimmer 12 Inches
Shop at:
SSS | SB
Tombow MONO MULTI Liquid Glue
Shop at:
SSS | SB | HB
3M Scotch DOUBLE-SIDED FOAM TAPE Permanent
Shop at:
SSS
Copic Sketch Marker RV04 SHOCK PINK
Shop at:
SSS | DB
Copic Sketch Marker YG01 GREEN BICE
Shop at:
SSS | DB
Copic Sketch Marker YG03 YELLOW GREEN
Shop at:
SSS | DB
Copic Sketch Marker YG17 GRASS GREEN
Shop at:
SSS | DB
Copic Sketch Marker YG67 MOSS
Shop at:
SSS | DB
Copic Sketch Marker V04 LILAC
Shop at:
SSS | DB
Copic Sketch MARKER V09 VIOLET
Shop at:
SSS | DB
Simon Says Stamp LARGE GRID PAPER Pack Pad
Shop at:
SSS
Precision Heat Embossing Tool Gun
Shop at:
SSS | SB | HA | HB
Tsukineko Versamark EMBOSS INK PAD
Shop at:
SSS | SB | HB
Inkadinkado EMBOSSING MAGIC Powder Bag
Shop at:
SSS | SB | HB
Simon Says Stamp EMBOSSING POWDER WHITE Fine Detail
Shop at:
SSS
Simon Says Stamp Premium Ink Pad INTENSE BLACK
Shop at:
SSS
Copic Sketch Marker YR04 CHROME ORANGE
Shop at:
SSS | DB
Copic Sketch Marker Y08 ACID YELLOW
Shop at:
SSS | DB
ZIG Wink of Stella GLITTER CLEAR Brush Tip Marker
Shop at:
SSS | SB | HB
Copic Sketch Marker Y38 HONEY
Shop at:
SSS | DB
MISTI PRECISION STAMPER Stamping Tool Kit
Shop at:
SSS | SB
MINI MISTI PRECISION STAMPER Stamping Tool Kit
Shop at:
SSS | SB
Neenah Classic Crest 80 LB SMOOTH SOLAR WHITE
Shop at:
SSS | SB | HB
Wplus9 Fairy Dust Dye Ink
Shop at:
WP9


3
Back to Top