Triangle Builder with Kath Stewart


It's the last Friday of the month which is always a little sad for us because it means we have to say goodbye to our guest designer for the month, Kath Stewart.  We know you're going to love today's inventive card.  Here's Kath with the details:

Hi Everyone, I’m back with my last project as the September Guest Designer. I would just like to say a huge thank you to Danielle and Miriam from Neat And Tangled for inviting me and giving me the opportunity to play with their fabulous projects. I can’t believe this is my last week but isn’t it the case that time passes quickly when you’re having fun.

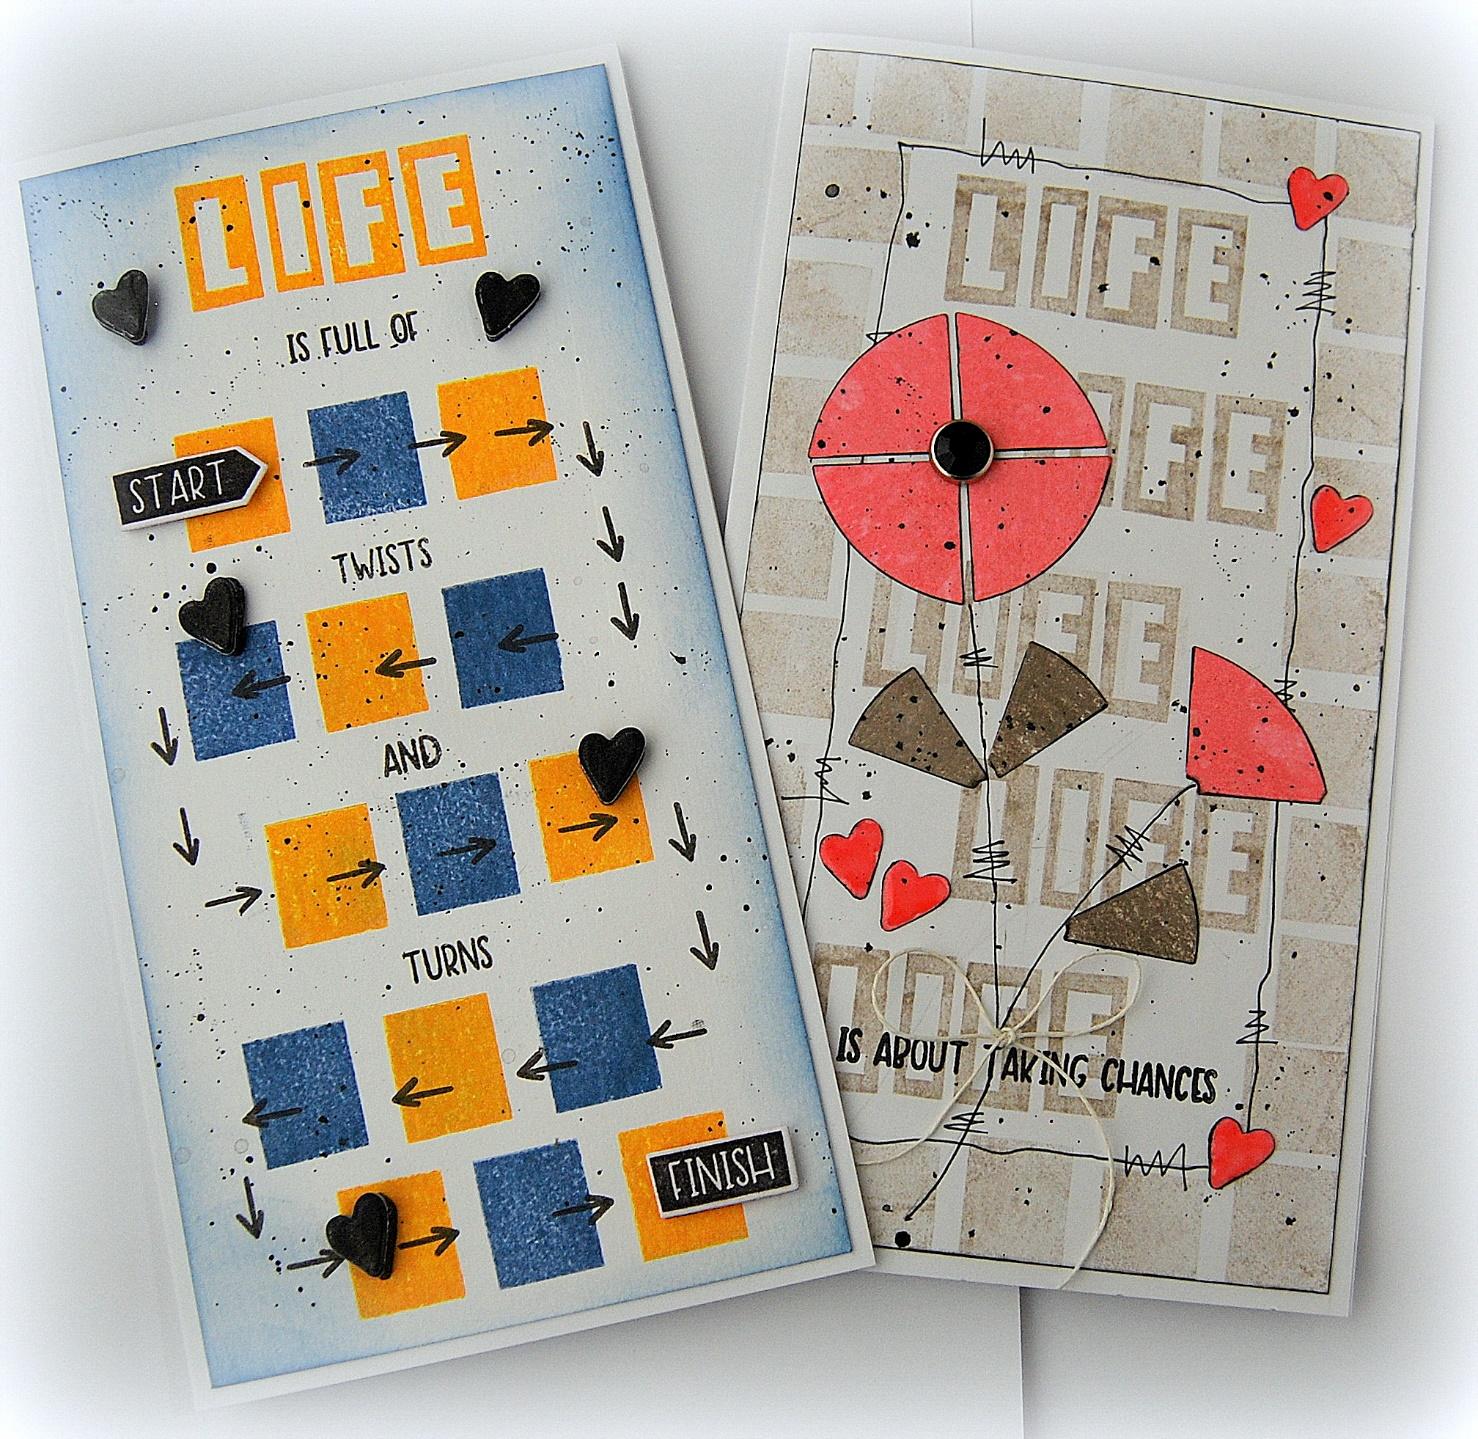
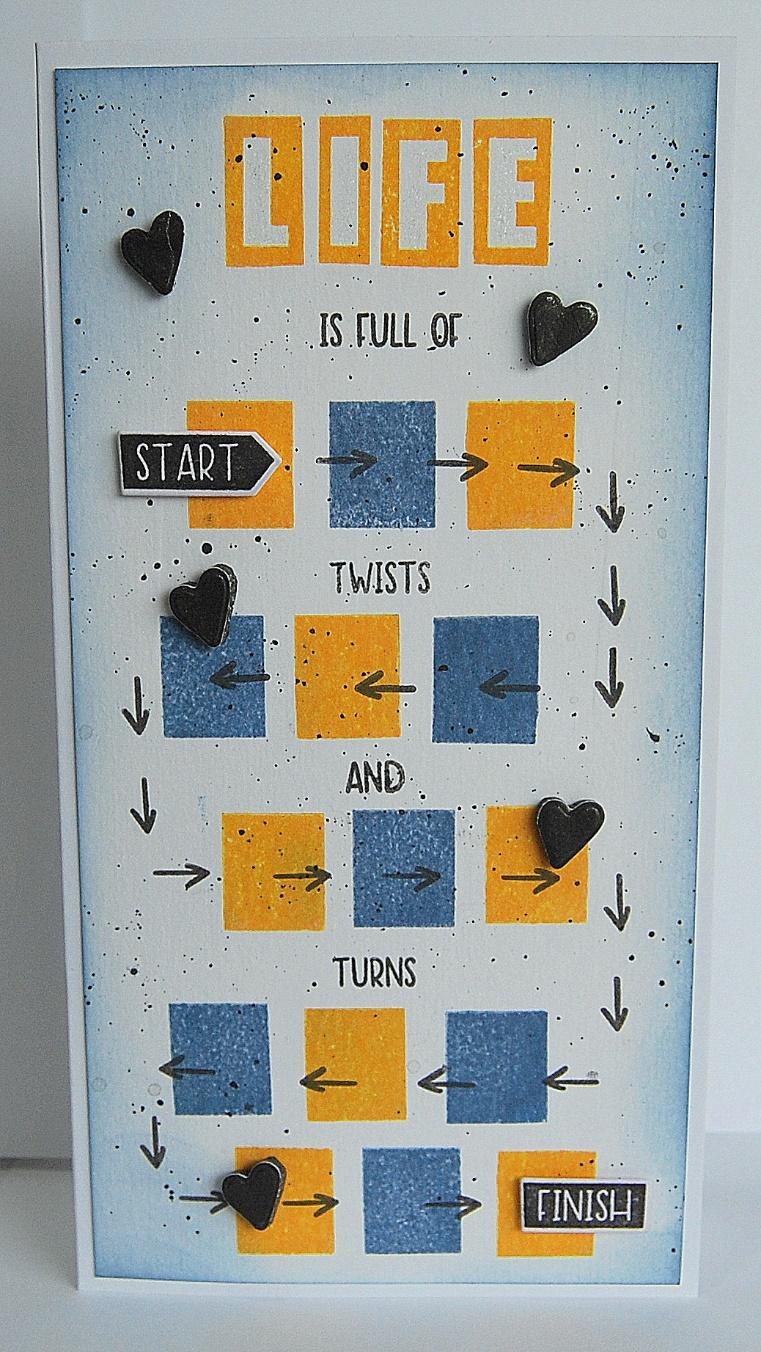
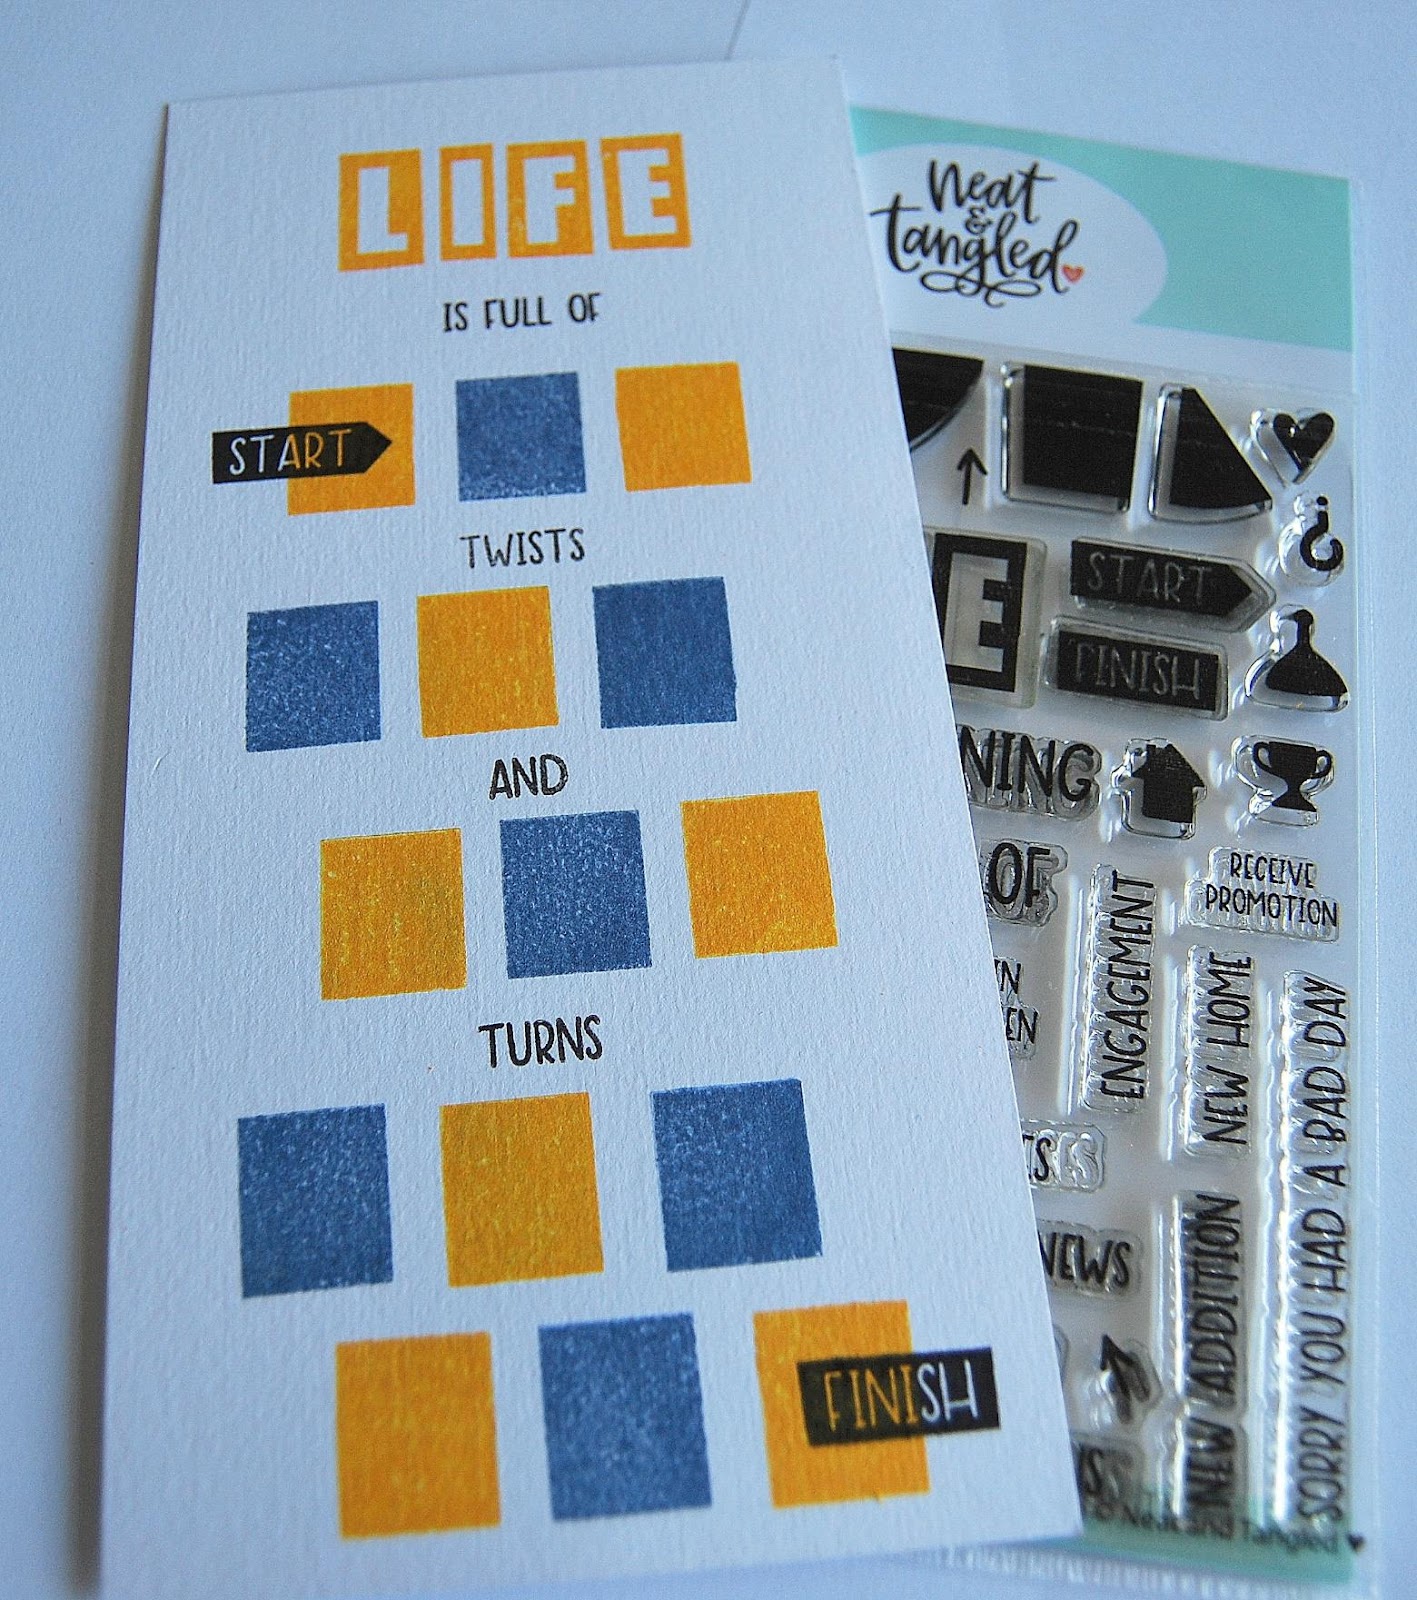
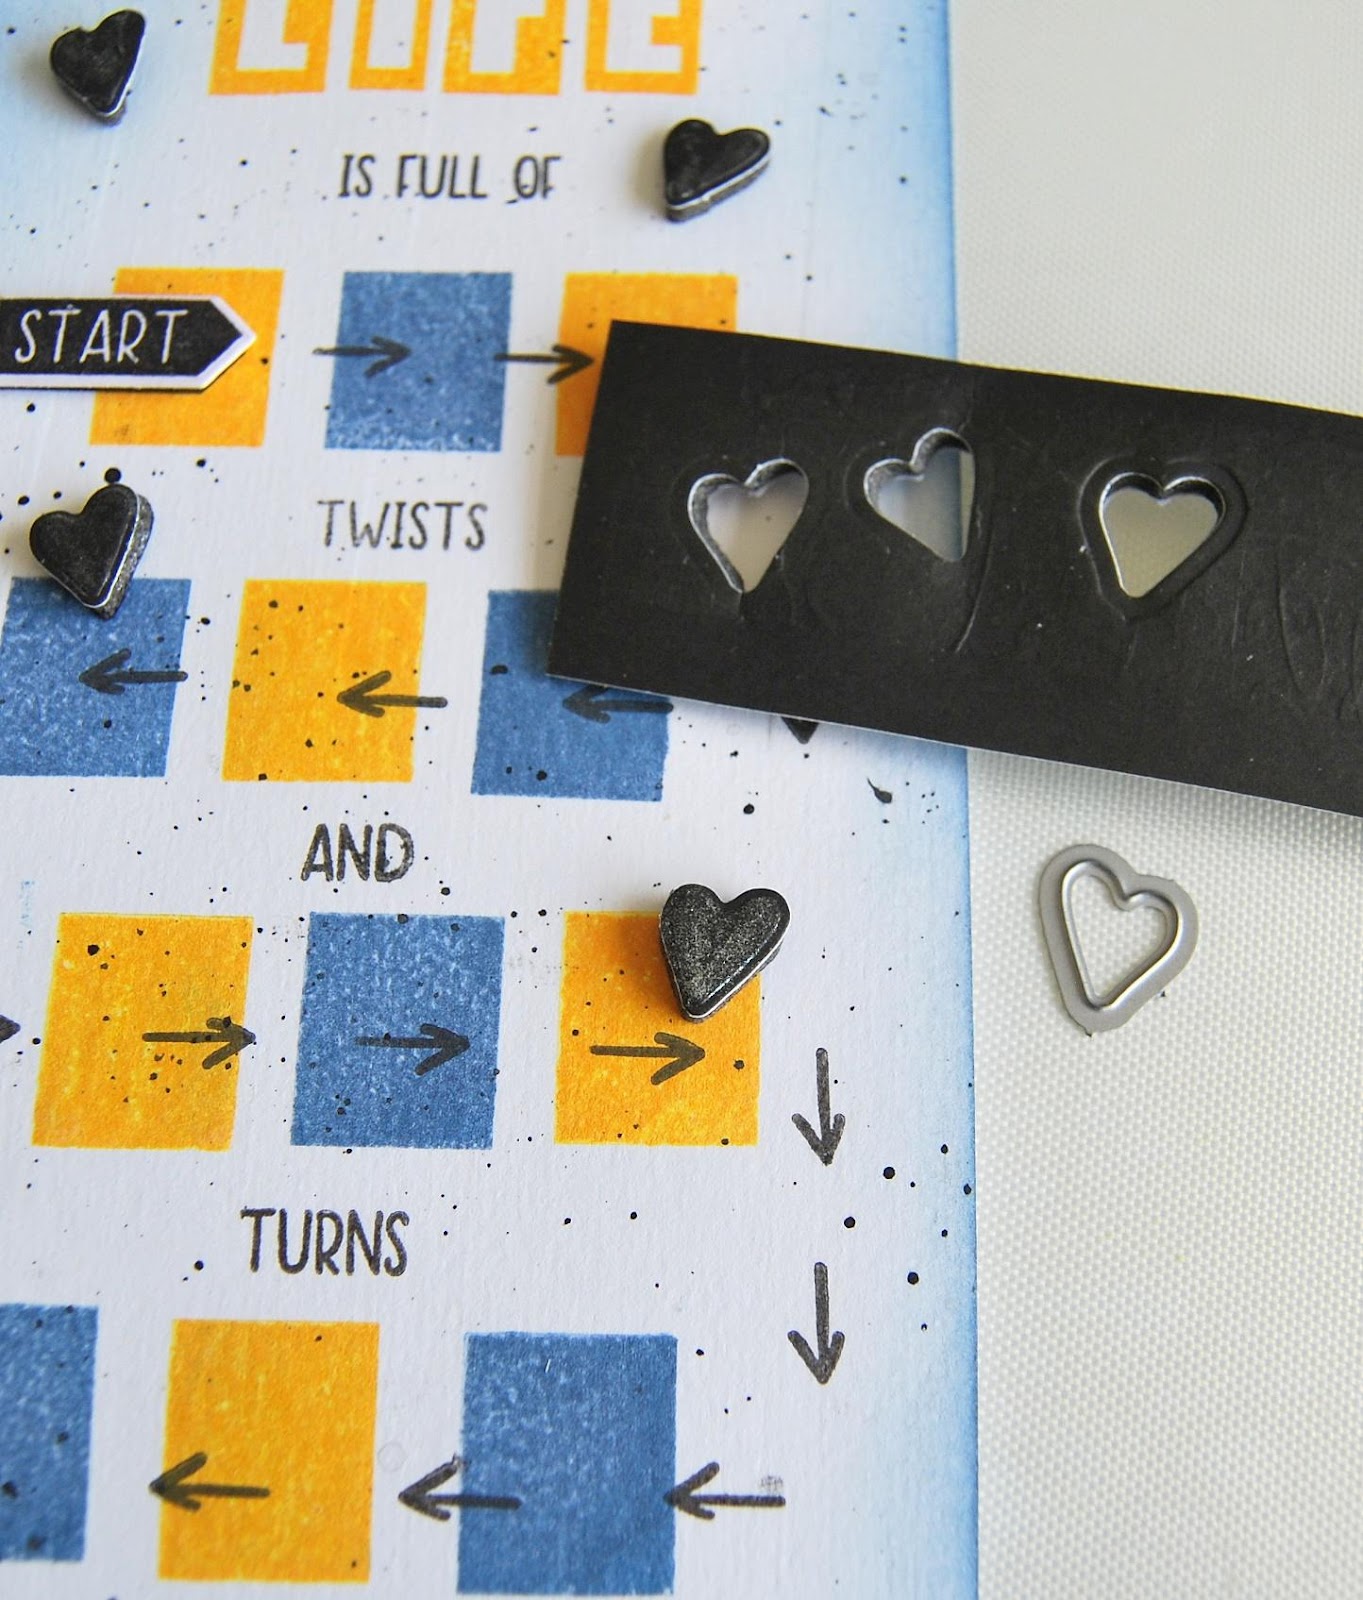
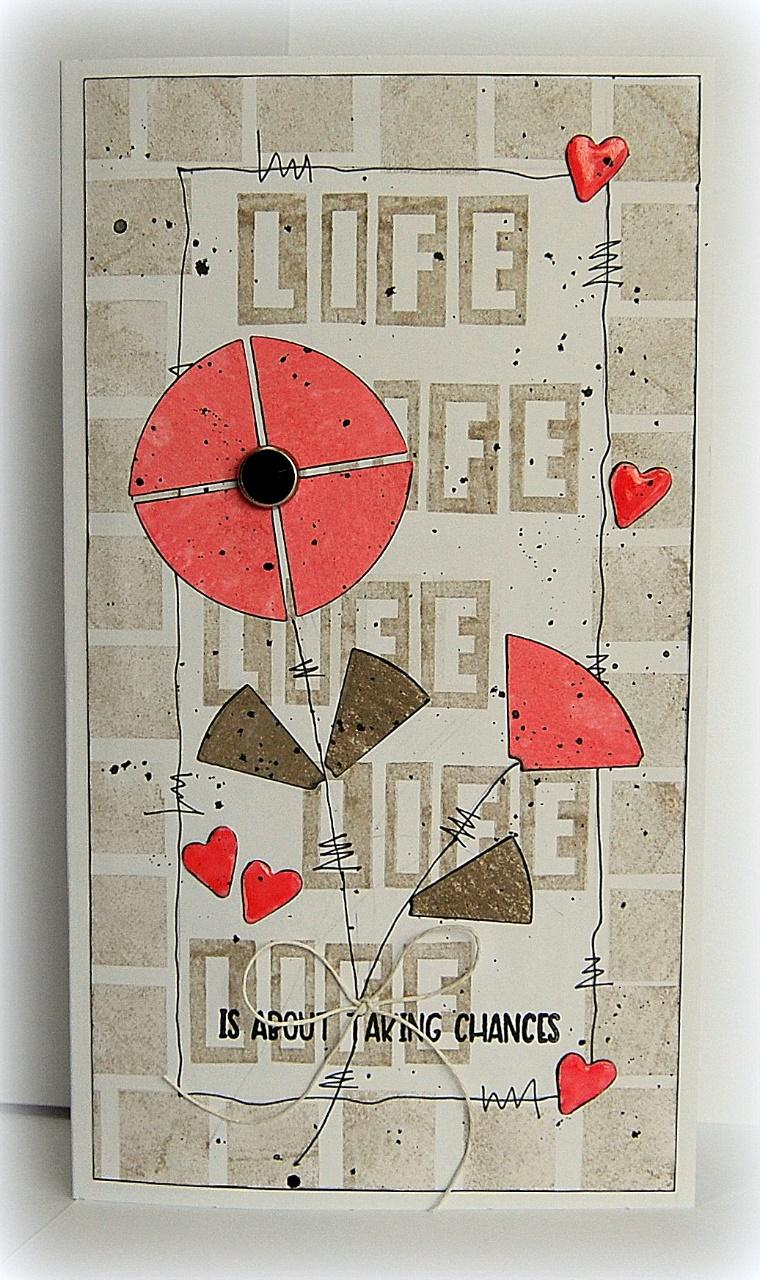
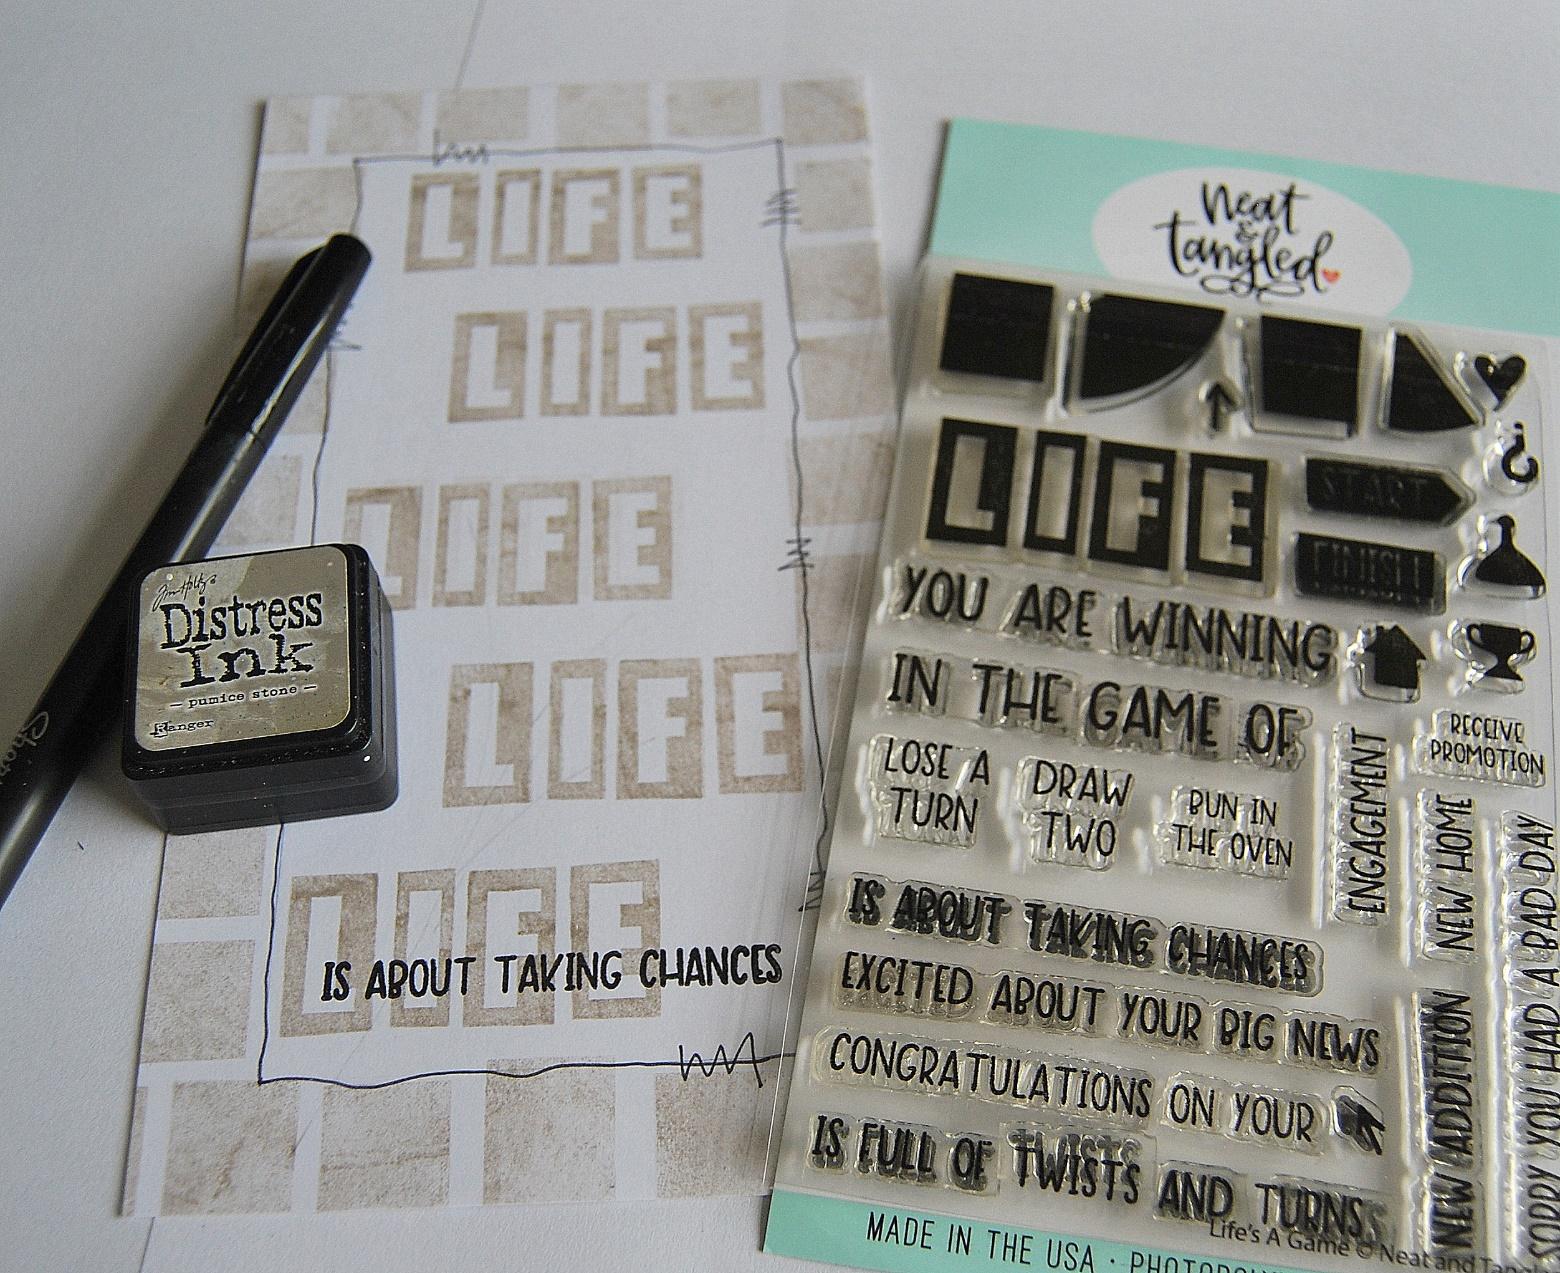
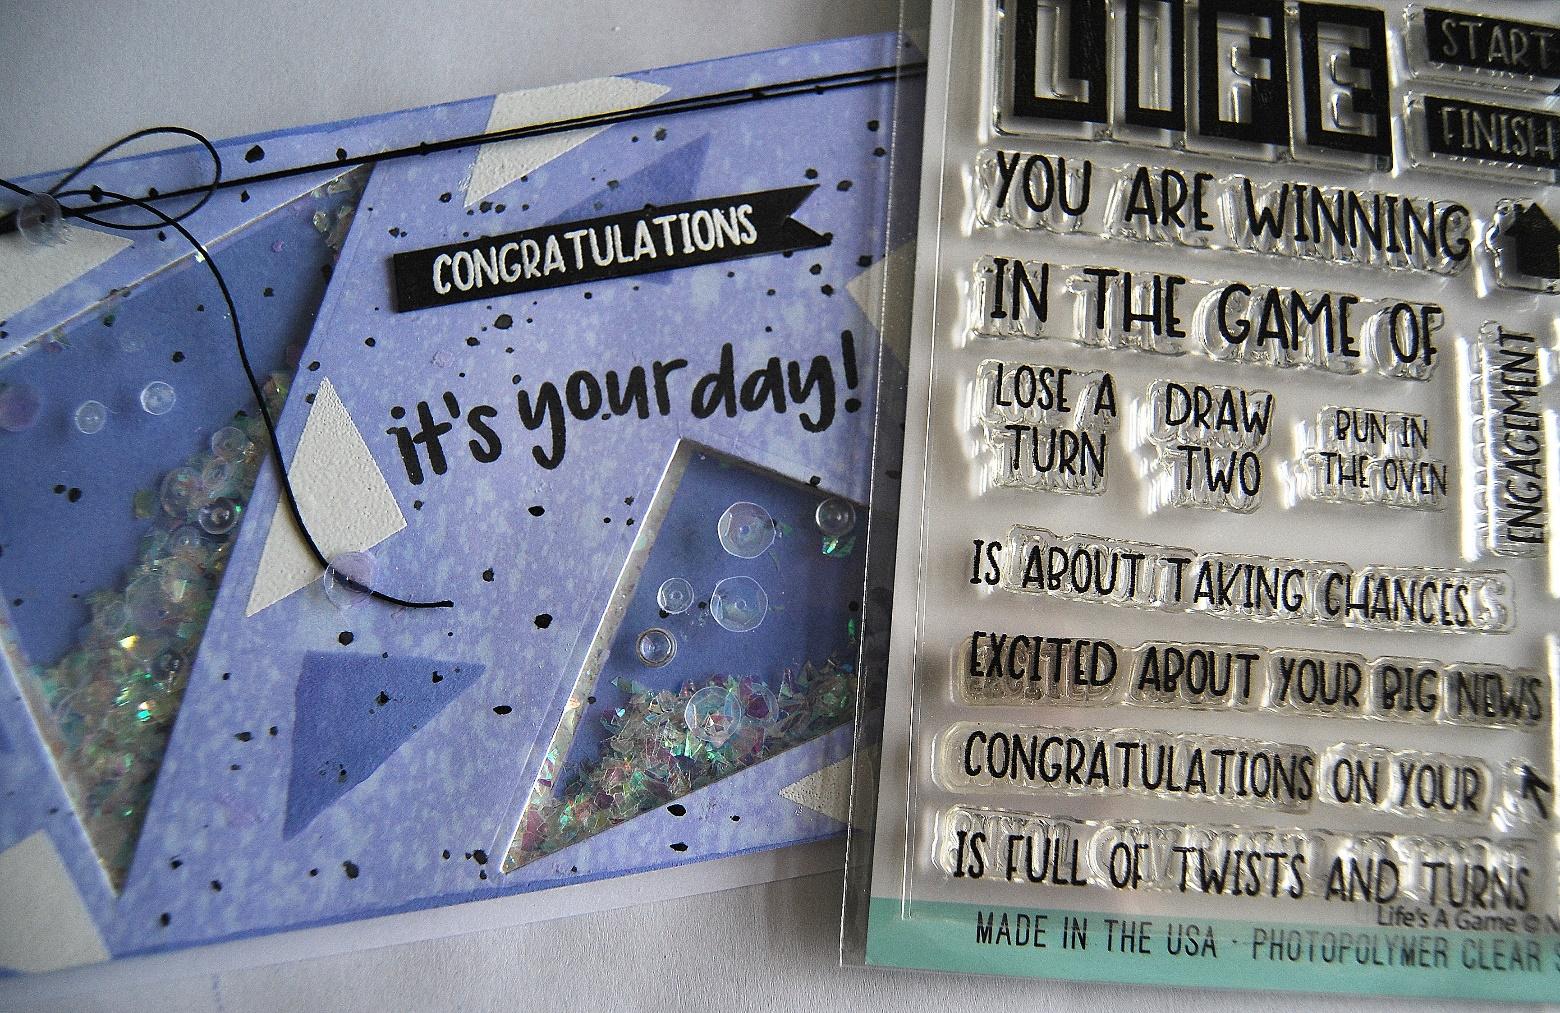
I’m sharing a shaker card using the Triangle Pattern Builder stamp set and matching set of Nice And Neat dies along with the Hooray and Life’s A Game stamp sets to create the sentiments.


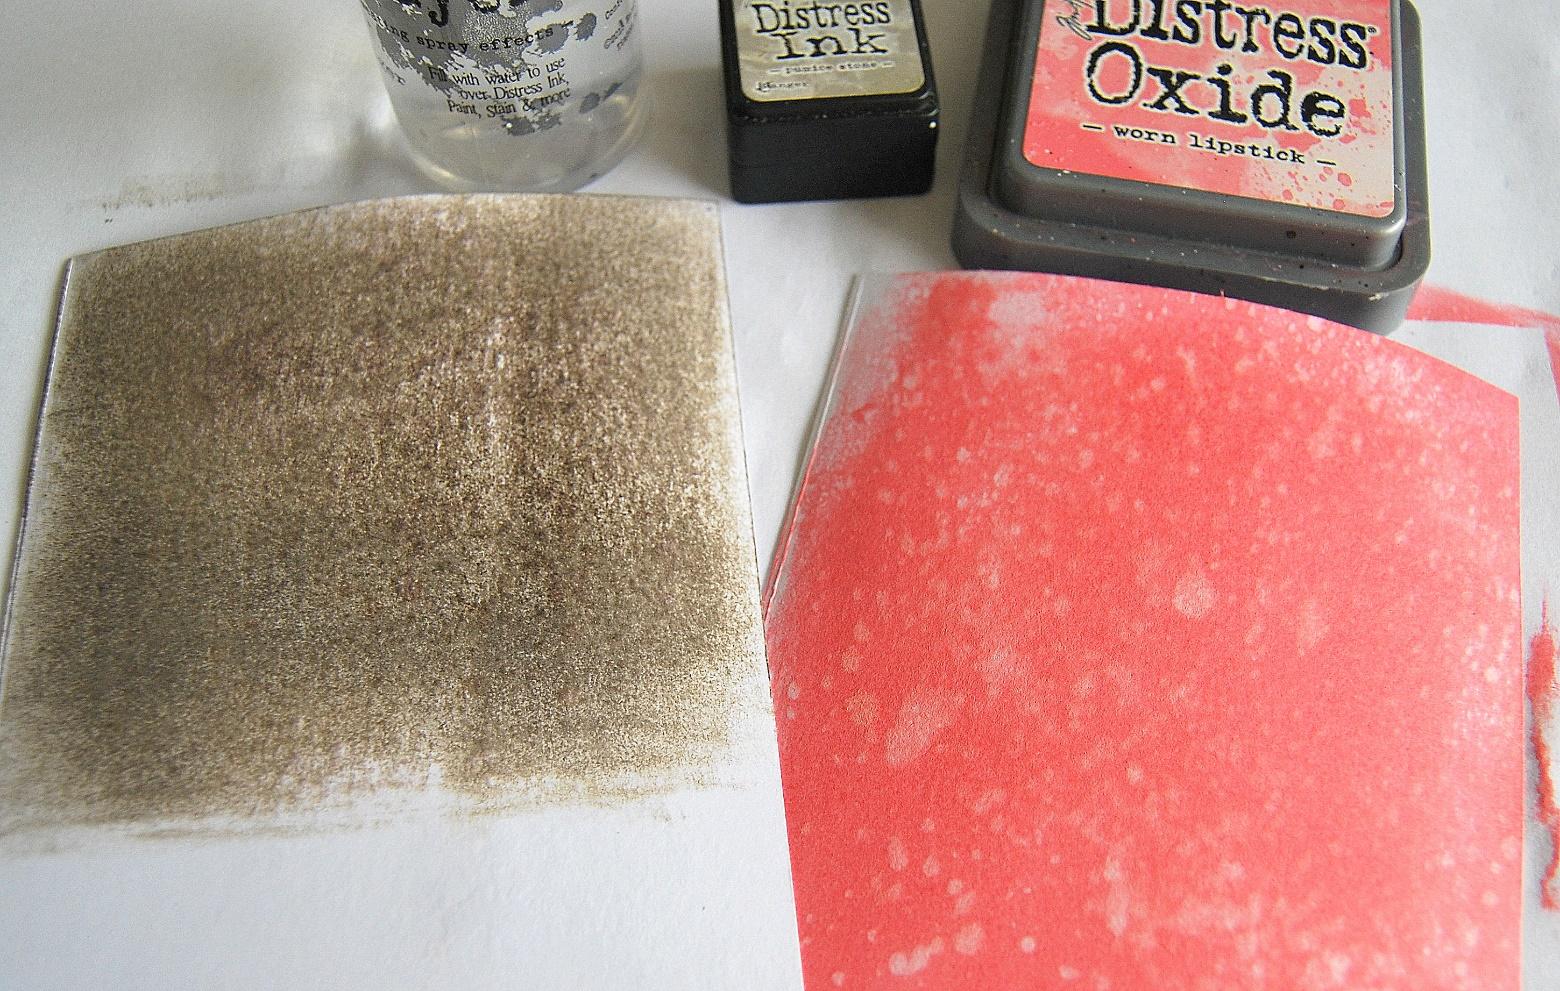
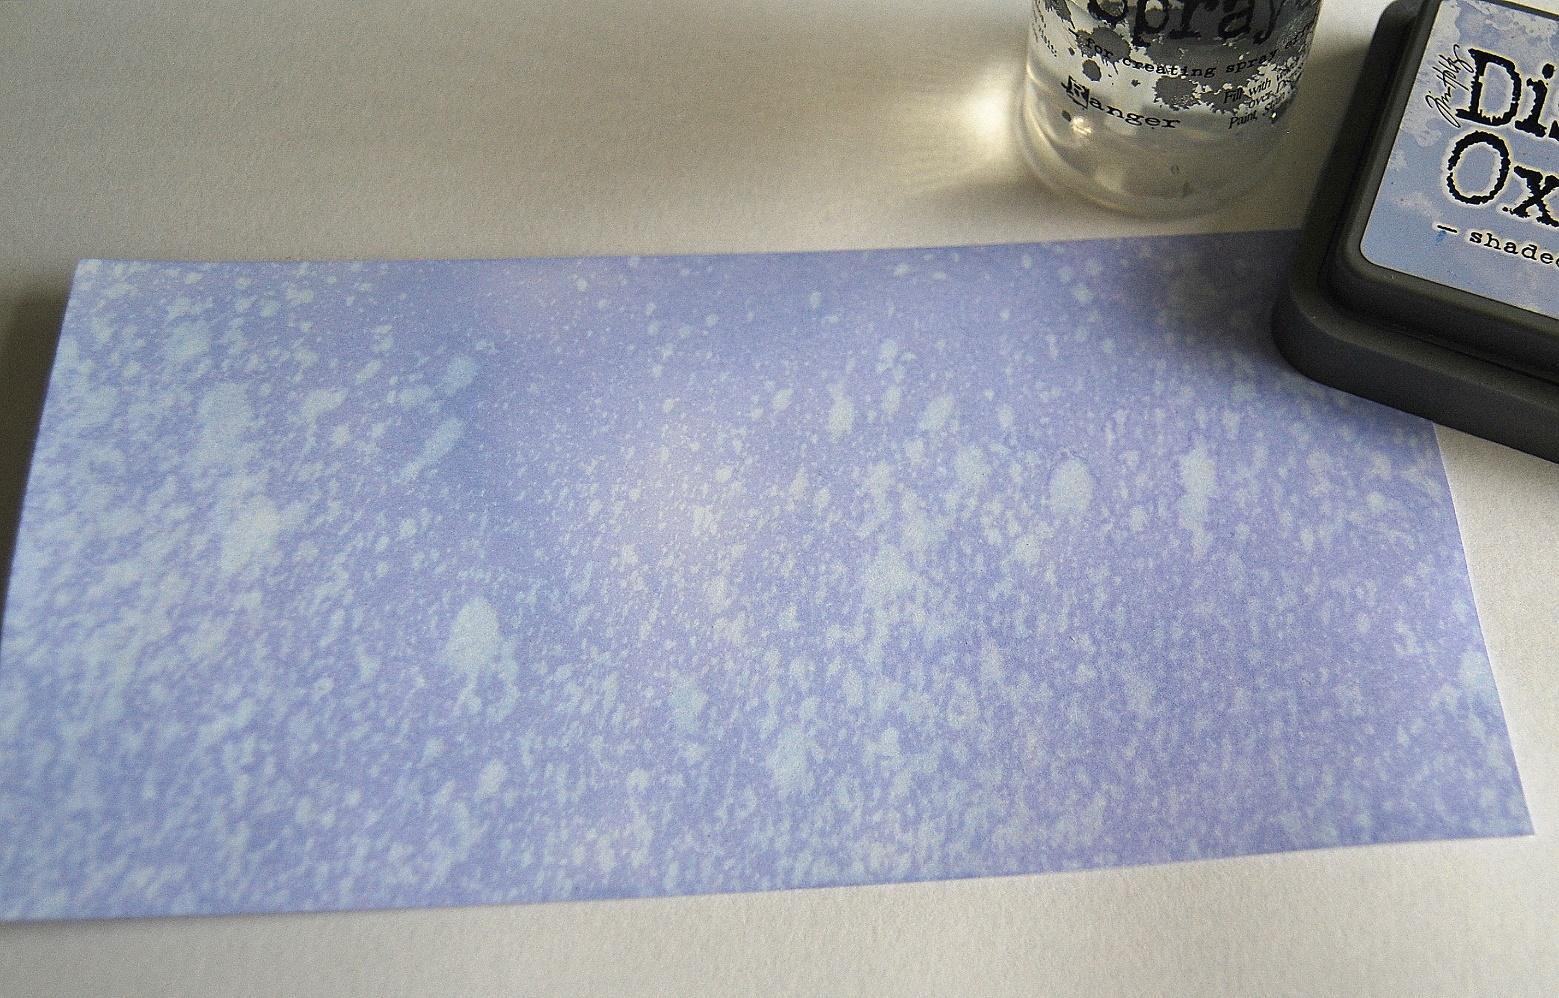
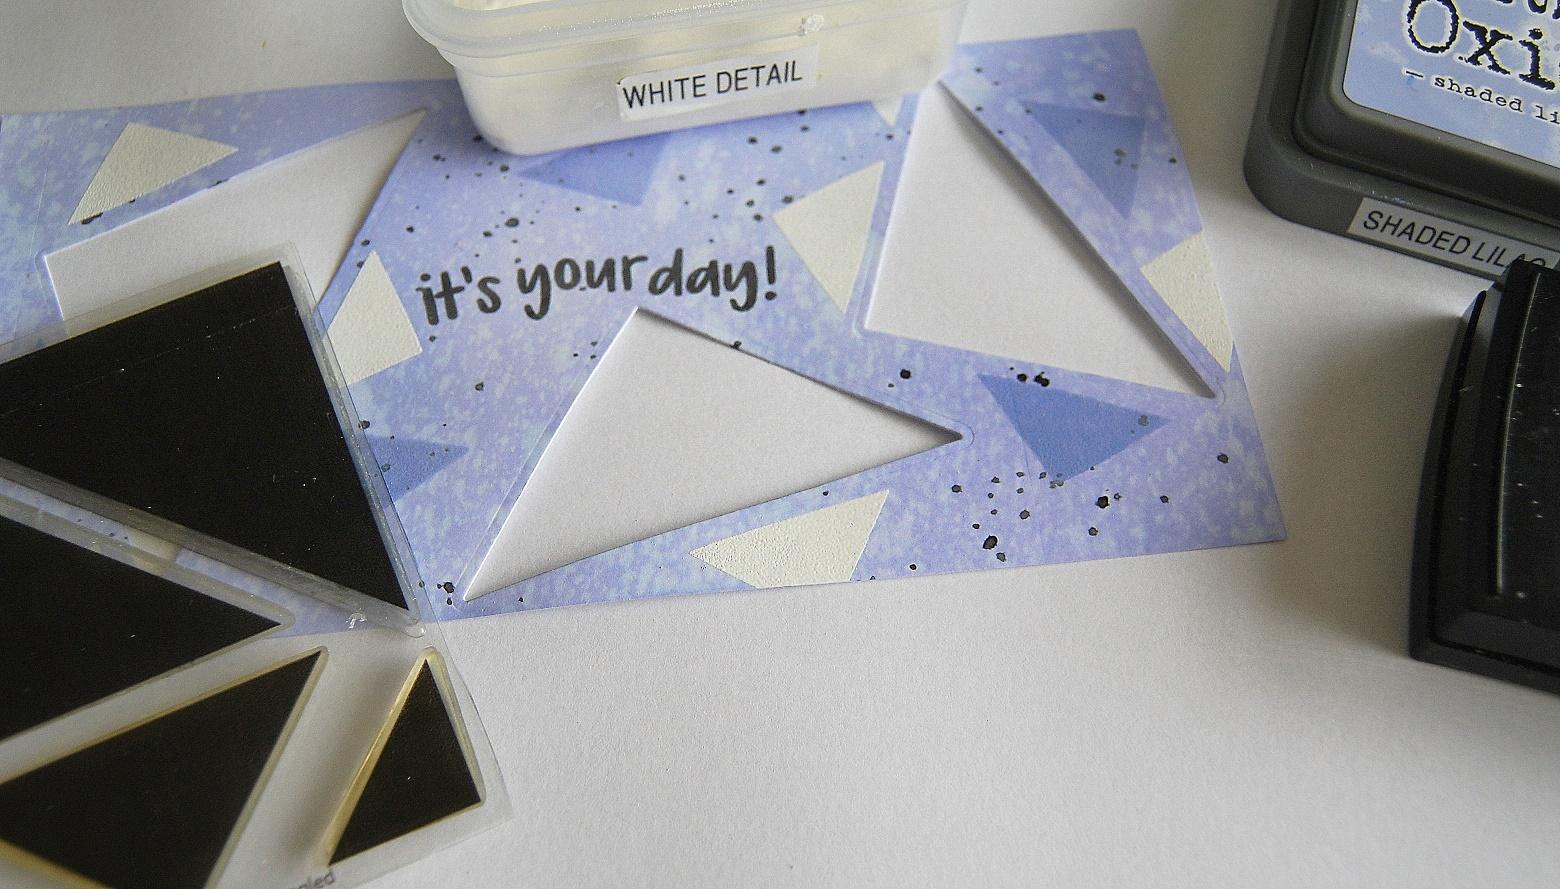
I trimmed Distress Watercolor card to measure 4” x 8”, coloured with Shaded Lilac Distress Oxide ink using a mini round blending tool, spritzed with water and blotted with a paper towel.


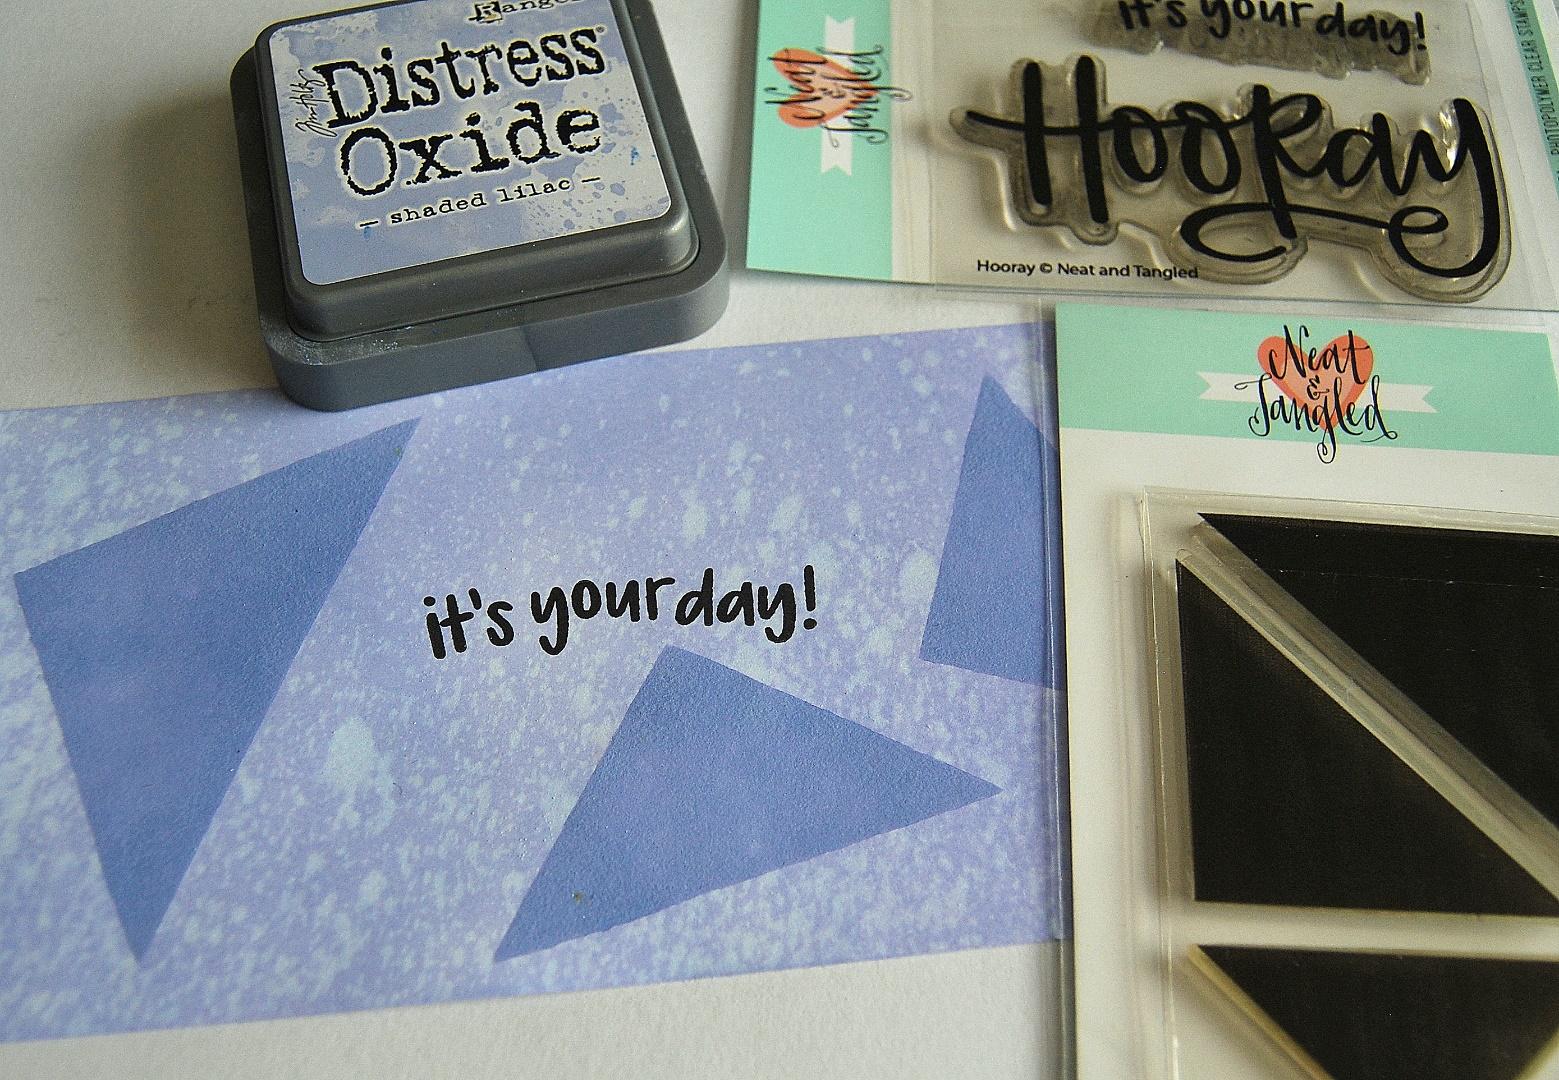
I inked the triangle images with the Shaded Lilac ink pad and stamped randomly on the background. I stamped the sentiment from the Hooray stamp set inked with Black Soot Archival ink.


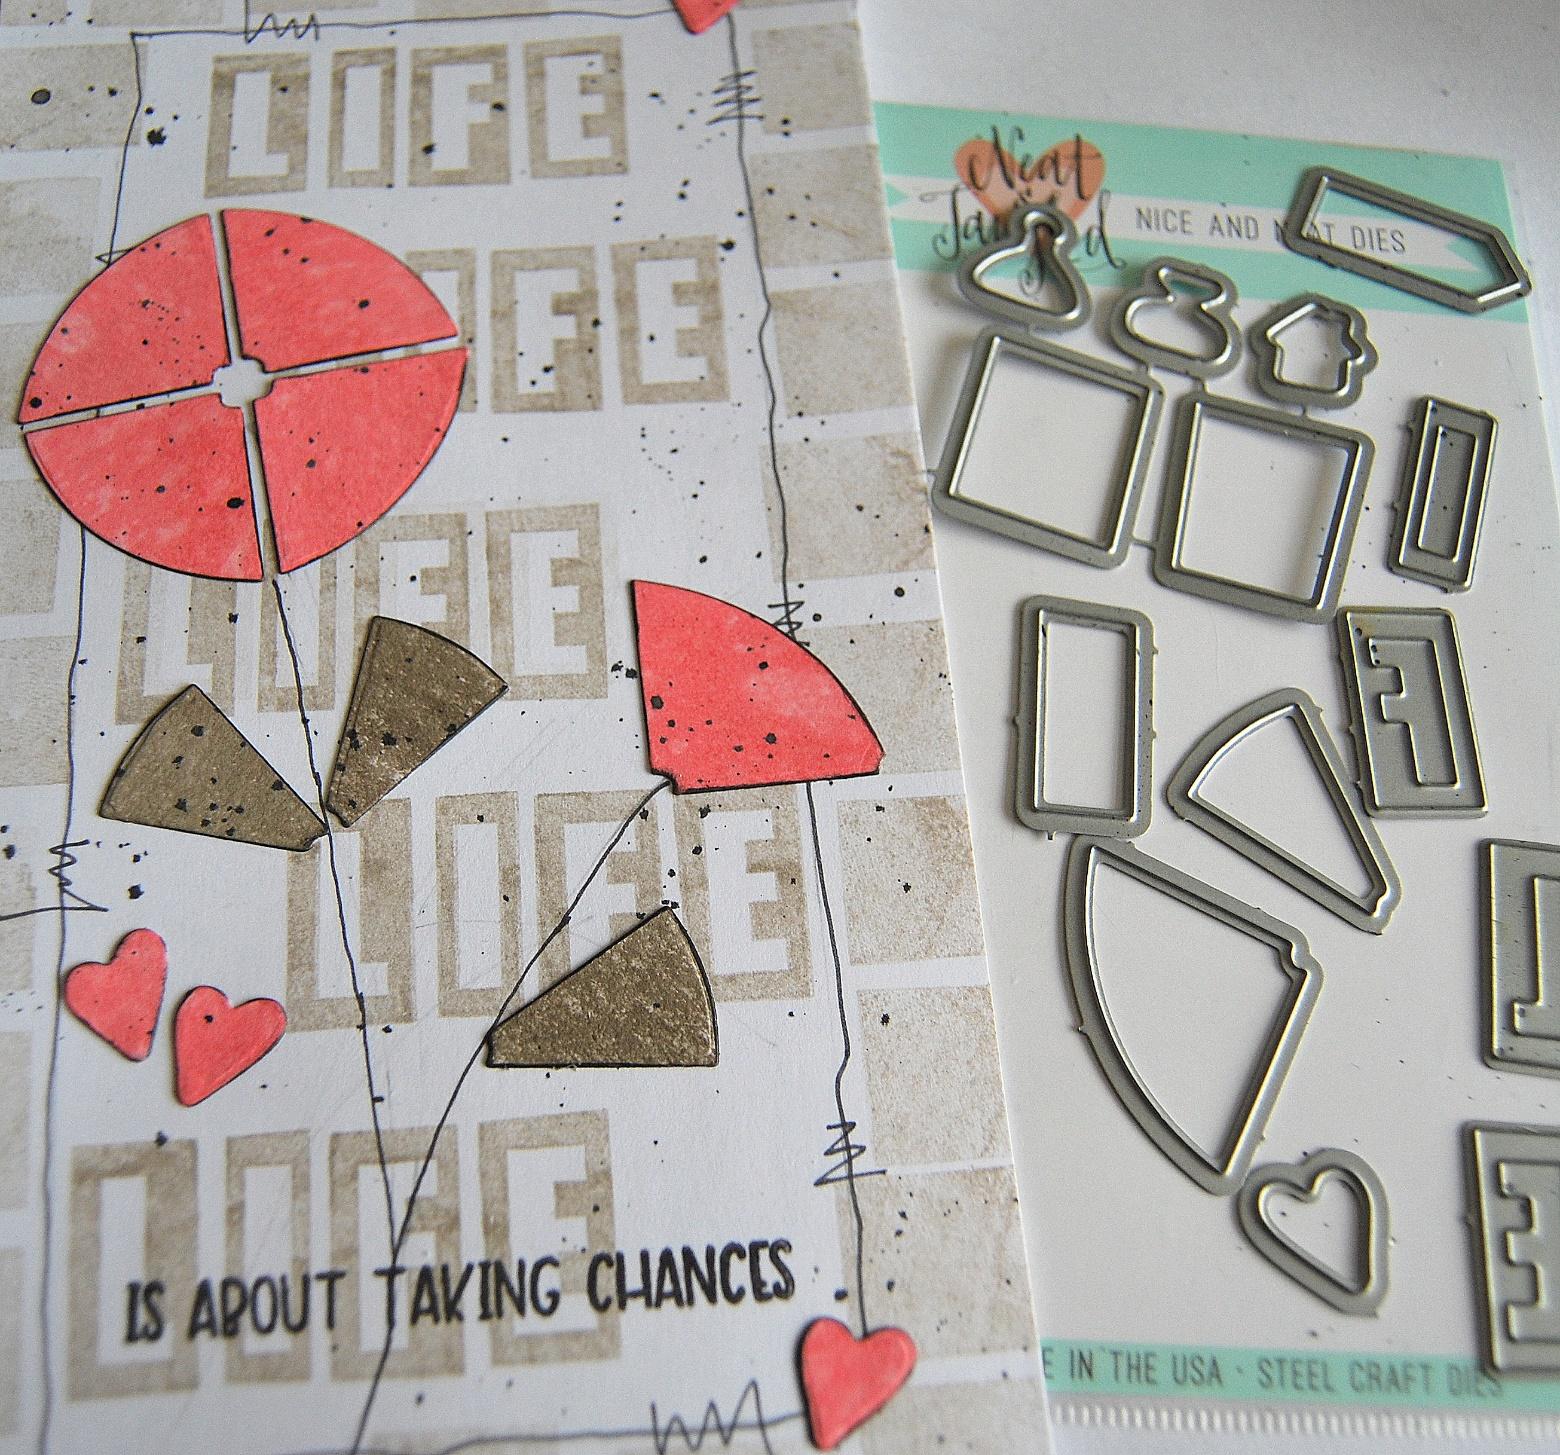
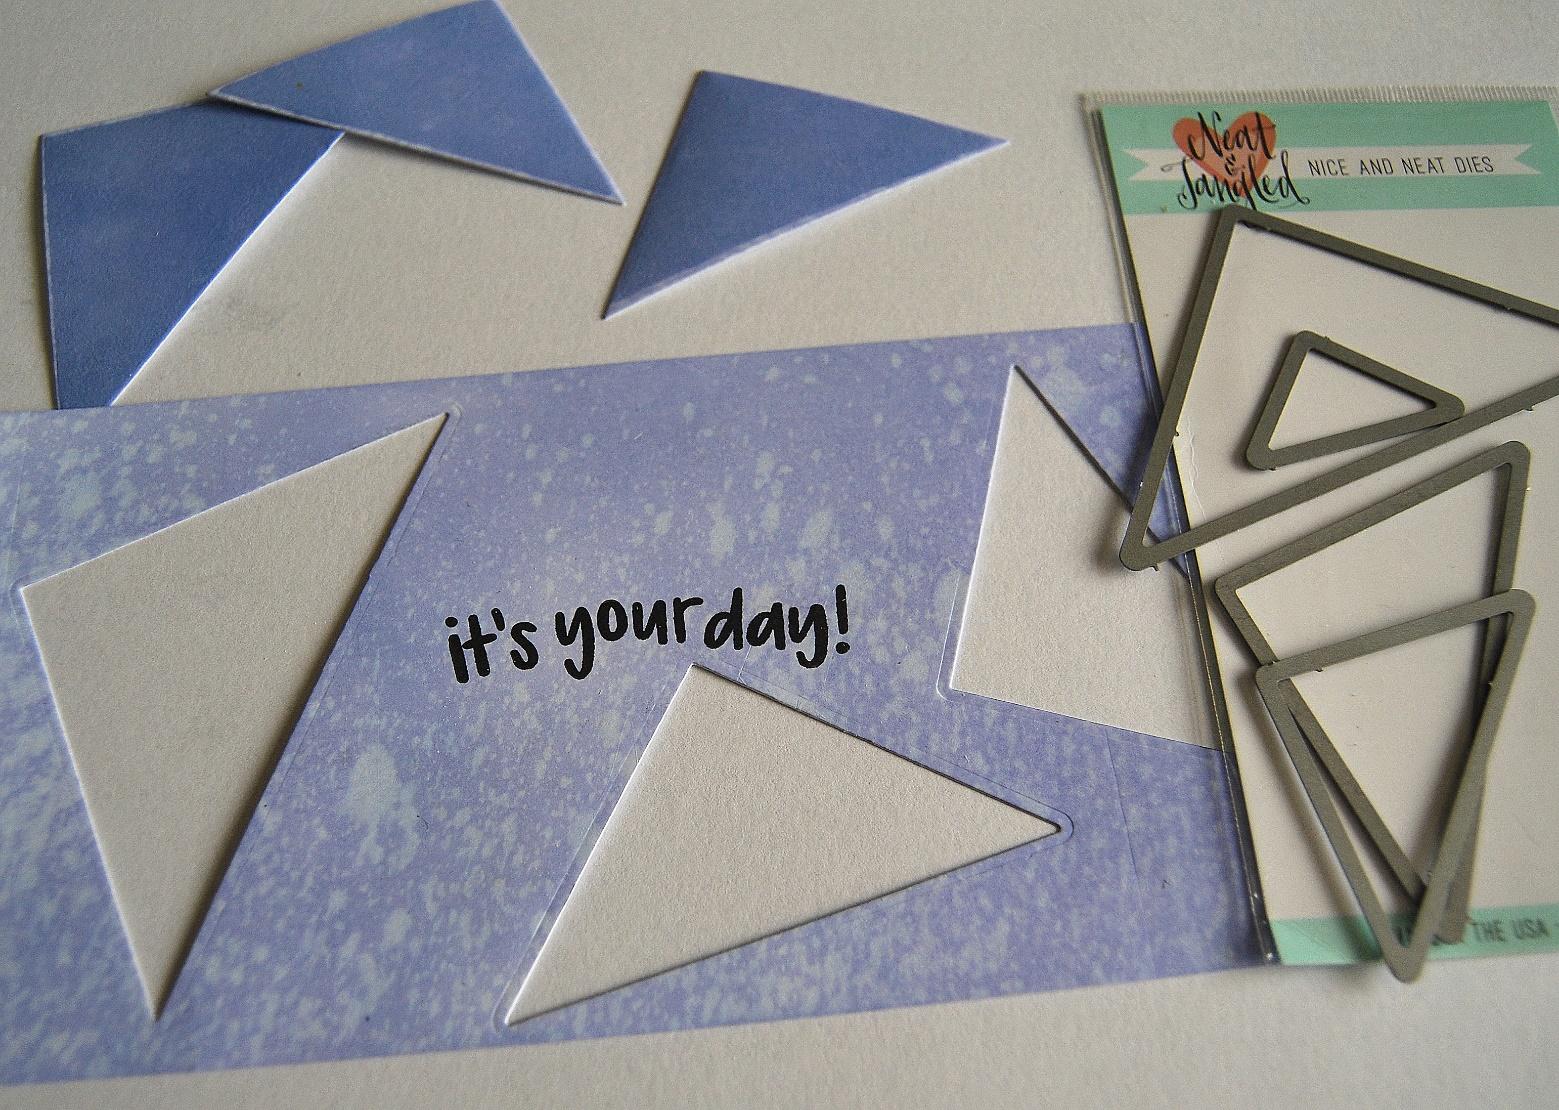
I positioned the dies over the stamped triangles and die cut the shaker apertures.


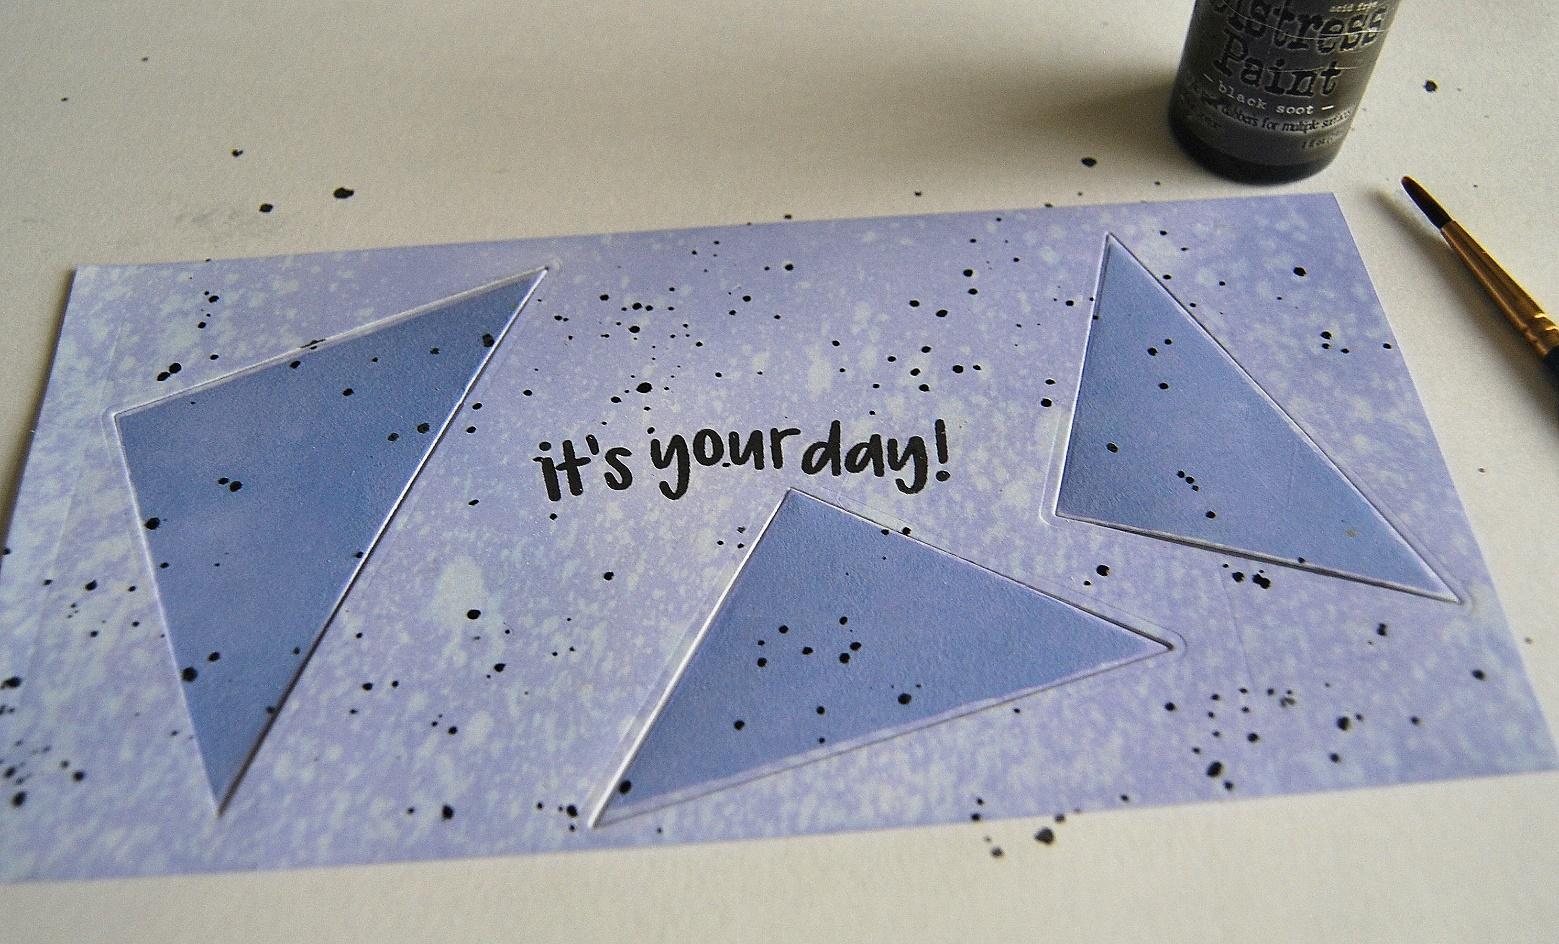
I placed the die cut triangles back in the spaces and added splatters using Black Soot Distress Paint.


I stamped the smaller triangle images inked with Shaded Lilac Distress Oxide ink and dried with a heat tool. I then stamped the same triangle image with Versamark and heat embossed with Ranger Superfine White Embossing Powder.


I added a panel of acetate to the back of the card, added sequins and confetti from my stash and 3D foam tape around each aperture.


I fixed additional sequins to the front of the panel and wound black thread around the top and tied in a bow. I stamped the sentiment from Life’s A Game stamp set on to black card, heat embossed with Ranger Superfine White Embossing Powder and trimmed on to a banner. I fixed the panel to a white 4.1/4” x 8.1/4” card blank


Thank you so much to everyone who has taken the time to leave lovely kind comments on the projects I made using Neat and Tangled products.

Happy Crafting, hugs Kath xxx
4

Stacked Die Cuts | VIDEO | Natalie Elphinstone

I have to admit I love a good challenge! And crafting challenges always push me to try new things and get more creative with what I already have on hand. When I feel like my mojo is slumping I'll look for a challenge to take part in, or even make one up for myself!

So for today's post I decided to challenge myself to make a project using only my Neat and Tangled dies, without any stamps! Now I didn't quite get there because in the end I couldn't resist the temptation to add a sentiment and a little finishing touch of Christmas lights, but my intentions were good! And you can see that I could have easily left those bits out, or replaced them with something else instead so I didn't feel like a failure! LOL!


In my usual style though I like to add lots of paper layers, and I like to stack them up and overlap them and cluster them together. I like to add a variety of different colours, and I'm always looking for an excuse to use up my patterned paper, and to throw in some glitter. I wanted to make sure I stuck to my usual style and include all these elements, even within the confines of my self-imposed challenge to only use die cuts. And so it began!


Do you think it's too early to begin Christmas projects yet? I hear there's only 90 odd days left before it's upon us, so I figure I'll take any crafting opportunity I can to get a head start on my gift tags ;-)


In my video today I'm going to show you how these tags came together. They were quite easy to assemble, and without any real stamping and colouring they were super quick too! I'll share all my hints and tips along the way for creating your own versions of these stacked die-cut tags.


Supplies:

Classic Tag 2 Die Set
Falling Circles Cover Plate Die
Warm Winter Scene Cover Plate Die 
Stitched Slopes Die Set 
SSS Holiday Helpers Stamp Set (Sold out)

Have a lovely rest of your week!
xx
Natalie
3

BOX Card with Daria [VIDEO]

Hello and welcome Dear Friends!

Daria here, and I have a fun card to share with you.  I wanted to make a shadow box like card. I've decided that the easiest way to make it is to use a Gift Card Box Die and Gift Card Box Additions dies.


This card was totally an experiment - I have changed a lot along the way. But I like the way it turned out.  There is a video to show how it all came together.


I have a friend who is due in October, and I was thinking about her while making this card. I wanted to make a fall themed card for a new baby coming :) To achieve it, I used leaves from Hello Fall Stamp set and a little stroller from Ride With Me Stamp set  Here is also some patterned paper used - Modern Graphics by Julie Ebersolefrom Ellen Hutson, to make a backdrop both for inside and outside of the box. 

Actually the Gift Card Box Die is quite thick, so you can make several layers of dimension for even deeper 3D effect.  You may also use flowers and different creatures peeking from inside.


The sentiment is also from Ride With Me Stamp set.  I like how delicate it is.


I have also placed a couple of leaves inside of the card for some extra something.


Thanks so much for stopping by, hope you liked that ideas and will give them a try.
Have a wonderful week,
D.

***

Neat&Tangled Products Used: 

Gift Card Box Die
Gift Card Box Additions Die Set 
Hello Fall Stamp set
Ride With Me Stamp set 
Ride with Me Die Set


2

I Love Fall with Keeway


Hello Fall! With Fall now officially in season, it seems even more than fitting to create a Fall themed card to share with you today! Besides, I just adore everything in our September Release, so I couldn't wait to share more inspiration using those goodies. My project is showcasing the Oh Deer and Birch Leaf sets!


The details on the Birch Leaf die cut is oh so gorgeous. And with such detail, I love to keep it simple and bring it out with some ink blending beneath it. I blended a piece of bristol paper using Mowed Lawn and Tea Dye distress oxide inks. Then, I die cut the Birch Leaf five times. and arranged them to create a delicate frame. I adhered them with adhesive spray and trimmed off any excess hanging off the edges.


I stamped a pair of deers from the Oh Deer stamp set in dark brown hybrid ink and colored them with my copic markers. Then I die cut the images out with their coordinating dies. I also heat embossed a sentiment from the Birch Leaf stamp set in white onto kraft card stock, and trimmed it to a thin strip. I finished the card by adding these pieces with foam squares. Thanks for joining me today!
4

Happy Thanksgiving!

Hello there!

Mayuri here to share a card using the Birch Leaf stamp set and co-ordinating dies!

©Candles in the Garden. Neat and Tangled SEPTEMBER 2018

I began by creating a loose watercolour background - I took an acrylic block, dropped some Dylusions Ink blots onto it and used it to stamp an image onto a panel of white cardstock. I kept the block in place to allow the colours to blend and then removed it so I could heat set the panel.

©Candles in the Garden. Neat and Tangled SEPTEMBER 2018

I sprayed a solution of water and Perfect Pearls onto my panel for a bit of sparkle and heat set once more. I then trimmed the panel down to slightly smaller than my card base and foam mounted it to the card front.

©Candles in the Garden. Neat and Tangled SEPTEMBER 2018

I die-cut the birch leaf four times out of white cardstock and adhered all the die-cut pieces together to create one thicker embellishment. I then adhered it to the card front and moved onto the sentiment.

©Candles in the Garden. Neat and Tangled SEPTEMBER 2018

The sentiment was stamped onto a strip of black cardstock with Versafine ink and heat set in white. I foam mounted that under the leaf embellishment and finished with a few sequins.

Thanks for stopping by!
5

2018 Retirement Sale!

Hello friends! It's that bittersweet sale where we say goodbye to some of our beloved products. But we must make room in the warehouse for all the exciting new goodies we have heading your way! You will find all of these retiring items listed 40% off in the SALE section of the shop. The prices are marked down, so no code needed! Only good while supplies last, so this is the last chance!

Here are some projects using just a few sets in the sale:
(All My Heart)

(Big Top Birthday)

(Birthday Tags)

(Bright Baubles)

(Bible Journaling)

(Big Bold Brew)

(Little Monster)

(On the Corner)

(Thankful Turkey)

(Graduated Stripes)

(Say Yes to Donuts + Big Bold Brew)

(Send Pretty Mail)


(Fractal Cloud)

(Creepy Cute + Creepy Cute Shadows and Sentiments)

Thanks for taking a look, and so happy to know that these much loved sets will find their way to good homes!

xo
Danielle

0

Life's A Game with Kath Stewart

Happy Friday!  Our September guest Kath Stewart is back with a couple fun and clever cards that we think will get thinking outside of the box.  Here she is with all the details:

Hi Everyone, I’m back again to share cards I made with the Life’s A Game stamp set and matching dies. I love geometric shapes and was having so much fun with this stamp set that I couldn’t resist making two cards.


So let’s get started with the first card.


I trimmed Distress Watercolor card to create a panel measuring 4” x 8.1/4”, stamped the LIFE image from the stamp set with Wild Honey Distress Oxide ink. I trimmed the ” Is About Twists and Turns” sentiment apart with scissors and stamped the first line of the sentiment with Black Soot Archival Ink. This is a great way to stretch your sentiment stamps and they can easily be stamped as originally intended by aligning them on an acrylic block. I stamped the rest of the rectangle images with Faded Jeans and Wild Honey Distress Oxide inks and stamped the rest of the sentiment.


I stamped the arrows and added shading around the edge of the panel using Faded Jeans Distress Oxide ink and a mini round blending tool.


I fixed Sizzix Black Adhesive Foam to the back of a scrap of black card and used the matching die set to cut the hearts.


I stamped the Start and Finish images on to white card and die cut with the matching Life’s A Game dies and fixed the panel to a card blank measuring 4.1/4” x 8.1/2”.


For the second card, I used the same size panel of Distress Watercolor card and stamped the Life image with Pumice Stone Distress Ink. I doodled a line around the stamping using a Sharpie Black Fine Marker Pen and stamped the rectangle image around the edges using the Distress ink. I stamped the sentiment with Black Soot Archival ink.


I coloured scraps of white card with Worn Lipstick Distress Oxide ink and Pumice Stone Distress Ink using the direct to paper technique. I spritzed with water and blotted with a paper towel.


I flicked splatters on to the background and the coloured cards using Black Soot Distress Paint and a fine paintbrush. I die-cut the hearts and sections to make up the flowers and leaves using the matching Life’s A Game die set. I edged each die-cut with a Sharpie Black Fine Marker Pen and fixed in place. 


I doodled flower stems, added a brad from my stash to the centre of the flower, a twine bow and a coat of Glossy Accents to the hearts. I matted the panel on to a white card blank measuring 4.1/4” x 8.1/2”

I’ll be back next Friday to share another project with you. In the meantime, happy crafting.
6

Pastel Copic Coloring with Kelly Latevola

Hello Crafters! 

It's Kelly here and I'm back with another Copic coloring tutorial for you guys!


You all know I love my Copic markers and I've been using them for a long time. However, there's still plenty of things for me to learn and pastel coloring is one I struggled with for a long time. 


Often times in summer and spring I would like to color things a little lighter but they always felt flat to me. I missed my dimension! I have found the trick to it is to add the dark colors. 

Sounds pretty common sense right?
Well it is, except I was very heavy handed with my coloring. The trick my friend is to add the tiniest little bit of the darker color. It won't overwhelm your image and the dark makes those light colors POP. 

Check out the video below to see what I mean! 


Did you see how flat they look before adding the hint of dark?
It makes all the difference! 
Give it a try :) 


Thank you guys so much for stopping by! 
I appreciate you joining me :) 


Supplies:

Neat & Tangled SO FOXY
Shop at:
SSS | Neat & Tangled
SNAKE SCALES - SIMPLY STENCIL
Shop at:
SSS | Neat & Tangled
Neat & Tangled FLORAL FRAME
Shop at:
SSS | Neat & Tangled
FLORAL FRAME - NICE AND NEAT DIES
Shop at:
SSS | Neat & Tangled
SO FOXY - NICE AND NEAT DIES
Shop at:
SSS | Neat & Tangled
Neat and Tangled CRYSTAL CLEAR SEQUIN MIX
Shop at:
SSS | Neat & Tangled
Sakura WHITE GELLY ROLL Medium Point Pens Set
Shop at:
SSS
EK Success WRITING PEN FINE TIP
Shop at:
SSS
Sizzix BIG SHOT PLUS MACHINE Gray And White
Shop at:
SSS
Neenah Classic Crest 80 LB REAM Smooth Solar White Paper Pack 250 Sheets
Shop at:
SSS
Fiskars PREMIUM CUT LINE Paper Trimmer 12 Inches
Shop at:
SSS
Tombow MONO MULTI Liquid Glue
Shop at:
SSS
Ranger MINI ROUND INK BLENDING TOOLS
Shop at:
SSS
Ranger MINI ROUND FOAM REFILLS for Mini Round Ink Blending Tools
Shop at:
SSS
3M Scotch DOUBLE-SIDED FOAM TAPE Permanent
Shop at:
SSS
Tim Holtz Distress OXIDE INK PAD SET OF 12
Shop at:
SSS
Tim Holtz Distress Oxide Ink Pad CRACKED PISTACHIO
Shop at:
SSS
Ranger Inkssentials Non Stick CRAFT SHEET
Shop at:
SSS
Simon Says Stamp LARGE GRID PAPER Pack Pad
Shop at:
SSS
Simon Says Stamp Premium Ink Pad INTENSE BLACK
Shop at:
SSS
Simon Says Stamp Premium Dye Ink Pad BLACK
Shop at:
SSS
ZIG Wink of Stella GLITTER CLEAR Brush Tip Marker
Shop at:
SSS
MISTI PRECISION STAMPER Stamping Tool Kit
Shop at:
SSS
MINI MISTI PRECISION STAMPER Stamping Tool Kit
Shop at:
SSS
Silver BLACK VELVET Brush Size 2 Round
Shop at:
SSS
Ranger Perfect Pearls PERFECT PEARL Individual Pigment
Shop at:
SSS
We R Memory Keepers TRIM AND SCORE Board
Shop at:
SSS
Ranger STAR DUST Stickles
Shop at:
SSS
Tim Holtz Distress OXIDE INK PAD SET OF 12
Shop at:
SSS
Tim Holtz Distress Oxide Ink Pad SQUEEZED LEMONADE
Shop at:
SSS
Tim Holtz Distress Oxide Ink Pad SHADED LILAC
Shop at:
SSS
Tim Holtz Distress OXIDE INK PAD SET OF 12
Shop at:
SSS
Tim Holtz Distress Oxide TUMBLED GLASS
Shop at:
SSS
Tim Holtz Distress Oxide SPUN SUGAR
Shop at:
SSS
Neenah Classic Crest 80 LB SMOOTH SOLAR WHITE Paper Pack 40 Sheets
Shop at:
SSS
Copic Sketch Marker RV02 SUGARED ALMOND
Shop at:
SSS
Copic Sketch Marker RV04 SHOCK PINK
Shop at:
SSS
Copic Sketch Marker E50 EGG SHELL
Shop at:
SSS
Copic Sketch MARKER C3 COOL GRAY
Shop at:
SSS
Copic Sketch MARKER C5 COOL GRAY
Shop at:
SSS
Copic Sketch MARKER G05 EMERALD GREEN
Shop at:
SSS
Copic Sketch Marker BV04 BLUEBERRY
Shop at:
SSS
Copic Sketch Marker W1 WARM GRAY
Shop at:
SSS
Copic Sketch MARKER W3 WARM GRAY
Shop at:
SSS
Copic Sketch Marker W5 WARM GRAY
Shop at:
SSS
Copic Sketch Marker Y02 CANARY YELLOW
Shop at:
SSS
Copic Sketch MARKER G00 JADE GREEN
Shop at:
SSS
Copic Sketch Marker G02 SPECTRUM GREEN
Shop at:
SSS
Copic Sketch Marker RV00 WATER LILY
Shop at:
SSS
Copic Sketch Marker Y0000 YELLOW FLUORITE
Shop at:
SSS
Copic Sketch Marker BV000 IRIDESCENT MAUVE
Shop at:
SSS
Copic Sketch MARKER BV02 PRUNE
Shop at:
SSS
Copic Sketch Marker C1 COOL GRAY
Shop at:
SSS
5
Back to Top