
Happy Monday! You are all in for a treat this week. We are collaborating with Tonic USA and not only will there be some pretty fantastic inspiration for you each day on both the Neat & Tangled and Tonic USA blogs, there are also two big prizes to be won.
Here at Neat & Tangled we'll be selecting one lucky comment from our collaboration blog posts to receive a $75 credit to spend at Tonic. AND, Tonic will select a commenter from their blog to win a $75 credit to the Neat & Tangled store.
Now for some inspiration, today Debby and Miriam are here to share. First up is Debby:


Everything was adhered to the card base and then I added a few sequins as well as a few dots of White Blizzard Glitter Drops to finish it off.

For my next card, I used the Embellishment Mousses in a different way. I was a little surprised by the texture of the mousse when I first used it. I expected it to be more like a paste that you used for stencils, but it had more of a clay consistency. You can still use it in that for for stencils, but you have to kind of work it into the openings. Or, you can soften it into more of a paste form by adding some water.
You can also add water to create a type of paint, which is what I did. I just used my palatte knife to put a bit onto a craft mat, added water to create a paint consistency, and than painted onto a watercolor panel using the Powder Blue and Pure Platinum embellishment mousses.
I then added some stamping using the Landscape Textures stamp set and the Tim Holtz Stamping Platform. I placed the stamp in the middle of the platform so that I could move the panel around underneath to create the random stamping.

Then I added some gilding by 'coloring' some dots on the panel using my glue pen. And then adding the Radiant Gold Gilding Flakes.
Note - make sure your ink is totally dry before you do this. I managed to smudge a bit of black ink when I was brushing away the excess gold flakes.
I die cut the You Can Do Anything sentiment and gilded it as well. To give it a little more strength, I did add a second layer and then adhered the entire piece to my panel.
Here at Neat & Tangled we'll be selecting one lucky comment from our collaboration blog posts to receive a $75 credit to spend at Tonic. AND, Tonic will select a commenter from their blog to win a $75 credit to the Neat & Tangled store.
Now for some inspiration, today Debby and Miriam are here to share. First up is Debby:

Hello, it's Debby here today, and I'm delighted to be joining in with this week's Tonic collaboration! I already have a fair few Tonic products in my stash as I love the quality of their tools and original embellishment products to name just a few. However, I've not yet had the chance to play with the Nuvo Glimmer Pastes or try out the Tim Holtz Stamping Platform.

I knew immediately I wanted to use the Moonstone Glimmer Paste to bring sparkle and texture to an ink blended stencil design. I pulled out the Interlocking Geo stencil from the new February release and blended a sherbet rainbow diagonally across the card using Hot Lips, Melon, Duckling, Mint and Spring Rain inks. Keeping the stencil in place, I then used a Ranger palette knife to spread the Glimmer Paste over the ink blended background. It's a bit like spreading butter I think! It never gets old to lift the stencil to reveal the design and I was delighted at how adding the Moonstone Glimmer Paste really brought this sherbet toned background to life with a million sparkles catching the light.
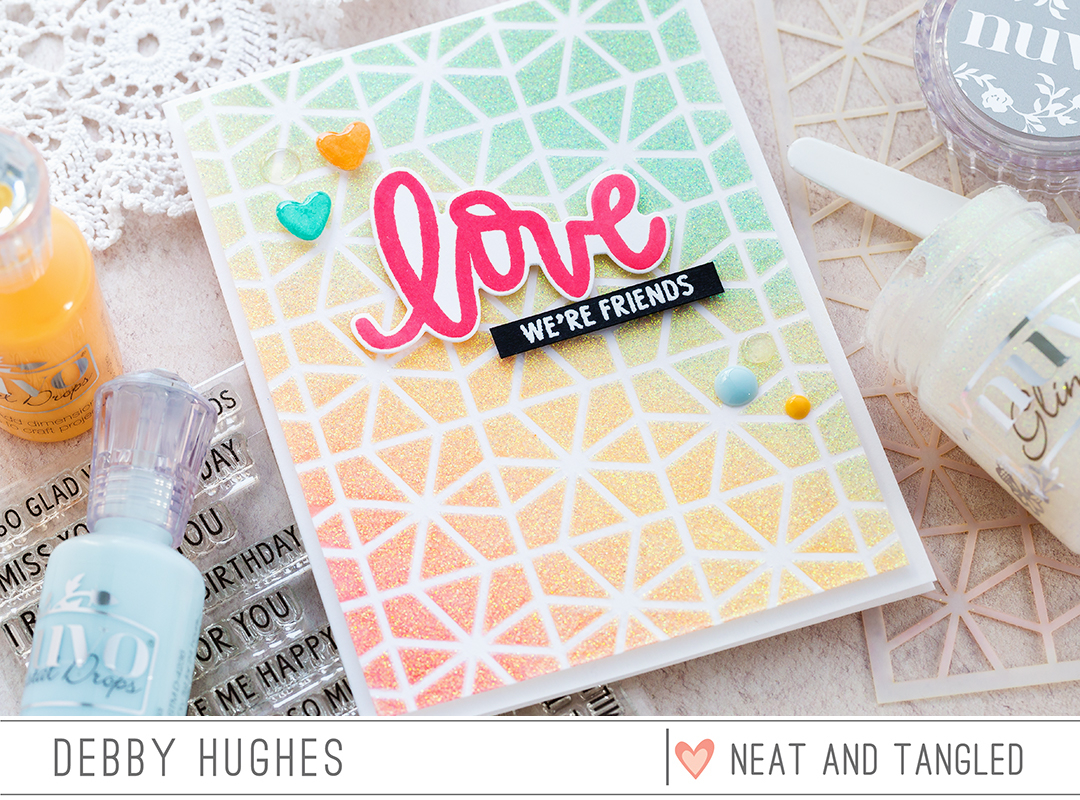
I put the background to one side to dry while I worked on the sentiment and embellishments. Using the Tim Holtz Stamping Platform, I stamped the love from Love Notes in Hot Lips inks. For me, stamp positioning tools have been a game changer for my stamping, and Tim Holtz's one lives up to all that I hope from a stamp positioner - strong, sturdy, well designed and makes stamping a breeze. I used the included magnets to keep my paper in place while I stamped the image a second time to ensure I had a good intense colour and even stamping. I used the matching https://ldli.co/e/3rx79x to die cut the sentiment and then paired it with a partially stamped sentiment from the So Many Sentiments set. I carefully cut the 'we're friends' part of the sentiment away from the rest, stamped it with clear embossing ink on Black card and white heat embossed before trimming to a skinny strip.

I added the background to a white card base and the two sentiment pieces to the background with foam adhesive and then accented with hearts cut with a die from the Love Notes set. I covered the hearts with Spring Rain and Melon inks, followed up with Glitter Gloss and then finally Crystal Glaze for a beautiful sparkly and glossy finish. I also added Crystal Glaze, Duck Egg Blue and Sugared Almond droplets as final accents.
Next up is Miriam:
Hi everyone! This week Neat & Tangled is collaborating with Tonic USA. I was so excited to be able to work with their products, and created two cards to share.

For this first card, I die cut our Punchinella die from cream cardstock. Then I used some liquid adhesive to essentially pain across the bottom of the die on a diagonal. Once the glue was dry, I used the Radiant Gold Gilding Flakes to embellish the bottom of the die cut. I then tacked the die cut piece down in a couple places over a piece of patterned paper.
Those dimensional hearts are from the Scored Shapes Dies set. I cut the hearts from both patterned paper and vellum. I rubbed the vellum hearts with Powder Blue embellishment mousse to give it a little shine and subtle color.
Those were then stitched to the punchinella/pattered paper as well as a sentiment strip with a sentiment from the So Many Sentiments set.

I also added a vellum mat. Just as with the vellum hearts, I rubbed the top and right edges of the mat with some embellishment moussse, this time using Pure Platinum mousse.
Everything was adhered to the card base and then I added a few sequins as well as a few dots of White Blizzard Glitter Drops to finish it off.

You can also add water to create a type of paint, which is what I did. I just used my palatte knife to put a bit onto a craft mat, added water to create a paint consistency, and than painted onto a watercolor panel using the Powder Blue and Pure Platinum embellishment mousses.
I then added some stamping using the Landscape Textures stamp set and the Tim Holtz Stamping Platform. I placed the stamp in the middle of the platform so that I could move the panel around underneath to create the random stamping.

Then I added some gilding by 'coloring' some dots on the panel using my glue pen. And then adding the Radiant Gold Gilding Flakes.
Note - make sure your ink is totally dry before you do this. I managed to smudge a bit of black ink when I was brushing away the excess gold flakes.
I die cut the You Can Do Anything sentiment and gilded it as well. To give it a little more strength, I did add a second layer and then adhered the entire piece to my panel.
Now it's time to head over to the Tonic USA blog to see what their team created. Be sure to leave comments here and there to be entered to win the giveaways. See you back here tomorrow for Day 2!


Wow - this is gorgeous! I love the blending of colors you chose!
ReplyDeleteGorgeous creations. I don't own any Nuvo products ... yet.
ReplyDeleteLove that shimmer paste - it is so beautiful and the colors are so soft!
ReplyDeleteI love that Moonstone Glimmer Paste and sentiment stamp set used for the first card. So fun and pretty!
ReplyDeleteGorgeous projects! Love Miriam's artsy masterpiece!
ReplyDeleteI've never used Nuvo drops or the shimmer paste, but
would sure love to! And I love Debby's background -
it's beautiful!
Really beautiful projects. I love Tonic products that I have so far. I'm really wanting to try out other colors in Glimmer Paste. I have a ton of the Nuvo drops but only a couple of glitter paste from a card kit.
ReplyDeleteGorgeous cards! Love Debby's use of the Glimmer Paste with the stencil!
ReplyDeleteThe Gilding Flakes and the Embellishment Mousse add a fabulous look to Miriam's cards!
Everything is gorgeous. Just bought some of the Glimmer paste to play with! TFS
ReplyDeleteStunning cards! I love this glimmer paste and the gilding flakes are so fun.
ReplyDeleteWow!! Gorgeous creations!! The moonstone glimmer paste is just amazing!! Love that card a lot!
ReplyDeleteI Loved all three cards shared today !
ReplyDeleteLove all the cards.
ReplyDeleteJust beautiful ... the gorgeous blend of colour with shimmer and shine on Debby's card is fabulous ... love the dipped gold look on the first of Miriam's cards ... and the delicious sentiment against the cool collaging on the second is fantastic! Anita :)
ReplyDeleteFantastic cards! I love how the Nuvo Glitter Paste adds so much sparkle but still lets the ink color show through! The embellishment mousse gives you so much versatility depending on how it's mixed. That powder blue color is gorgeous!
ReplyDeleteThe glitter paste really adds a sparkle to
ReplyDeletethe stenciling. The gold on the diagonal
of the die cut is a great idea.
Fantastic projects.
thanks for sharing
txmlhl(at)yahoo(dot)com
Very lovely card ideas. I love the glimmer paste with the soft colors. The gilding flakes are so pretty too. FabulouS
ReplyDeleteWow, love the look of the shimmer paste! It looks like fun to play with!
ReplyDeleteGorgeous cards! Loving the paste!
ReplyDeleteDebby and Miriam, such great projects! I love how you both showcased the different products!
ReplyDeleteI love the glimmer paste and the gilding flakes too - such a beautiful effect on cards.
ReplyDeleteAwesome card Debby, I didn't know that the ink would shine through, thanks for this great idea!
ReplyDeleteMiriam I love your cards and I learned new things about Gilding Flakes, thanks for that!
Love love love the glimmer paste over the inks, Debby! And that stencil is awesome! I also like the landscape stamping on card 3, and the way Miriam used the glimmer paste! Very cool look!
ReplyDeleteLovely projects! The designers really showcased the products well. Thank you for the chance to win!
ReplyDeleteWonderful cards. I really like the use of glimmer paste on the first one.
ReplyDeleteSuch gorgeous cards, so creative and inspiring too!
ReplyDeleteWow! These are fabulous. Love them all ♥
ReplyDeleteThese cards are
ReplyDeletegorgeous and love
the glitter paste.
Carla from Utah
Such a great idea for the glitter paste. I usually add color to the paste and add it, much easier to glimmer paste over a colored design. All of the cards are terrific!
ReplyDeleteSO pretty. I love the blending of colors. AND the dots. I bought some of those, and love them.
ReplyDeletethe cards are so beautiful!!!
ReplyDeleteLovely cards! I love the glimmer paste, but now I want to try the gilding flakes!
ReplyDeleteAwesome cards. Nuvo drops and the glimmer paste are on my wish list.
ReplyDeleteWow! Beautiful card form both Debby and Miriam.
ReplyDeleteWow, I didn't realise Tonic had so many different and beautiful products! These cards show them off so well!
ReplyDeleteLove this amazingly post with gorgeous creation!
ReplyDeleteWonderful cards. I love Tonic products because they make my cards glitter-tastic!
ReplyDeleteI love this card. I have some of the glitter paste and have struggled a little to get the stencil clean, but the colors are so magnificent I am anxious to copy your method. ‘
ReplyDeleteLDYJS@outlook.com
I am not to similar with these to is products. I am excited to follow along on this blog hop to see what everyone does. So I can see what there is that I can't live with out.
ReplyDeleteIt looks like I'm going to have to get my hands on some of that glimmer paste to use with stencils because that is gorgeous!!
ReplyDeleteWonderful creations! I`d love to try that glimmer paste, it looks gorgeous over the inks! Thank you for great inspiration :)
ReplyDeleteI love the backgrounds and the clever sentiment treatments. Well done!
ReplyDeleteAwesome cards!
ReplyDeleteLove Debby's card,with all these gorgeous soft colours. And that second one, with Punchinella, really caught my eye, too! Great collaboration, guys! I'd happily give the glimmer paste and the guilding flakes a go :-)
ReplyDeleteWonderful cards!!
ReplyDeleteI came here from Debby Hughes' blog. I absolutely love her soft, sparkly card. It took me a while to see the circles in that cool stencil. Now that I'm here, I see more wonderful cards. Thank you.
ReplyDeleteWonderfully creative, fun and gorgeous projects; Tonic products paired with Neat & Tangled is a recipe for WOW! Love the shine, the sparkle, the gold-dipping...everything!
ReplyDelete~carol
Both of these cards are beautiful, and it is great to see Tonic products featured. I have a few of their embellishment items, and I am always impressed with the quality.
ReplyDeleteThese cards are beautiful! I have the Moonstone Glimmer Paste and would love to have more colors, it's so gorgeous.
ReplyDeleteLove the beautiful cards.
ReplyDeleteGorgeous cards!!
ReplyDelete[hmnelson15{at}frontier{dot}com]
Absolutely gorgeous! Can I just buy a 10 gallon bucket and do my whole house in the moonstone glimmer paste mixed with various colors?!! One entire wall would be done with that Geo stencil in those sherbet colors! : )
ReplyDeleteThe effect of the Glimmer paste is so lovely. The gilding flakes and embellishment mousse are wonderful products and your cards really make these products shine.
ReplyDeleteWonderful cards ladies I love all the mouses, pastes and guilding flakes!
ReplyDeleteI think I'll have to add some of that Glimmer Paste to my collection! It adds such a nice texture. I loved all those cards!!! So absolutely beautiful
ReplyDeletePure awesomeness! Love these wonderful projects! I need some of that glimmer paste!!
ReplyDeleteWow, this is so lovely!!
ReplyDeleteThat glimmer paste is so pretty with the stenciling and I just love the gold embossed punchinella die cut, wow!
ReplyDeleteAmazing use of the wonderful stencils. I just love the punchinella with the swipe of gold ( so gorgeous and rich) and the wonderful glimmer paste! Thanks so much for your wonderful inspiration!
ReplyDeleteWow! Awesome creations!!! All the details are amazing!!!
ReplyDeleteSo creative and encouraging. Sometimes a small saying can make a world of difference in a persons life, I absolutely love these. Beautiful and powerful at the same time.
ReplyDeleteWonderful inspiration and collaboration!
ReplyDeleteLove Debby's pretty sparkling background and Miriam's use of the gold gilding flakes! Fabulous projects ladies!
ReplyDeleteBeautiful sparkling on Debby's card and stylish gold on Miriam's!Stunning works!
ReplyDeleteSo much shine! I love them!
ReplyDeleteThese cards are so beautiful !
ReplyDelete[margessw(at)icloud(dot)com]