Showing posts with label sketchy cupcakes. Show all posts

September Guest Designer: Lucy Abrams!


Hello friends! Our September guest, Lucy, is back today with one final project for you! It has been so much fun having her with us! She has a super cute card for you today!
----------
Hello. Today it's my final post for Neat and Tangled, and I'm sticking with my paper piecing them. I chose the sweet little telephone stamp from the Just Hello set, and decided to give it a happy face. I used the smiley face and speech bubble stamps from the Sketchy Cupcakes set. 
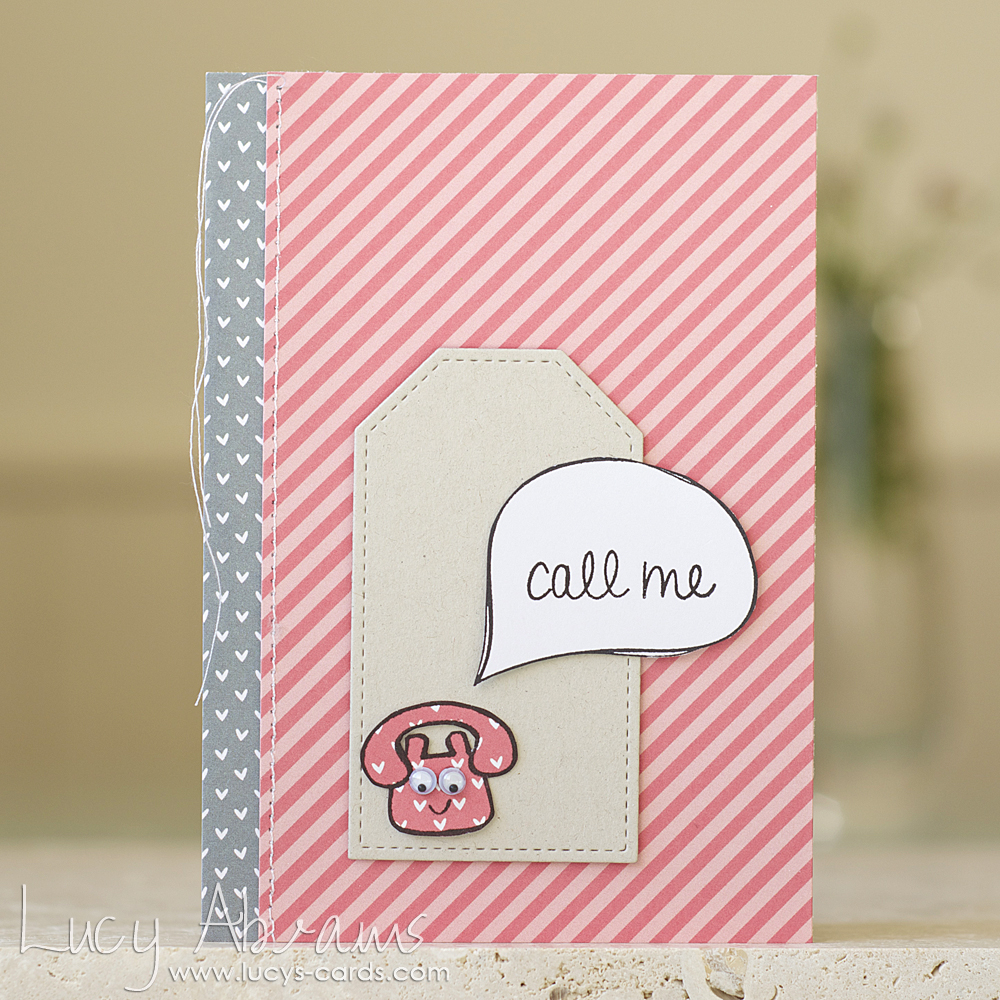
I love bringing inanimate objects to life in this way. :)

I'd like to send a huge thank you to Danielle for having me this month. It's been an absolute pleasure playing with your cute stamps Danielle!
----------
Don't forget our September release starts Monday the 22nd! We have 1 new sequin mix, 6 new stamp sets and some coordinating dies!
4

happy birthday triangles


Howdy!  It's Amy T here sharing a birthday card.  I've been trying to build up my stash of birthday cards because I tend to leave those to the last minute.  


I've become the official birthday card maker at work.  It took me several months to start the tradition so about half of my co-workers received store bought {gasp!} cards.  To make matters worse, they were highly over priced ones from Whole Foods.  For those of you that aren't familiar with Whole Foods, it's called Whole Paycheck because of their prices.

Okay, so I think it is more stressful to make cards for non-crafters than for crafters, how about you?

This particular card has heat embossing, something that I never tire of.  I finally put my more heavily used embossing powders in a disposable container and have plastic spoons handy. In the past, I would do the heat embossing over a scrap piece of paper...I always made a mess and wasted a bunch of the powder.  

I think this card could be unisex, how about you?


I used Mister Huey's Sherbet & Garden.

I think that the matte gold sequins are suitable for a guy...not too shiny for them.


The Happy Birthday sentiment is from


*The muffin top sentiment makes me chuckle every time!

Tiny Triangles that's one popular stamp!


Remember, there's an "Email Me When Available" button if you're interested in something that is out-of-stock in the shop! 

Thanks for stoppin' by and have a terrific weekend!


42

Hello Stud Muffin

Hello Neat and Tangled lovelies!

Katie Gehring here to share a card I made suitable for the the big and little men in your life!  Last weekend, I was at a youth football game and saw a little boy wearing a shirt similar to this one.


 I am not sure that I have ever called anyone a "stud muffin," but I think it's an adorable term of endearment.  I pulled out Sketchy Cupcakes and thought about how I could turn the muffin into a "stud muffin."

I made a card base from kraft cardstock and trimmed a panel of patterned paper and adhered it to the front. Next, I die cut a stitched rectangle from white cardstock.  I also die cut the word "stud" using some alphabet dies on black cardstock.

dsc_0475

I stamped the muffin top and wrapper onto cardstock and trimmed them out.  The stud part of the muffin was realized through the use of some bronze brad that have been in my embellishment stash forever.

I adhered the die cut letters and the studded muffin to the white rectangle and stamped "hello" from Just Hello to the card.


dsc_0476

This weekend, this card will be making it's way to Grayson Savery.  You may have seen Danielle's post a few weeks back that she has reopened the Happy Mail for Grayson campaign.  You can read all about it here, and more about Grayson here.


I hope that it brings a smile!  Have a great weekend friends!  Thanks for stopping by!

Katie

5

Birthday Bash Blog Hop! + HUGE Giveaway

Hello friends! Welcome to the Little Tangles Birthday Bash blog hop! Today I am hopping along with some of my favorite friends to celebrate Neat and Tangled's first birthday even more!  You should have arrived from the Little Tangles blog. If you got lost, or want to see the full list of stops head there!

The hop theme is also the theme for the current challenge, so be sure to link up your projects as well! 
Now for my card! I paired the little cupcake from Sketchy Cupcakes with a NEW sentiment from a set that will be released in September ;) I had a little fun with a white gel pen doing some sketch marks and faux stitching, then added gold sequins to finish it off.
Happy Birthday!

Now you can hop on over to Suzanne at Freshly Noted! But before you go check out the hop giveaways!

ONE(1) commenter from the hop will win the ENTIRE first year collection of Neat and Tangled Stamps*

TWO(2) additional commenters will each win a $5 gift certificate to the store

So be sure to comment all along the hop to increase your chance of winning! 


*No substitutions will be made. If you already own sets you receive as the prize I ask you to pay it forward!

76

Chalkboard Cupcake Card

Good morning! Heather here - super excited to be sharing a card to help celebrate Neat and Tangled's 1st birthday! 


I decided to play with Sketchy Cupcakes and make a card using the chalkboard technique. I love how simple this technique is, and how elegant it looks! Simply stamp your images with watermark ink, heat emboss with white powder, then slightly offset and stamp again with white pigment ink. I then wrapped a bit of paper towel around my finger, dipped in pigment ink, and added the smudges to help complete the chalkboard look.


I added some Tangerine Satin Sequins, pattern paper from a Crate Paper 6x6 Party Day paper pad,  and a bit of washi tape that I found at Michael's. I hand trimmed some scraps of the pattern paper into the 3 little banners, attached them at the top with washi tape, and used a tiny Tim Holtz paper clip to attach to my card. 


Finished off with some doodlings around the chalkboard with a white gel pen, and a little more doodling in black pen around the outer edges.

Thanks for stopping by! Happy 1st Birthday Neat and Tangled!

7

Dressing up die cuts

Hello and TGIF friends!

Die cutting is a fun way to add interest to your paper projects, but sometimes plain paper cuts just need a little extra something.  Earlier the week, I needed to make a birthday card for my daughter's friend and nothing says Happy Summer Birthday like ice cream.  So I turned to my trusty Silhouette and die cut a cone and some scoops of ice cream.


Although the cuts look yummy, I still felt they were a bit boring, so I turned to my Neat and Tangled stamps: Sketchy Cupcakes and Little Tangles and added some sprinkles, swirls, and smiley faces. 


From there, I assembled the card. I adhered the scoops and cone to an embossed panel of dark brown cardstock with foam tape.  I stamped the word bubble and sentiment, also from Sketchy Cupcakes onto white cardstock, trimmed and adhered to the card.  I am no artist, but I also drew a little tongue on the orange scoop of ice cream for a little whimsy. 


Just think of all the fun ways you can use your stamps to dress up your die cuts!  That's all for me today!  Thanks for stopping by!

Katie


6

Seize the Birthday Sponsor + Card

Hello friends, Danielle here!

I am happy to announce that Neat and Tangled is sponsoring the next challenge over at Seize the Birthday! If you aren't familiar with this challenge blog it's really neat! It's aim is to help you get birthday cards done for both him and her!

Here is the current challenge sketch, this week it's for "her"

And here is my take at the sketch
Happy Birthday Stars
 I am pretty bad with sketches, so I went for a pretty literal interpretation :) I die cut the stars and then stamped them with Sunburst, and used the sentiment from Sketchy Cupcakes. I also chose a nice feminine color combo of yellow, teal and pink.

I do hope you'll join in the challenge - a Neat and Tangled stamp set of choice is up for grabs!

xo
Danielle

12

May Guest Designer: Laura Bassen


Hi friends! I'm here today with another post from our amazing guest designer, Laura Bassen!
- - - - - - - - -
Hi there! Laura here, and I've got a couple more Neat & Tangled projects to share. For my first card I used the thin stripe from the Across the Card set. I'm in love with this ultra thin stripe and by using the stamp's backing as a guide, it was super simple to line up and get consistent spacing over and over again. The sentiment is from the Sparkle and Shine set.
For my next project, I was determined to use some of those delicious sequins. I made a tiny little shaker card. This card only measures 3x3" and could easily be made into a cute little tag. The sentiment is from Sketchy Cupcakes. If you are new to making shaker cards, like I was, here's a good tutorial: http://prairiepaperandink.typepad.com/amyr/2009/06/how-to-make-a-shaker-card-video-tutorial.html
Thanks so much for having my Danielle! I've had a blast playing with your stamps and sequins♥
~Laura

- - - - - - - - - - 
Thank you so much for joining us this month Laura!
6

Party Day with Neat and Tangled

_DSC0001

Hey there! It's Suzanne here today with a fun scrappy card that I made using a sentiment from Sketchy Cupcakes along with Crate Paper's Party Day collection.

_DSC0009

One of my favorite things to do with my sentiment stamps is reconfigure them to fit the space that I am stamping in. This stamp is actually designed with the words "Happy" and "Birthday" on separate lines, but you can see how I selectively inked the image to fit the words on this word window from the Party Day ephemera pack. I just love Danielle's handwritten font!

Thanks for stopping by! Have an awesome day,
Suzanne


9

I love your Muffin Top

Hi Friends! It's Chari here today with a fun card featuring the Sketchy Cupcakes set.

MuffinTop

I constructed my little muffin on white card stock, using some masking for the cherry, and then colored with copics.  I applied picket fence stickles to the muffin top with my finger to look like a sugary topping.  The polka dots on the muffin cup are made with white enamel accents to match the washi tape.  I adhered my images with foam adhesive to raise them up from the card base and accented with butter cream and mermaid's tail sequins.

Thanks for stopping by, hope you all have a wonderful day!
7

Happy Birthday

Hey there!!!  Amy K. here and I have a masculine birthday card to share.
I know masculine cards are very difficult for many of us but I have a quick and fairly easy card here using the woodgrain image from the set On the Strip 2!  If you don't have this set and it's counterpart, On the Strip, you are missing out!  These two sets alone give you ENDLESS options for cardmaking!
 
Here I've stamped the woodgrain strip with brown ink over and over again until my kraft panel was filled.  Every time I would ink the stamp I would move it across just a bit to give it a more realistic look.  My sentiment was stamped on a scrap strip using a sentiment from Sketchy CupcakesTucking a few woodgrain buttons under the sentmemt strip was the final touch for my masculine card.   
 
happy birthday2


What do you think? Masculine cards.......are they hard or easy for you?  Thanks for stopping by!!!


3

What did the fork say to the cupcake?

Hello friends,

Katie Gehring here to share a card I created using Sketchy Cupcakes.

Q: What did the fork say to the cupcake?
A: I love your muffin top!

I love stamps with a sense of humor and Sketchy Cupcakes has that in spades!  To create this little comic vignette, I stamped the fork and muffin and colored them with Copic markers. I cut them out adding a patterned paper cupcake wrapper to the muffin and wiggle eyes to both the fork and the muffin to add a bit of animation.


dsc_0641

I arranged the fork and muffin in a Polaroid frame and stamped the word bubble and sentiment, trimmed and adhered it to the card. Some fun patterned papers by My Mind's Eye lend to the festive feeling on the card.

So have you heard any good jokes recently about cupcakes, muffins or forks for that matter?  Please share!

Thank you for stopping by! 
Katie
5

Hey Sweets!

_DSC0008

Hi everyone! It's Suzanne here today with a card that was inspired by Day 5 of the Online Card Classes' Pattern Play series. Last week there was a great video about how to use large patterns in 12x12 paper for cardmaking by cutting out parts of the pattern to make embellishments. That's what I did on my card today using the Full Bloom paper from Little Yellow Bicycle's Just Because collection:


I was also inspired by the awesome color combination in this pattern, so I used Hero Arts wet cement ink to stamp the dotted washi from On the Strip 2 along the bottom of the card, then adding the handcut flowers on top of it. Next, I stamped the bubbles from Just Thinking of You in Versamark, later adding the sentiment from Sketchy Cupcakes in Hero Arts navy ink:


_DSC0012

I added some tiny pearls and crochet thread to embellish the card at the end. Have you tried this technique yet? I am one of the laziest crafters around and have to admit that cutting these flowers was pretty fast and easy!

Thanks for stopping by today,
Suzanne


4

Cupcake Magnets

I had this idea back in March release when I saw the Sketchy Cupcake set, making interchangeable muffin tops and bottoms!  So here are my Cupcake Magnets!

There are four interchangeable muffin tops, each decorated a little differently.  There are also two muffin bottoms for a muffin boy and girl.

Muffin Magnets

Here, I've switched the yellow muffin top with a green striped muffin top.

Muffin Magnets - Close Up

And here are all the muffin tops decorated with sequins, rhinestones, glitter and buttons.  Each muffin top and bottom has a strong magnet attached to it which allows easy customization.

Muffin Magnets - Close Up

Decorating the muffin tops were super fun!  I can definitely see myself creating more of these little guys.

-- pamela
6

Adding Glitter – One Tag, Three Ways


Hi, Jean here to confess that I’m a glitter-newbie. I dabbled with glitter around the holidays, but for the most part, I get easily confused when I see the wide array of glitter choices on the market for today's crafter. 

I decided to delve into some glitter techniques to “up my glitter game” by creating tags with Neat and Tangled’s newly released Sketchy Cupcakes stamp set. 

To focus on the techniques, I kept the tag design and stamp choices the same in each. I also stayed with pink glitter, although the shades of pink are different.

Let’s take a look!

First up, I heat embossed American Craft POW glitter paper for the cupcake top. I also heat embossed the solid cupcake bottom with white embossing powder on white cardstock (I have never tried this before, but definitely like the look!). Word of caution – on my first try, I accidentally melted the glitter paper while heating the embossing powder. I’ll be honest, I’m not even sure that this product is intended for heat embossing, but I thought I’d include it in the list nevertheless. The paper is probably best used as a background. 


Next, I tried the American Crafts Zing! glitter embossing powder. Zing! embossing powder is a mixture of glitter and embossing powder so the application is relatively simple. I stamped with Versamark, shook the Zing! powder onto the image, and sealed with my heat gun.


Finally, I wanted to try Ranger’s Stickles™ Dry Fine glitter. I stamped the cupcake with the Ranger Emboss It ink pad, then shook the Ranger Sticky embossing powder onto the image. When heat embossed, this powder provides a sticky stamped surface for adhering. Once I’d heated the powder, I covered the image with the dry glitter. I then briefly heated the image a bit more.


I've summarized my findings in the chart below. If you're willing to put up with a bit of mess, then the Ranger glitter is the most "glittery" and my recommendation.

I've barely "touched the tip of the iceberg" in terms of glitter options in this article. For example, I haven’t addressed glitter glues at all, which I know are a favorite for many crafters. It’s definitely a relatively easy way to add glitter without a lot of mess. There's also microfine glitter, which deserves an article unto itself.

What’s your favorite way to add glitter to your project?

Supplies:


2
Back to Top