Showing posts with label Later Alligator. Show all posts

May 2019 Guest Designer | Jill Hawkins

Happy Day! Jill here with my last post for the month!

For my card this week, I die cut the Geometric Circles from two different pink cardstocks and one white. I then inlaid all the pieces to create a simple central pattern. I stamped the cutie little monkey from the  Wild Ones stamp set,  colored him with Copic Markers and fussy cut him out. I then stamped the sentiment from Later Alligator on a cardstock strip. I then added a simple stitched detail and adhered everything down, using foam tape to give the monkey a little lift. Such a sweet card! I plan to give this to a friend because she is moving.
Hope you all have a great weekend!
Jill

6

My Little Alligator | VIDEO | Natalie Elphinstone

There are two things that I love most about stamps and dies and stencils. One is the absolute endless possibilities they give and the other is that they don't ever 'run out'. So once you've invested in a few products you really have no limit to the amount of different projects you can create. And of course, I'm not just talking about card making! Your Neat and Tangled products work just as well on scrapbook layouts, pocket pages, notebooks, Bible journaling, home decor projects, you name it!


Today I was inspired to create a spread in my Travelers Notebook documenting a phase Shiloh went through as she was teething. First she developed her two middle teeth on the bottom, and then she sprouted her top incisors next. She looked like a little vampire! And keeping in mind I was still breastfeeding at this stage, so it was slightly frightening! LOL! 


Now I know there are all ranges of 'normal' out there, but my other 3 kids had done the standard thing of growing all their middle teeth first, so this was something a little unusual for me. Wondering if my baby was some kind of freak, I turned to the font of all wisdom.... and asked my Instagram followers what they thought ;-) You all reassured me that plenty of your babies had done the same thing and so maybe it wasn't so weird after all!


Anyway, it was still a story worth documenting and I had the ideal stamp set in mind to help me tell it. I figured the toothy chompy alligators from the Later Alligator set would match my theme perfectly, and I was right. A flawless combination of teeth and cute - just like Shiloh!


I created a series of little windows down the side of my page using the stacked circles from the latest release Build a Tag Die Set. Then I filled each one with different images to make a little scene, varying the shapes and images and products to generate a lot of interest. And as always I made sure to leave plenty of space to write my journaling.

You can watch the process of how my page came together in my video today. I hope you enjoy!


Supplies Used:

Later Alligator Stamp Set
Later Alligator Die Set
Friendly Florals Stamp Set
Friendly Florals Die Set
Snake Scales Stencil

Have a nice day!
xx
Natalie
2

Later Alligator - No Line Copic Marker Tutorial by Mindy Baxter


Hello everyone. It's Mindy from My Creative Scoop. I'm back with another Copic Marker Video Tutorial to share. 

This month I'm sharing how to color this adorable little Alligator from the Later Alligator Stamp set. I'm going to show you how to color the no line technique and we are going to keep the color a little on the lighter side to resemble a watercolor look. 

I'm using G20, YG13, YG17, YG63, YG67 W7, E40, E41, E42

I hope you enjoy the tutorial below. 


I hope you enjoyed this month's tutorial I will see you next month with a new coloring tutorial.

Have a wonderful day!

Mindy
6

Later Alligator - Two Simple Cards with Daria.

Hello Dears,

Daria here. So glad you are joining me today. Do you like our latest addition to the critters family from the July release - Alligators and Crocodiles? Actually, I do not know the difference (have to google it, lol), but I do think that Elena's creations are so fun and playful. Plus, I have a friend of mine, who just loves crocodiles. So, of course, I had to play with the set.


I've come up with two cards, and have an idea for the third. It is always like this with me. I start to play with the set without any plan, and inspiration just come from the product. Eventually, I don't always have the time to make them all...

I took a slightly off-white paper with little fibre inserts in it (hope it is seen on the photos). I filled the panel with lots of images from Later Alligator stamp set, then, colored one of the Crocodiles with colored pencils. To finish this card, I used the bakers twine. I like the organic feel of this card.


For the second card, I've decided to go for a more clean look. I used only the portions of images from the same set: stamped, die-cut and then foam-mounted them on a front panel. I also used the patterned paper from Essentials by Ellen line - Modern Graphics by Julie Ebersole as a backdrop. Smile sentiment is from So Many Sentiments stamp set. It was super fast to make. To make it look more busy and less clean, you may also try to add more critters around the panel border. I think it would also look fun.


I hope you liked that simple ideas and will give them a try. Be sure to tag us in social media. It is always so rewarding to see what you create. 

Hugs, Daria. 

***
Neat&Tangled Products used: 

6

So Glad I Found You with Keeway


Hi there! It's Keeway and I'm so glad you're here with me today because I have the cutest alligators in love shared on this card.  In our recent July Release, we introduced the new set Later Alligator. This adorable set had the cutest little reptiles, and I borrowed those alligators create a little romantic card by combining a few different sets.

I stamped the alligators from the set Later Alligator, and the heart from the set Floral Heart. The images were stamped in dark brown hybrid ink and colored with copic markers. Then I used the coordinating Nice and Neat dies to die cut the images out.
I created a simple layout and simply created a radial ink blend of Worn Lipstick and Tattered Rose distress oxide inks. This was to add a focal point and a little bit of a dreamy feel to the pair. I splattered with the same inks. Then, I selected a sentiment from the A-mazing stamp set which I also stamped in the same dark brown hybrid ink.
And finally,  I adhered the floral heart and then alligators to my card with foam tape. It just looks like the left alligator is running towards his love for a nice big hug! Thanks for joining me today and hope to "see" you again soon!


5

The art of paper layering | VIDEO | Natalie Elphinstone

I come from a scrapbooking background, and have patterned paper stashed up for days (actually, to be honest, it will be years!) and rather than just sit back and admire them all I have this ongoing desire to try and actually use them! Shock!!


I feel like sometimes in the cardmaking arena we focus on lots of stamping and colouring and fancy ink techniques ... all of which I love.... but it doesn't whittle away my giant pile of paper!! So you may have noticed that I've been trying lots of ideas lately to achieve the best of both worlds - incorporate lots of patterned paper, but still highlight the cute stamped images.


Not satisfied to simply use a single piece of patterned paper as my background (that wouldn't use up nearly enough of my stash!) I am perfecting the art of paper layering. It's a technique I use with abandon when I'm making my tags, but one I rarely turn to when making cards. But no reason why I can't try a similar thing here, and so I followed my own made-up rules to success and I think it's turned out quite lovely.


In my video today I share the process of how this card was made, and I let you in on all my keys to success when it comes to choosing which papers to use and how to layer them. I hope you enjoy it!


Supplies Used:
Neat and Tangled Later Alligator Stamp Set
Neat and Tangled Later Alligator Die Set
Neat and Tangled Ride With Me Stamp Set
Neat and Tangled Classic Tag 2 Die Set

10

Stamping reflections on water with Bibi + Later Alligator stamp set


Hello everyone,  It's Bibi here and today I'm sharing a video -post with easy tips to stamp images reflected on the water.

You can use the technique explained in the video below to stamp images under the water and with the tips in the video, you will also be able to stamp images reflected on any glossy surface by swapping the colour of the background.

For today, I'm using sweet images from Later Alligator Stamp set and I also used Snake Scales Stencil from the July release by Neat and Tangled.

To colour the card I used water-based products such as markers ( Zigs) and Distress Oxide inks and coloured pencils to add darker or lighter areas and to apply colours to tiny parts of the images.


I hope you like it !

Many hugs  and happy crafting 
x
Bibi

6

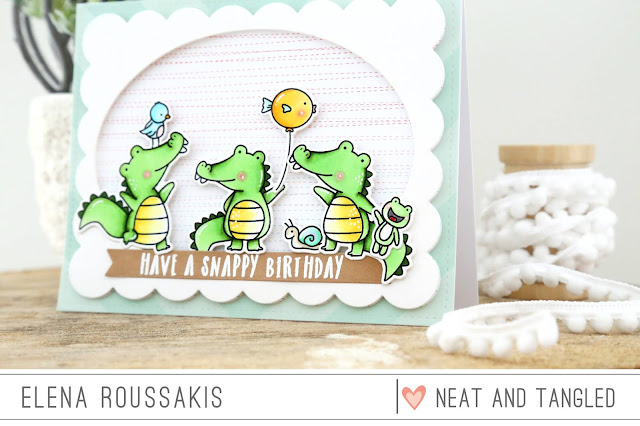
Have a snappy birthday (with Elena)

Hi there!

Elena here, with a fun birthday card featuring some cuties from our newest release:


All 3 of the gators from Later Alligator are here for the party! I also added some of the smaller images from the set. A little bird to perch on top of a gator's snout, a fish balloon, a crawling snail and the frog stuffed animal.


To color the gators, I used copic markers YG11, YG13 and YG67 for the main green of the bodies. I then colored the scales with the darkest color, YG67. The tummies were colored with a trio of yellow copic markers: Y000, Y17 and Y11.


Once I had all of the images colored, I heat-embossed the sentiment onto a kraft banner flag. I then created a frame around them all using the largest scalloped rectangle die from the Scalloped die collection. I cut into it using an oval die from Lawn Fawn and voila! A custom frame.

I used a subtly dotted patterned paper behind the gators, and another striped one on the card base.  Nothing too bold, since I wanted the images to really pop.

I hope you like it! Thanks for stopping by!

♥.
6

July 2018 Release Day 3: Later Alligator + Giveaway

Hello friends! Welcome to day 3 of our July 2018 release week! We've got more great inspiration for you today! Don't forget, all products will be available Thursday, July 5th at 8am EST! 

Each day we are showing off some new products, providing lots of inspiration, and having a giveaway! 

In case you missed 
Day 1: Life's A Game be sure to go check it out HERE!
Day 2: So Foxy + Snake Scales be sure to go check it out HERE!

Today we have a great new set designed by Elena Roussakis. Later Alligator is a snappy 4x6 set sure to make you smile!

 And now for some incredible inspiration! Be sure to head to each design team members blogs for details by clicking on the photos, and for a chance to win a $25 gift certificate! One person will be chosen from among comments on the design team members blogs!


Such cute crocs!
Would you like to win our new Later Alligator stamps and dies? To enter:

1. Be a follower and leave a comment! 
2. Follow us on Facebook and share about release with your friends! (leave another comment)

3. Follow Neat and Tangled on Instagram and repost about our release! Use #neatandtangledrelease (leave another comment)
SaveSaveSaveSaveSaveSaveSaveSave
82
Back to Top