Showing posts with label christine drogt. Show all posts

Neat & Tangled Farewell to Christine

Hey everyone!  The end of the year is always a little bittersweet.  We have some new folks joining the team, but we also have some much loved team members departing.  This week we're highlighting our departing team members and showcasing some of their gorgeous creations from the past year.

Today we're saying goodbye to Christine Drogt.  Christine has such a great eye, and we love how technique savvy she is, she's a definite teacher!

Here are some of our favorite projects from Christine (click on the photo to go to the original post...you'll also be able to see some video tutorials as to how she created the cards).


Aren't they wonderful?  I'm always excited to see what Christine comes up with and I always learn something from her videos.  She is going to be missed!

If you want to keep in touch with Christine, you'll find her here:

Blog:  http://www.kartenchaos.blogspot.com
Facebook:  https://www.facebook.com/Kartenchaos
Flickr:  https://www.flickr.com/photos/59776014@N02/
7

Christmas stamps on a non-christmas card

Hi there, it's Christine!

Today I have a very quick and easy one-layer card that I made using the new Winter Wishes set along with the beautiful Origami Map from last months release.
It's all about color and image-combination. I picked houses, a plane and hearts with a nice sentiment and picked a rainbow color-range for a non-christmas card. 


Having the hearts and the plane are a little off to the side to add a bit of interest and draw attention. Details can be easy but have a big impact. (And that's why the little grey corner on the yellow house drives me mad... YES is does!)


What kind of cards would you like to make using the little houses from Winter Wishes? Maybe you have some inspiration for me!

Hope you have a nice day!

Smiles.
Christine

5

Quick and simple one layer Christmas cards (using non-christmas stamps)

Hello crafty peeps,

it's Christine.
I have 3 types of quick and easy Christmas cards to share. I guess you all know them:

Many people start mass-producing cards for Christmas, so I thought I'd share three one layer cards that can easily be mass-produced.. They're all quick and easy, but some are even quicker that others ;) And the best thing: You don't even need any Christmas stamps for the following projects:


Type 1: "There's plenty of time left, so I'll mix some techniques"
  • Ink your On the corner die with Versamark before you place it on your cardbase and run it through your die-cut-machine
  • Remove the die and sprinkle on some glittery embossing powder to accentuate the cut frame. Heat emboss.
  • Stamp the sentiment from on the corder additions.
  • Add some sequins (Birthday Bash Mix) and gems
  • stick some washi tape to the bottom of the card
  • round the top corners.


Type 2: "November already, let's do something less time consuming"

  • Stamp and emboss your sentiment from Sparkle and Shine in White
  • Also stamp and emboss the Circle from Sparkle and Shine and the circle from Creepy Cute
  • color the circles with watercolor.
  • remove color from white embossed areas.
  • color gems in matching colours using Markers (Copic for example) and add them.


Type 3: "Oh gosh! December 18th already and I still need a bunch of cards. it MUST be simple!"

  • stamp the Time Warp background in gold ink (I uses Brilliance)
  • Stamp a star from Photo Booth and the Sentiment from Sparkle and Shine and gold emboss both.
  • Round the corners.


That's how it works, right? ;)

I hope this inspired you to use your non-Christmas Neat & Tangled stamps for quick and easy Christmas cards :)

Used products:
On the Corner - Nice and Neat Die

Photo Booth On the Corner Additions Sparkle and Shine


Time WarpCreepy CuteBirthday Bash Sequin Assortment


6

Release After Party Day 2

Hello crafty friends,

Christine here!
It's my pleasure to  bring you more inspiration using the October release stamps. Just like Anna told you  yesterday the international girls celebrate a fabulous release-after-party with you.

I have five cards to share with you today:

I instantly fell in love with Origami Map! It screams for watercolor, but I wanted to challenge my self not to use a emboss-resist technique! So this map ist mostly grey and twi countries/sport are colored in aqua. One got a pin-needle, the other one a heart. Mapping can be so much fun!


 Living in Germany we don't really celebrate thanksgiving or Halloween, so I don't have a lot of  pumpkins in my stamp collection. This one is pretty cool with it's super bold lines. It's from the Be Full set.


The next card is VERY graphic. I used the plate from My plate is full to draw attention to the sentiment and used forks, knifes and spoons in light colors to have a nice background.


As I said - thanksgiving isn't popular over here ;) So I used the turkey for a Good luck/Hello card using some washi with sentiments and just let the turkey from Turkey Talk gobble ;) Isn't he cute?


 Next up maybe my favorite card. I used the skull from Creepy Cute (a set beyond cuteness!!!) with some spiders and Creepy Cute Shadows and Sentiments. There is a bow in that set, but I created another bow made of bones. (Maybe that's hard to see). I just puffy heart love the bad to the bone sentiment!

Another card that's more cute than creepy is this one: a CAS one layer card using the bat from Creepy Cute.


Hope you enjoyed this little inspiration-parade. If you haven't ordered your stamps so far - you should - they're adorable!

Thanks for stopping by and taking the time to check this post!


Used supplies:


8

Card in Collage Style

Hello everyone,

it's Christine. :)

Today I'd like to talk about collage style cards. I think many of them look so cool -- but I have a hard time putting them together.
Well, I still tried it today, hehe:


I thought that for the collage style I'd need:
  • different embellishments
  • different layers
  • a nice color combo
  • a focal point
I used the Punchinella Background Stamp to  have a graphic, yet colorful background.
My layers are the tag and the girl from Gift for you, but I made sure to add more images (the cake and the tiny heart-speechbubbles. For embellishments I used some ribbon, floss and sequins in Tangerine to add a second color.
I think I need more of all the small scrapbooking-supplies for the collage style. It looks so cool when others create something simple but full of detail!
What are your favorite supplies for collage-style cards? Do you have any pinterest boards that could be helpful for me? I'd love to know - thank you!

Have a nice day!


PunchinellaGifts for You

Tangerine Satin Sequins

6

Pop it up!

Hey there,

it's Christine :)
In my last post I talked about arranging sentiments in different directions. I did it again ;) But on top, I played with dimension.

I really like to stamp backgrounds twice - straight onto the background and once onto a die that is placed right on top of the background. This time I used a few die-cut to give some interest and dimension to a quite simple card. I knew this card would be a bit busy, so I made sure to have a very simple solor scheme with kraft, brown and white.

I started by stamping the Time Warp background with versamark ink and embossed it with briown embossing powder. Then I adhered the die cuts into some scrap paper in a pattern that I liked and stamped with versamark again. This time I used white embossing powder to make the white pop on the kraft cardstock. The rest was like a puzzle: I adhered every die cut onto the right place and popped them all up with dimensional adhesives. To make the sentiment from A Long Time Ago stand out even more I decided to go for the dark brown again. I cut a strip of brown cardstock, white embossed the first part if the sentiment and adhered it directly to the front of the card. The larger part of the sentiment was brown embossed. To add a little detail and break up this very simple color scheme I added a tiny heart with lots of glossy accents on it :)


You can see the dimension here: it really adds interest, don't you think?


Thanks so much for stopping by, enjoy the rest of your weekend!

Christine

Time WarpA Long Time Ago


6

Create A Smile Stamps Blog Hop!

Hello friends! Danielle here today hopping along for the Create a Smile August release! You should have arrived from Mayuri's blog!
Create a Smile are a new stamp company in town, designed by our own design team member, Christine! Their first stamps were released in July 2014. The stamps are made of high quality photo-polymer and produced in Germany. They will for sure make you smile! Create a Smile is releasing two sets TOMORROW! You can find their store at www.createasmilestamps.com. There are TWO fun sets filled with super cute images, available for purchase at 8am CET (2am EST).

You can win a $15 gift-certificate for the store - all you need to do is hop along and leave comments on all the fantastic and inspiring stops (one comment per person, per blog please!). We’ll pick a random winner from all the comments - so the more blogs you visit, the more chances you have to be a winner! You have until Saturday August, 9th 8am CET (that's 2am EST). The winner will be announced on the Create A Smile Blog on Sunday (July 13th)

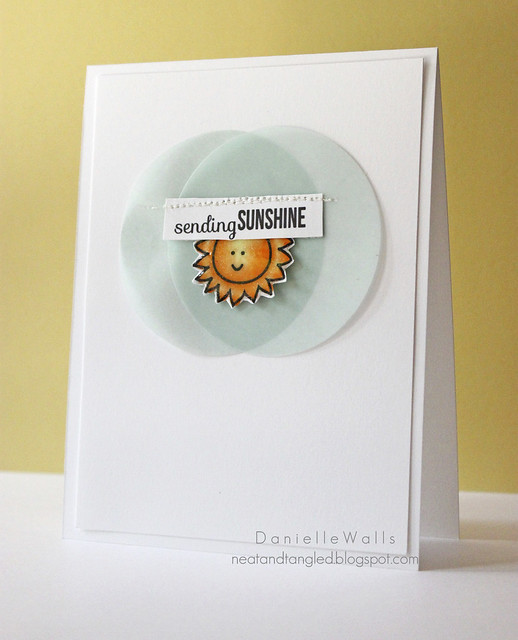
To make things fun, Christine took a poll on Facebook asking for some challenge ideas. Those of us doing the hop each chose a challenge to use to create our projects. I chose the challenge to create an encouragement card for a sick child. As a mother of three little ones I know the smile a special card can bring!

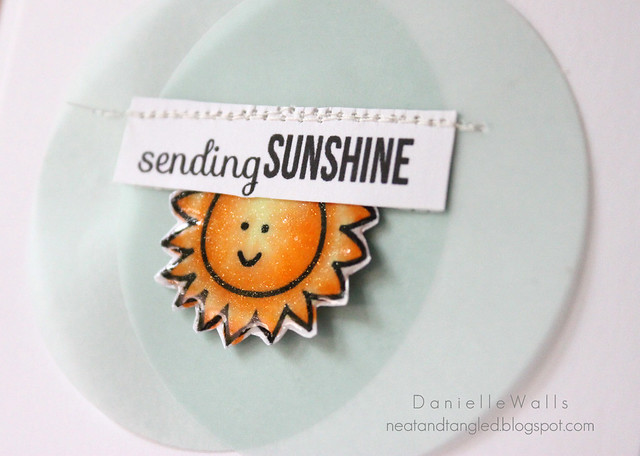
I used the little sun and sentiment from the Your View set. I colored and cut out that sweet little sun and adhered it behind the sentiment I stamped and cut out. I then die cut two circle from some colored vellum and adhered the sun and sentiment on top.  To finish it up, I adhered it all to my card base and did a little stitching.
sunshine2
For my sun I colored him with a Wink of Stella pen and covered in Glossy Accents!
sunshineclose

The next stop on the hop is my friend, Amy Tsuruta!

If you got lost, or are just getting started here is the full order:

Danielle Walls (you are here)

Happy Hopping!
Danielle

30

A happy birthday

Hi there!
It's Christine with a quick post on "Adding interest by irritation."

We all know that: we create a card and while we're working on it (or even before we start) we try to find the right placement for all the elements. One of the most important elements (for me) is the sentiment.
The sentiment decides if people start thinking, giggling, smiling,...(insert any reaction here) and it's important that the sentiment goes well with all the elements on the card, especially if you use punny sentiments.
There are many sentiments that work on nearly every card, such as birthday sentiments. So if you want to make those sentiments special and make people focus on them you want to add some interest. You can do that by painting a focal point as a backdrop for your sentiment (like Joni Andaya did in this post) or keeping the rest of the card pretty simple (like Danielle did here). You could also use embellishments to draw the eye to your sentiment. 
But one other way to add interest to your sentiment is: Make it unusual - irritate the eye.

For my card I created a quite busy background with Sparkle and Shine. So I really wanted the sentiment to pop on that background. I did this by color (Bold black on soft light colors looks good, right?) and by an unusual placement. I used the Every Day Labels Set  because this set gives you endless possibilities to combine your sentiments. I went for an unusual placement (but kept in mind that we tend to read from top to bottom and from left to right!) 
I think this makes the sentiment more interesting and adds something "special" to the card.


I also added some embellishments, that I created with the stamps. I stamped the stars, cut them out, but them on toothpicks and added a thick layer of glossy accents. I used the same colors that I already used for the background - this way the embellishments are not distracting but still add some dimension and interest.


Okay, that's it for now. Maybe you feel inspired to get out your sentiments and try something unusual. :)

Thanks for stopping by, have a great day!
Christine

7

Scrapbook Adhesives by 3L Week Day 4!


Hello friends! We are so excited to be teaming up with our friends at Scrapbook Adhesives by 3L to bring you LOTS of inspiration (and some great prizes) this week! They have amazing products that include 3D foam squares and shapes, Dodz, E-Z Runner tape dispenser, Adhesive Sheets, and tons of other amazing options! After you view the projects here be sure to head over to their blog for even more! In case you missed:


First up we have this bright beauty from Christine using our Sparkle and Shine set! Don't those diamonds look like they are glowing? My goodness!  She used Scrapbook Adhesives Foam Dots for some dimension, as well as the EZ Runner to adhere all the elements.


And we have this freaking amazing card by Yana :) She used our On the Corner stamps and new die!

Alright, now head on over to the Scrapbook Adhesives by 3L blog to see more projects!

Be sure to comment on both blogs throughout the week to win a prize pack including a selection of Neat and Tangled's most popular stamps and sequins valued at over $25 as well as a selection of popular products from Scrapbook Adhesives by 3L valued at over $25! That's over $50 worth of awesome product! Two winners will be chosen! 

Don't forget to stop by everyday this week for more fun! :)

27
Back to Top