Showing posts with label Francine Vuillème. Show all posts

Happy Birthday with Francine Vuillème

Hi crafty friends! Francine Vuillème here! I’m back on the Neat & Tangled blog for a last guest spot.

Today, I’m showcasing the Mail Background cling stamp. Here is the card I’ve made:


I started by creating a top-folded card base and adhered colorful patterned paper to the card front. Next, I stamped the Mail Background stamp in light gray ink to the semi-circular stitched shape. I adhered the shape to the card front using foam pads for more dimension. I stamped the background to a piece of white cardstock again but this time in black ink and cut just one envelope. I used a character from the Piece of Cake stamp set that I stamped in black ink, colored and cut with scissors. I fixed the sweet boy behind the envelope and adhered both to the semi-circular shape using foam pads. The sentiment is from the Little Monster stamp set and was heat embossed with white embossing powder onto a strip of black cardstock. To finish off my card, I added a few colorful enamel dots.

I hope you’ve got inspired by this card. This was my last guest spot so far. It was a pleasure to play with all these adorable stamps during the last three weeks. Thanks to the Neat & Tangled team for having me as a guest this month and for the lovely comments!

Sending smiles from Switzerland!
3
Hi crafty friends! Francine Vuillème here! I’m thrilled to join the Neat & Tangled blog for a new guest spot. 

Today, I’m featuring the super sweet Mommy, Daddy and Me stamp set. I’ve decided to create a birth card using the baby bear and his Mommy (or maybe Daddy):


How cute are these critters? I just love them. The bears and the branch (which became a tree) are from the Mommy, Daddy and Meset. The bunny is from the Ride with Me set and the sentiment is from the Itty Bitty Welcoming Committee set. I started by creating a top-folded card base using white cardstock. I sponged the clouds using a stencil with blending tools and Brocken China Distress ink. I stamped the sentiment in black ink. I die cut a grassy border from green cardstock and adhered it to the card front using foam pads. Next, I stamped the images in black ink, colored them, cut them with scissors and adhered them with foam pads as shown to create a sweet scene. To finish off my card, I added a red heart bellow the sentiment.

I hope you’ve enjoyed this card inspiration. Have a great weekend and see you next Saturday for my last guest spot.
2

Introducing our March Guest Designer, Francine Vuillème

Hi crafty friends! Francine Vuillème here! Maybe some of you already know me as I was part of the Neat & Tangled DT in 2016. But for those who don’t, here is a bit more about myself.


I live in Switzerland in the wonderful Three Lakes Region with my husband and our sweet little Papillon dog called Max. I’m also a cat lover (I always had cats before having Max but trust me… he is a cat in a dog body LOL). I couldn’t live without animals by my side and cuddling them makes me SO happy! I’m bilingual in German and French.

Crafting is a form of meditation for me and it reminds me of my childhood. People say that my creations are clean and colorful but I like playing with different styles, mediums and techniques. It depends on my mood and inspiration. I love coloring, creating watercolored or ink blended backgrounds, making splatters, using stencils, thinking out of the box and adding rainbow and bright colors to my designs.

For my first spot, I decided to feature the Paint Night stamp set. Here is what I came up with:


I started by creating a watercolor background using Distress inks and watercolor paper. Once it was dry, I cut the panel down to size and adhered it to a top-folded card base using tape adhesive. Next, I stamped the images in black ink, as well as the sentiment. The sweet girl and the sentiment are from the Paint Night set. The sand bucket from the Beach Day set became a paint bucket. The butterfly is from the Mommy, Daddy and Me set. I cut the colored images using scissors and adhered them to card front using foam tape for more dimension. To finish off my card, I added a tiny red heart to the sentiment and Wink of Stella clear glitter to the images.

That’s all for me today! I hope you’ve enjoyed this post and my card inspiration. Special thanks to Neat & Tangled for having me as a guest and see you next week with a new post!
6

Design Team Reunion: Francine Vuilleme

Hi everyone! Francine Vuillème here! I’m so excited to join the birthday celebration and the design team reunion! What a wonderful idea! I was a DT member in 2016 and I still remember how happy and excited I was to join the team! 

Thanks so much Danielle for having me for this celebration and HAPPY BIRTHDAY! You are such a kind and beautiful woman (inside and out). I’m proud to be part of the N&T family and I’m honored to guest for you today! Good luck for the next years of this fabulous crafty adventure! 

For this event, I created this card:

I used the pirate set called Yo Ho Ho. I love all characters in this set and I thought the flag would be perfect for a birthday sentiment. I masked the pirate skull on the flag and I then stamped the Happy Birthday text that I found in the Beach Day set. I colored the pirate and cut him out with scissors. I added jeans texture to the pants using a piece of fabric. I sponged the front panel of a top-folded card base with yellow Distress ink using a blending tool. I adhered the image with foam pads to the card base as well as a sandy hill that I die cut from Kraft cardstock. I glued tiny stars and sequins here and there for a festive look. To finish off my card, I added Wink of Stella clear shimmer over the rainbow sweater. 
  
I hope you enjoyed this project! Have wonderful day and happy crafting!

Francine
9

A happy card and a little break...

Hi everyone! I’m back with my latest card for Neat & Tangled! Today, I decided to feature the Origami Map stamp set: 


This stamp set is fabulous! I only used a part of the stamp. I stamped it with Versamark onto watercolor paper and heat embossed it with white embossing powder. I colored the image with Zig Real Brush Pens. The colors are so bright and beautiful! I sponged the background with Distress ink. The label is from the Everyday Labels set.

Here are the sets I used:


I hope you like my creation! This is also my last card for Neat & Tangled so far! I decided to make a little break but maybe I’ll be back at the end of the year! Thanks so much Danielle for your kindness and letting me work with your fabulous stamps!!! <3

Have a wonderful day and thanks to all Neat & Tangled fans for the lovely comments…


1

Get crafty with Francine – Watercolor Bubbles Video Tutorial

Hi everyone! 

Francine here with a new video tutorial! Here is a close up of my card:


Today, I’m going to show you how to create watercolor bubbles with Distress inks. For this card, I decided to feature the Everyday Circles stamp set and I thought the "Hello" sentiment would be perfect with this bubble design. This set is probably one of my favorite sentiment stamp sets! You can use it in so many different ways. It’s a "must have" in my (your) sentiment stamp collection.


TIPS & TRICKS:
  • Draw circles using a circle template to create a unique design.
  • Choose two shades to color each bubble. This will add interest and create more depth.
  • Let dry before you color the intersecting circles.
  • Try different techniques with this design: use watercolors, Zig or Tombow markers, pencils or alcohol markers.


Watch the video below (or HERE) to find out how I created this card:   


I hope you like what you’ve seen! Stay tuned: the May release week starts tomorrow!


8

Get crafty with Francine – Non-traditional birth card + VIDEO

Hi everyone! Francine here with a new video tutorial! Here is my card:


Today, I’m going to show you how to create a non-traditional birth card, without babies and cute images. I used a Christmas set!!! Yes, you’ve read correctly (lol)! The houses are from the Winter Wishes stamp set and the sentiment from the newest Itty Bitty Welcoming Committee set. I stamped the houses with MFT dye inks on Neenah Solar White cardstock. I chose to create a rainbow using 8 colors (Razzle Berry, Orange Fizz, Daffodil, Limelight, Blu Raspberry, Lush Lagoon, Blue Breeze and Grape Jelly).

TIPS & TRICKS: try to think out of the box and create birth cards without traditional birth images like babies, animals, cute things, etc. It’s a fun challenge and a perfect way to use bright and happy colors.

Watch the video below (or HERE) to find out how the card was created:


Click the HD ICON TO WATCH THE VIDEO IN BETTER QUALITY


***SUPPLIES I USED***

Stamps: Winter Wishes and Itty Bitty Welcoming Committee (Neat & Tangled)
Dies: Circle STAX, Stitched Circles and tiny heart (My Favorite Things)
Inks & co.: Black Archival ink (Ranger), Peacock Feathers Distress ink (Ranger), My Favorite Things dye inks: Razzle Berry, Orange Fizz, Daffodil, Limelight, Blu Raspberry, Lush Lagoon, Blue Breeze and Grape Jelly
Paper: Neenah Solar White cardstock, red cardstock (Bazzill)
Other: foam pads, blending tool, Mini MISTI stamping tool


I hope you like what you’ve seen! That’s all for me today! Thanks for stopping by…


6

Get crafty with Francine – A different way to use the Hexastar die (video)

Hi everyone! Francine here with a new video tutorial! Here is my card:


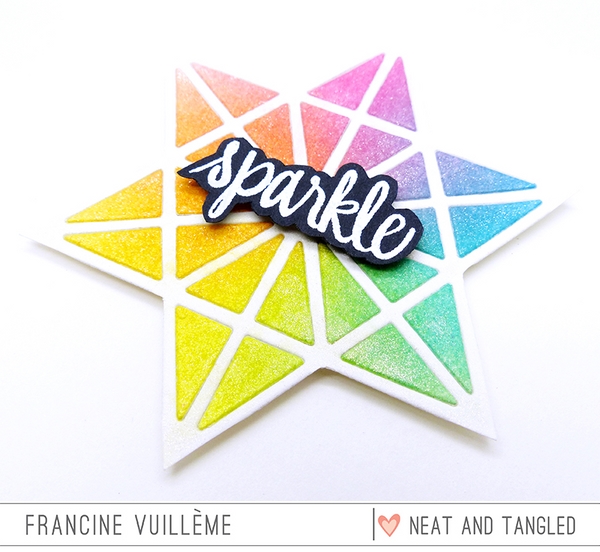
Today, I wanted to show you how to use the Hexastar Cover Plate die in a different way! You can die-cut the plate from cardstock, use it as a stencil but also create new shapes as I did with the star. The sentiment is from the Sparkle and Shine stamp set. 

Watch the video below (or HERE) to find out how the card was created:


TIPS & TRICKS: with the inlaid technique, use dryer sheets to hold the pieces in place!


Here is the Hexastar Cover Plate die I used in the video: 


I hope you like what you’ve seen! Thanks so much for watching and happy crafting!

7

Get crafty with Francine – February card & video

Hi everyone! 

Francine here with a new video tutorial! Here is my card:


I love the new Perfect Blend stamp set from Neat & Tangled! I already made a few cards with it for the release week and it is super versatile! It’s really fun (and important) to have such sets that you can use again and again! This set also allows to make graphic designs what I like so much!

TIPS & TRICKS: Try to think different and don’t color the whole stamped image! Add color to the detail you want to focus on and play with colorful backgrounds.


Watch the video below (or HERE) to find out how the card was created:


I hope you like what you’ve seen! Thanks so much for watching and happy crafting! 


6

Get crafty with Francine - January card & video

Hi everyone! Francine here!

Today, I'll share my first video for Neat & Tangled with you! Here is my card:


I love the wonderful splatter from the Ink Splash stamp set! I decided to stamp it in rainbow colors using Distress inks. I also added a layer of Wink of Stella clear pen for more glitter and it looks beautiful! The paintbrush is from the Crafting is my Jam stamp set. I colored it with Copic markers. The sentiment is from the Sparkle and Shine set. 


Watch the video below (or HERE) to find out how I made this card!


I hope I've inspired you to stamp some rainbow splatters too! :-)

Don't forgot to stop back on Monday for the start of our January release week! You can get a first look at the new products HERE and HERE.

Thanks for watching and have a wonderful day! 

21

Design Team Addition! Introducing Francine Vuillème

Hello friends!

I am here today with a very special post. I am so happy to introduce you to our newest design team member,  Francine Vuillème. Francine is AMAZING. Her work always catches my eye, and I am so excited to say that she will be doing a monthly feature for us!

Here is a little about Francine:

My name is Francine! I live in Switzerland in the wonderful Three Lakes Region with my sweetheart and our cats. I’m bilingual in German and French from birth. English is not my native language but blogging in English is a good (and fun) way for me to improve this beautiful language! 

I discovered scrapbooking and cardmaking in 2009 by leafing through a book and it was love at first sight! I like playing with different styles and techniques. It depends on my mood and inspiration. But I always love coloring, rainbow and bright colors, making splatters, using stencils and blending tools, paint brushes and watercolors. I started my blog – called 1001 cartes (1001 cards) – in 2011 and my YouTube channel in 2014. You can also find me on Instagram.  

When I’m not crafting, I spend my spare time cooking, playing bowling and party/board games with friends, taking walks along the lake or making one day boat trips with our little boat during Summer. I couldn’t live far from a lake and without my cats! Cuddling with them makes me SO happy! I’m an animal lover! <3
________________________

 And she created a card for you today using our new Santa's Ride stamp set! Her coloring is phenomenal!
Be sure to leave some love to welcome Francine to our Neat and Tangled family!


15
Back to Top