Showing posts with label Delicate Dots. Show all posts

Pink + Gold Card with Daria Grushina [VIDEO]

Hello-hello Awesome People!

Daria here. I was playing with Floral Frame Stamp and die set. And there is a video too. There is lots of heat-embossing, pink and gold. So, it turned out to be very girlish birthday card. 


Here, you may find the process:


I started with stamping the Floral Frame with Versamark Ink and heat embossed it in gold embossing powder. Then, I die-cut it using coordinating die.


Next step was to stamp the Delicate Dots Rubber Background stamp to the pink panel. This beautiful colour of cardstock comes from Over The Rainbow Assorted Cardstock Pack. I used the central portion of the Floral Frame that left after die-cutting to mask the center. This way, I had a space for the sentiment free from the background dots.


I heat-embossed the sentiment from the same stamp set in the middle of the panel, using white embossing powder. I adhere the frame with foam tape. I also added a few sequins here and there for some extra shine.


This card turned out to be really tender. I love the combination of pink, white and gold.  Plus, it is completely made with heat embossing, and I love heat-embossing. Each time, it is like magic. Hope you like it (wink).


Thanks so much for stopping by, and see you next time,
xoxo,
D.


ps: There is another project, I've done with the same Floral Frame Stamp and die set. You may find it here, including a process video for the card. 
0

XOXO Card with Daria Grushina

Hello-hello Awesome People!

Daria here. Hope you have a lovely weekend as well as some time for crafting. As I have for you a very simple card to make. I used only three products: stitched heard die from Love Mail die set, Just Because stamp set for sentiment and Delicate Dots Rubber Background stamp


I started with die-cutting hearts from different types of paper. I used left-overs from my stash: woodgrain embossed paper, gold metallic paper, one in yellow from Over The Rainbow Assorted Cardstock Pack... I also had a piece of vellum previously embossed with Delicate Dots background in gold embossing powder. 


Then, I made some stamping. I used Versafine Onyx Black ink to stamp a XOXO sentiment from Just Because stamp set on one of the hearts. I also stamped the background stamp directly to the cardbase. I usually stamp a few of those to have them on hand, as I really love those dots as a background for my projects. 


Final stage is to glue everything together. I used foam tape to do so. For vellum heart, I placed a tiny square of foam adhesive behind the sequin. There is a double layer of foam tape for the yellow heart. 


That's basically it. As I told you - quite simple and easy. Hope you liked it and may be will give a try. Thanks so much for stopping by. 


Some of the products I used today are on sale ;) You may also sign up for notification for those that are not available at the moment.  

xoxo

2

A Colorful Day with Koren Wiskman


Koren Wiskman, Neat and Tangled, pink trees, green grass, little girl painting, greeting card, have a colorful day, paint night, stamping, coloring, die cutting, scene

Hello everyone, Koren here, with a card that is sure to bring color to your day! I'm using the Neat & Tangled Paint Night stamp set to create this card. This stamp set, as of the time of writing this post, is both in stock and ON SALE!! Every crafter needs this adorable stamp set and supply is limited.  

Background:
To create this background, I masked a nice size square in the upper two thirds of my card panel which is cut to 3 1/2 inches by 4 3/4 inches. I am NOT afraid of white space on a card, in fact  I welcome it, so I like to build my scene this way often- leaving lots of white space below the focal parts of the card. 

Once the background area was masked off, I used a mini cloud stencil to create some soft pink ink blended clouds. To do this, I used blender brushes and Distress Oxide ink in Picked Raspberry. Not only did I ink the clouds but a also went around the outside of the square to fade into white. Giving the clouds a bit of a highlight. 

Koren Wiskman, Neat and Tangled, pink trees, green grass, little girl painting, greeting card, have a colorful day, paint night, stamping, coloring, die cutting, scene


To create the ground, I used some green cardstock cut to the same basic dimensions of my background square. It really doesn't matter what size background you create. I used a hill edge die from my stash to cut a simple ground. This piece will get popped up using foam tape. 

To give the background some life, I took some Cotton Candy cardstock and loaded it into my Original MISTI along with Neat & Tangled's Delicate Dots background stamp. I used the same pink ink as before to stamp some tone on tone dots. I used this beautiful creation to cut out my trees from a tree builder die set I have in my stash. I made two trees one to adhere flat to the background and one to pop up. 

Images:
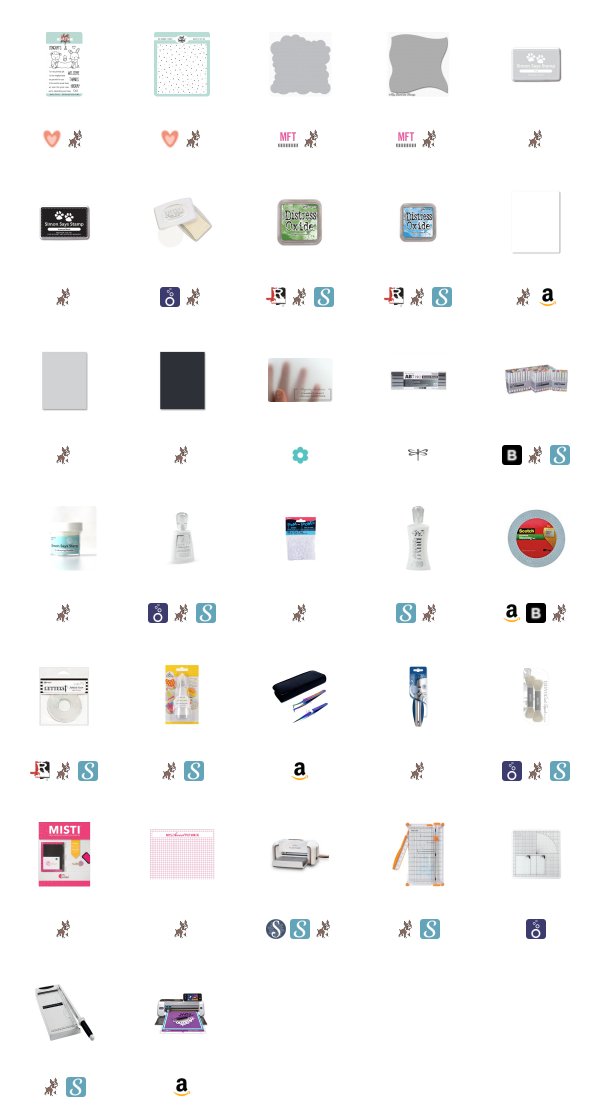
I stamped my image from the Neat & Tangled Paint Night stamp set using black alcohol marker friendly ink onto some heavy-weight white cardstock. I then used some alcohol markers and colored pencils to color this image. Starting first with a base coloring with my markers and then deepening the shadows with the colored pencils. I cut this image out and popped it up using foam tape. I have made a color map listing all of the markers and pencils used to color this image. 


Sentiment:
As for the sentiment, I stamped "have a colorful day!" using the same black ink. This time I used a speech bubble die to cut it out. This too was popped up onto the background using foam tape. 

The entire panel was added to a size A2 top folding card base. 

I hope that I've inspired you to create something today, 

Koren 

1

Vellum Overlay Card with Daria Grushina [VIDEO]


Hello-hello Awesome People!

Daria here. Today, I am playing with Grateful Heart stamp and Delicate Dots Background Stamp. And again I have a very simple to make yet elegant card to share. Moreover, I've managed to film a short video process for you. Hope, you'll like it. Here is it:


And some more close-up photos:


I started with heat-embossing. I used a left-over piece of vellum from previous project and heat-embossed the Delicate Dots Background Stamp in gold embossing powder from Hero Arts over a vellum from the latest Over the Rainbow Assorted Cardstock Pack.


Then, I stamped a flower from Grateful Heart stamp set over my card-base with Versafine Onyx Black. I love this monochromatic pattern, and I actually already made a card using it. If interested, you can check it out here. There is a video too.


Maybe you remember, that I had a left over flower from previous project, so, I've decided to use it today. I coloured the flower cluster from Grateful Heart stamp set with alcohol markers in light shades of lilac.  Then I used coordinating die to cut it out. 


As about sentiment, while I was making this card and shooting a video, I thought that these dies are still available. But, unfortunately not :((( I am very about that. But, that is a great chance to look into your stash and find something similar. There were a lot of similar designs at Neat and Tangled over a past few years: Awesome, Amazing, Celebrate, Hooray, You are Pretty, Hello...  Good news, that those coordinating stamp sets are still available and you can get them a super discounted price. Here are the links for Just Because and Love Notes stamp sets.


I finished it up with a few banner shapes made with Skinny Stripes die set, just to add that extra something. I glue everything to the vellum using foam squares behind the flower and sentiment. Then I used Tombow Adhesive tape dispenser behind the flower and banner to overlay my entire vellum piece to the stamped cardbase.


That's it. Hope you like these simple idea and will give it a try. 
xoxo

6

Welcome to the Neighborhood with Koren Wiskman


Hello everyone, Koren here with a cute card using the Neat & Tangled Itty Bitty Welcoming Committee to greet someone new to the neighborhood. With all of the chaos surrounding us, I thought I would concentrate on spreading some kindness instead of germs. This stamp set is currently on sale in the online shop.

I started with a piece of Neenah 110 lb. Solar White cardstock cut to 3 1/2 by 4 3/4. I used one of the cloud building stencils from my stash to ink blend some clouds in the sky. I used my Nuvo Blender Brushes and Distress Oxide ink in Salty Ocean to create them. I then moved on to the bottom portion of my background and used Distress Oxide ink in Mowed Lawn and my drifts and hills stencil to ink blend some ground.

I took another piece of that same white cardstock and loaded it and the Neat & Tangled Delicate Dots Background stamp into my Original MISTI. I stamped the dotted design onto the white cardstock using Simon Says Stamp's Fog ink. I then cut an oval into the center of the panel using a retired Neat & Tangled die set called Card Front Designs but any oval die around this size would do the trick.


I wanted to make the sky and hills slightly more muted in color. Instead of recreating the entire background I cut a piece of heavyweight vellum to the same size and placed it over top of the cloudy sky background. This muted the colors and created almost a haze effect to help the background fall away. I love how this looks.

Now that I had a nice background for my images to live on, I needed some focal images. I stamped the characters from the Neat & Tangled Itty Bitty Welcoming Committee onto the same white cardstock using Simon Says Stamp Intense Black ink. This ink is alcohol marker friendly and I used both Copic and Tombow alcohol markers to color my images. I have created a Color Map to show you each marker used to color the images on this card. I have to say, the NEW Tombow ABT Pro Alcohol Markers are really great. I highly recommend checking them out if you like to color with alcohol markers. These are good!


I wanted to add a little something different to these images after they were colored and cut out. I took some pastel rainbow patterned paper I had in my stash to paper piece the blanket or banner the two critters have stretched across the scene. This is easy to do, just stamp the same image onto the piece of patterned paper of your choice and cut it out using some nice cushioned grip scissors. I then glued all the pieces in place using some liquid glue.

I loaded my paper pieced image into my MISTI and arranged the "welcome" sentiment to be stamped on the banner image using the same black ink as before. For the sub-sentiment "to the neighborhood" I stamped it using embossing ink onto black cardstock and heat embossed it using white embossing powder. I used my Fiskars wire guide paper trimmer to cut it into a strip.

I adhered the cloud panel directly to my Simon Says Stamp Fog card base and then used tear tape adhesive around the outside edge to adhere the vellum piece making sure to hid the adhesive the best I could. I then used foam tape to pop up the oval aperture panel. The images were all popped up using the same foam tape. I used clear foam adhesive to pop up the sub-sentiment because I wanted to make sure it was not seen.


To finish off the card I added Nuvo Crystal Glaze to the crown and tiny white pom poms to the tops of the party hats.

I hope that I've inspired you to create something today and maybe spread some kindness.

Koren


2

Video: A look at the February Release and a Card Using Butterfly Beauties


Hello everyone. Koren here today, and I have a new video for you. In this video, I take a look at the NEW February release and make a beautiful card using the new supplies. I use the NEW Neat & Tangled Butterfly Beauties stamp set and coordinating die, as well as the Delicate Dots background stamp.

I started with the NEW Cardstock Assortment Pack to create an A2 size card front and stamped the Delicate Dots background stamp using black pigment ink.


I cut two camouflaged butterflies from the background using the coordinating die for the Butterfly Beauties stamp set and seated them back into their negative spaces, and popped them up using black craft foam.

The main focal image is also from the NEW Neat & Tangled Butterly Beauties stamp set  and was colored using some of my favorite colored pencils.

I hope that you will feel inspired to create with this wonderful NEW release. I also have a Color Map for you using Faber Castell Polychromos Colored Pencils.


Thank you so much for spending time with me today.

Koren


4

Two Confetti Cards with Daria

Hello-hello Awesome People! MERRY MERRY CHRISTMAS!!! 

Hope you have a wonderful holiday season with your families filled with magic and love.


Daria here. And for  today's projects I was inspired by loots of confetti and christmas lights everywhere. So, I die cut lots of circles from coloured and glitter cardstock using Circular die set.

Then, I randomly arranged them onto my card-bases and adhered everything with foam squares from Scrapbook Adhesives.


I had two card-bases, one stamped with Delicate Dots rubber background stamp and one made from woodgrain embossed card-stock. 


For both of the cards, I added sentiment from Classic Christmas stamp set.  I stamped them onto banners made with Skinny Stripes dies.  


Hope you like these simple ideas and will give them a try. And Happy New 2020 Year! YAY!
Wishing you lots of crafting, inspiration and joy into the upcoming year.


Love,


D.

3

Two cards with Lots of Foliage with Daria

Hello-hello Awesome People! 

Daria here. And I have for you quite spring feel cards. Don't know what happened in the middle of Christmas cardmaking, but, here they are: 


I had a little bit of time, and a lot of scraps from coloured cardstock. So, I took my big-shot and Foliage Frame die set and cut looooots of foliage. 


I had two card-bases, that were stamped with Delicate Dots rubber background stamp: one in black and one being heat-embossed in gold. 


It took some time to arrange all the leaves. Here is a little tip: adhere your elements in sections. When there is so much little elements, it's much easier to control the position of every single one. 


For both of the cards, I added sentiments from  Typed Sentiments stamp set  and So Many Sentiments stamp set. I stamped them onto colourful banners made with Skinny Stripes dies.  A few enamel dots  from Sophisticated Enamel Dots set became a perfect finishing touch.


Thanks so much for stopping by,
Have a wonderful day,

D.

ps: I have a video footage for these cards, let me know if you'd like to see a process video. xoxo

1

Two Cards from One Left-Over Piece with Daria


Hello-hello Dear Friends,

Daria here.  I am not sure you remember, but last time I've played with the Grateful Heart stamp set I've ended up with an extra piece. When I don't know how to finish a card, I usually leave it for some time and then try to look at it from another angle.

That is the case with today's projects.


I had bright yellow panel heat-embossed with flowers from Grateful Heart stamp set. You can find the  process video here. It is the same steps in creating the panel: heat-embossing and then adding dimension with distress inks.

At first, I though that it will be a card with the totally yellow front panel. But then, I've decided to cut  the panel in two and placed them into card-bases, that were previously stamped with Delicate Dots rubber background stamp.


Basically, I am playing with asymmetry. When you place your elements on a card slightly (or not so slightly) asymmetrical it creates a visual movement as force an eye to follow.  Pairing asymmetry with geometrical shapes creates quite a modern look.

So, for my first card, I've placed the sentiment asymmetrical towards the yellow panel (picture above).

I went even further with the second card. I played with asymmetry of yellow panel. I positioned it towards right corner of the card front. I like the look. It is a little bit unusual. Hope you like it too, and may be will give it a try.


For both of the cards, I added several sentiments from  Typed Sentiments stamp set  and So Many Sentiments stamp set. I stamped them onto colourful banners made with Skinny Stripes dies.  A few enamel dots  from Sophisticated Enamel Dots set became a perfect finishing touch.

Thanks so much for stopping by,
Have a wonderful day,

D.

4

Little Flower Patterns with Daria

Hello-hello Dear Friends,

Daria here. Today, I am playing with Grateful Heart stamp set and Delicate Dots background. 


Here you can find a little how-to video.


I had a couple of loosely water-coloured panels and decided to use those.

I took the small flower from  Grateful Heart stamp set and it in black all over the coloured panels I had. I tired to oriented it as leaves are on the greens and flower is on the pinks. I believe it is the fastest colouring possible.


I die cut the flowers with  coordinating dies, and placed them on stamped with Delicate Dots card-base.  As I predicted, I can't stop using the new rubber background stamp Delicate Dots. It's just perfect and love it.  

I also added a sentiment from  Typed Sentiments stamp set and placed on a banner from Skinny Stripes dies.


For my second card, I went with vertical design. I arrange the flowers, added a few leaves die-cut from gold glitter paper, and adhered everything with foam tape.


For the sentiment, I again took Typed Sentiments stamp set along with Skinny Stripes dies. A few enamel dots  from Sophisticated Enamel Dots set became a perfect finishing touch.

And there is a video for second card too. It will be available at our IGTV on Instagram.  Click here to find it.


Thanks so much for stopping by, hope you've liked those ideas and will give them a try.
Have a wonderful day,
D.
4

August 2019 Release Week Wrap Up!

Hello friends!

I can't believe it's already Friday, and the last day of our August 2019 release!

Thank you all so much for your excitement and positivity this week - from welcoming our new illustrator, Robbie Bryant, to celebrating our new products and new format!

Also don't forget to see if you were a giveaway winner this week, that post can be found HERE.

We have one final new card for you today from Mindy.


And a last look at all of her cards from the week. I love how it shows just a few of the possibilities using these new products


All of the products are available in the shop now! And here is one last look at them up close:

Delicate Dots Background Stamp

Grateful Heart Stamp Set

 Grateful Heart Dies


 Sophisticated Enamel Dots

Wel also do have some more of the August 2019 Bundles in stock - these sold out fast! It's a great way to get all of the coordinating products from this month in one click and at a 20% discount!

Be sure to share when your new goodies arrive, and of course what you create with them!

Have a great weekend!
Danielle
9
Back to Top