Showing posts with label Succulent Journaling Card. Show all posts

Watercoloured Succulent Tag With Debby

Neat & Tangled Succulent Journaling Card https://ldli.co/e/qr2yd5

Hello, Debby here and I'm going back to my clean and simple roots with today's card. I still love clean and simple design, and when I go in a shop and see cards on the shelf, it is those that I would reach for even now. If I still bought cards that is. Sometimes I've found it hard to share a card with just the barest of designs. It's always a temptation to add more, but as they say, less can be more and so that's where today's card came from. That desire to keep things clean and simple. 

Neat & Tangled Succulent Journaling Card https://ldli.co/e/qr2yd5
I stamped the Succulent Journalling Card with clear embossing ink on Arches Cold Pressed watercolour card, sprinkled with white embossing powder and heat set. I watercoloured the succulents with Daniel Smith watercolours using lots of layers to build up the colour. 

Neat & Tangled Succulent Journaling Card https://ldli.co/e/qr2yd5

I found that the wide banner on this image was the perfect size for the two line sentiment from So Many Sentiments. I stamped the sentiment in clear embossing ink, sprinkled with Antique Gold embossing powder and heat set. I then trimmed the piece to a tag shape, punched a hole in the top and threaded with twine

Neat & Tangled Succulent Journaling Card https://ldli.co/e/qr2yd5

I mounted the tag on to a panel of Fog card and in turn on to an Ivory card base. Finally, I accented with clear sequins. 

I resisted thoughts to dress this card up more with an interesting background, and instead let the subtle watercolours of the succulent tag stand proud as the focal point. 

Thanks for joining me today and I'll see you next time!


10

Masculine Birthday Card | Stephanie


Hey everyone! Stephanie here and I am SO EXCITED to be here for my first post
on the Neat & Tangled blog!

I put together a masculine birthday card for you today because honestly, I find them the absolute hardest cards for me to make haha. I am terribly feminine in my creations which typically suits me well but when it comes time for me to give a card to a "manly man" (aka my gigantically bearded husband) I almost never have anything on hand. So here is what I came up with!


I started by creating the wreath and hooray sentiment using the Hooray Die. I die cut it twice - once from green cardstock and once from blue cardstock - and then I trimmed the wreath away from the  blue one. I layered them on top of each other with some adhesive and lined the back of the wreath with a bit of vellum.


I used the Succulent Journaling Die to create a journaling card which I repeatedly stamped with the wood stamp from the On the Strip 2 set. I'm going for earthy here can you tell lol? ;) And for my card base I stamped a light colored ink with the "celebrate" sentiment from the Just For You set

I finished my card off with some stitching at the top of the journaling card and I just couldn't help myself and added some sequins as well haha. I made sure to use simple iridescent ones (that I grabbed from the new Sugar Plum set) to not be too girly.


What do you think? Do you have trouble creating masculine cards?
Thank you so much all! Much love!

Xo, Stephanie

Catch up with me here: Instagram > Facebook > My Blog

10

Making Waves with Laura Bassen

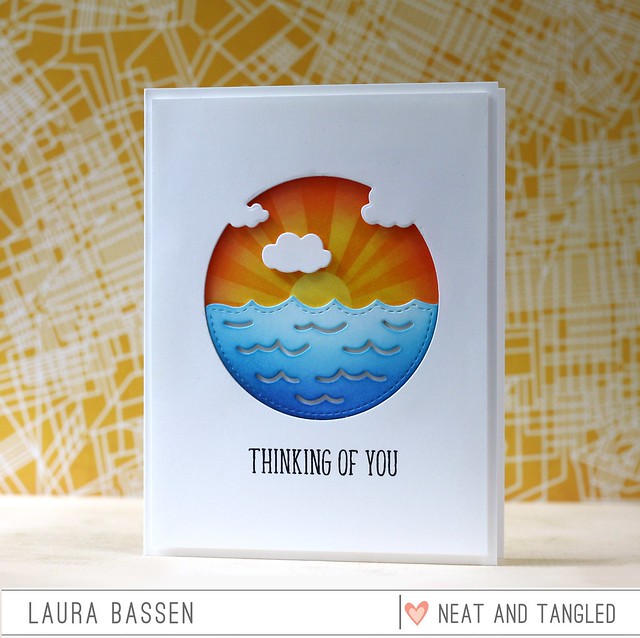
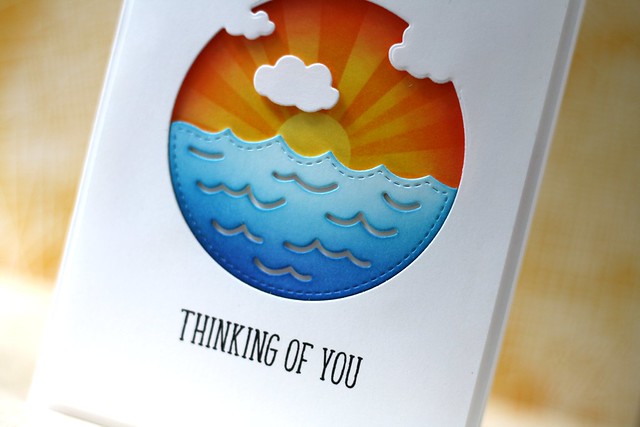
Hi there! Laura here and today I have a project to share featuring the Making Waves dies.
Neat & Tangled-Making Waves
I thought it would be fun to do some fancy schmancy masking & ink blending for the sunset. I used post-it tape to mask the rays and a 3/4" circle punch to create a mask for the sun.
Neat & Tangled-Making Waves
The sentiment is from Succulent Journaling Card stamp set. That's all for today! Thanks so much for stopping by!
11

Succulents thinking of you cards with Sveta Fotinia

Hello everyone!

Sveta is here and I want to share with you  my way to use Succulent Journaling card Nice And Neat die for a sympathy cards. Of course you can use the same idea for more happy occasions and choose brighter colors for it!


For the first card I used both dies.  I created a background with pale mint Bazzil cardstock using the mat die, and cut the journaling die itself using black cardstock. I blended a bit of white chalk ink on the sentiment strip to give it a chalkboard style look. I chose the "Sending prayers" sentiment from Succulent Journaling card stamp set.


For the second card, I continued with the chalkboard theme and used black cardstock blended with white for a whole card base. This time I went with inlaid die cutting technique and colored my succulents with purple chameleon pen marker.


I really like this lacy look of succulent die cut! Next time I will definitely try to cut out succulents and create something really tender! How would you use this die/stamp set? Please share with us!


Thanks!
Have a great and inspired day!
13

July Release Redux Cards by Taheerah

Hey everyone, happy Thursday! It's Taheerah here today to share some cards featuring the July release!

The wicked postman held my release package captive earlier this month so I didn't get a chance to join in with the other talented DT ladies - but that just means I've got the limelight to share them with you now!

Let's start with the first card:


For this one I used the sentiment and star image Hello You to create a bold, chalkboard look.


I did a bit of shadow stamping, with the help of my MISTI, to create a chalky look, and heat embossed the main images!


Next up, a couple of cards featuring the Succulent Journaling Card stamp set and die!


I die cut the journaling card from patterned paper and lightly coloured some of the pieces, before paper piecing them back in. The sentiment is from Square Thoughts!


Such pretty details!

And here's its alternative version:


This one is more subtle, but just as pretty!


Next up, Mermazing:


This one might be my favourite of the lot, just because of all the clever details!


I partially inked up the mermaid, and then stamped the shell to be her bikini and drew in her waist!


And just check out those waves! I used a combination of glue and ink to create dimensional froth which I then heat embossed!


Check out that dimension!

And finally, Kitty's Favourite Things:


I die cut a circle using the Making Waves dies and then wound a lot of twine round in, before inking and misting the twine to change its colour!


I coloured my kitty with Copics, trimmed him out and adhered him behind the giant ball! The sentiment banner was die cut using the Kitty's Favourite Things dies, and I added a heat embossed vellum heart using one of the stamps from Hello You. The background was created by misting, using both the Geometric Blooms and Pentagon stencils, placing them on top of each other before misting. I think it mirrors the ball of wool effect. :)


I hope you loved these release projects as much as I loved creating them! The July release seems to have been very popular, with a few of the new products out of stock currently - so make sure you sign up to notifications for your favourites to know when they're back in stock! Thanks for stopping by!

4

July Release projects

Hello there! Mayuri here to share some cards for the July Release - there's a great selection from this month's release, and I've experimented with a few techniques that I hope will inspire you! I've seen the watercolour trend showing up more in more in the card making world, and so I wanted to try a technique using Distress Inks and water.

For this first card, I stamped the shapes from Hello You in Picked Raspberry, Festive Berries, Shaded Lilac, Peacock Feathers and Salty Ocean all over a panel of white cardstock. I left a blank space in the centre for the sentiment.

©Candles in the Garden. Neat and Tangled July 2016 Release.

I then took a damp brush and went over the stamped areas with water, sometimes using a light touch and sometimes slightly heavier. I liked how quickly the water seemed to dry in some areas, allowing me add more colour and more water to create a sense of movement.

©Candles in the Garden. Neat and Tangled July 2016 Release.

I heat set the panel and then stamped the large sentiment from the same set with Versamark Onyx Black ink in the centre. I trimmed the panel down to the same size as my card base and adhered it straight down.

©Candles in the Garden. Neat and Tangled July 2016 Release.

I added a few sequins and some gold splatters to finish up. For my second card, I took the speech bubble die from Square Thoughts and die-cut it several times from a panel of white cardstock.

©Candles in the Garden. Neat and Tangled July 2016 Release.

I held on to all the centre pieces that get cut out with the die so that I could adhere them all back in place. First, I took an inky panel from my stash and adhered it down to a white card base, and then I foam mounted the die-cut panel in place.

©Candles in the Garden. Neat and Tangled July 2016 Release.

I also die-cut the fractal heart shape using the Heart of Gold die and adhered that to the front of the card. The sentiment comes from the matching Square Thoughts stamp set and was white heat embossed onto a strip of black cardstock before being foam mounted to the front.

©Candles in the Garden. Neat and Tangled July 2016 Release.

For my last card, I took the Geometric Blooms stencil, laid it onto a panel of white cardstock and swiped through some embossing paste. While the stencil was still in place, I also spritzed some Funky Fuschia Dylusions Ink spray.

©Candles in the Garden. Neat and Tangled July 2016 Release.

I removed the stencil and set the panel aside to dry while I worked on the focal element. I stamped the cat from Kitty's Favorite Things onto a piece of white cardstock and coloured him in with Copic markers.

©Candles in the Garden. Neat and Tangled July 2016 Release.

After my embossed panel had dried, I trimmed it down and foam mounted it to a card base. I die-cut the cat out using the matching die and also foam mounted it to the card front. I had added a little slit beneath his right paw so that I could tuck the sentiment banner underneath.

©Candles in the Garden. Neat and Tangled July 2016 Release.

The sentiment banner was die-cut using the die from Kitty's Favorite Things and a sentiment from Succulent Journaling Card was heat embossed in white. To finish, I added a few gold sequins.

Thanks for looking!

:-)
4

Succulent Journaling Card: Two Techniques - Two Cards

Hello Dears!

Daria here. And for today's post I have two cards to share both with Succulent Journaling Card Stamps and Dies using two different techniques.

Recently, I played with Pointillism technique by Heather Nichols, and could not wait to try it with Succulent Journaling Card Stamp.


How to: At first, I heat embossed the image in white. Then, I took all different shades of green inks and all small dots stamps from different stamps sets and started to stamps dots - over and over again. It is time consuming, but it creates very soft look with lots of dimension. While stamping, I put darker shades closer to the petals' inside parts and lighter to their ends... You also want to overlap your dots many times for continuous shading. I started with bigger dots and ended with smaller ones. 


I die-cut Succulent Journaling Card from Bazzil kraft cardstock and used some tiny strips of foam tape to secure it over my already colored card. It adds even more dimension.


For my second card, I have decided to do some in-laid technique. I die-cut Succulent Journaling Card several times from white and kraft cardstock. Then, on one of those, I colored petals with Twisted Citron distress ink using blending tool, keeping it more darker towards the center. As it was done, I in-laid all the small pieces into the frame.


I love this technique as it gives lots of visial dimension while keeping the card flat.  Here is a close up:


The sentiments for both cards came from the Succulent Journaling Card stamp set.


They turned out very similar, but also very different. Two different techniques - two cards. Hope you enjoyed.

Thanks so much for stopping by,
See you next time,
Daria.


8

Dry Embossed Succulent Journaling Card Die Two Ways


Hey everyone!  Miriam here sharing two cards featuring the Succulent Journaling Tag Die.

Rather than cut the die, I used it to for dry embossing.

This first card was hard to photograph, but I kept it very clean and simple.  You can see the embossing better in this close up shot.  I added a few mats to complete the look.


For the second card, I used a combination of watercoloring and Copic coloring to accentuate the embossing.  I started by watercoloring the different sections and then used Copics to add depth and texture.


Here's a close up.  I love the different looks you can achieve using this die, and you don't even need to actually die cut it!  The sentiments for both cards came from the Succulent Journaling Card stamp set.


Thanks so much for stopping by, hope your week is going off to a great start!

5

Life by the sea with Sveta Fotinia

Hello, dear friends!

I haven't posted in a while! I took a little break to move to our beach house and to enjoy some summer days. I adore sea and was so happy to get Neat&Tangled last release with this cute mermaid from Mermazing stamp set!


I've colored her with Chameleon markers and covered her tail with Stickles to make it look like real scales.


The Making Waves Nice and Neat die set is perfect to create a background scene and focal point. I used two colors of Bazzil cardstock for this card. I chose colors that would evoke sunset on the sea.


To create a sentiment I combined two of our newest die and stamp sets: the banner die from Kitty's Favorite Things Nice and Neat die set and a sentiment from the Succulent Journaling card stamp set.


I love the color palate, and the tiny little stars from Lucy's Little Things - Rose garden shaker mix that I adhered to finish this project matched perfectly.

Enjoy summer time!
12

Miss you, with Elena

Hi there!

I'm still having fun coloring the cat from Kitty's Favorite Things:


I always eat when I'm sad, so I gave him a milk bottle in hand to help him deal with the missing you blues.

I colored him with light grey copic markers, and then flicked some darker grey stripes all over his body. The milk bottle was colored and die-cut separately, but I then drew in the lines that were missing around his paws so that it would look like a complete image. 


I used the circle die from Making Waves, and the banner die from Kitty's Favorite Things (without the matching stamp image!) to complete the focal cluster. I love that wavy banner shape! The sentiment is from another new set, Succulent Journaling Card.

Behind the focal image, I cut strips of a mint-colored cardstock and adhered them to an ink-splattered white mat. Everything was then added to a pink polka-dotted background piece.

I hope you like what I've created! 


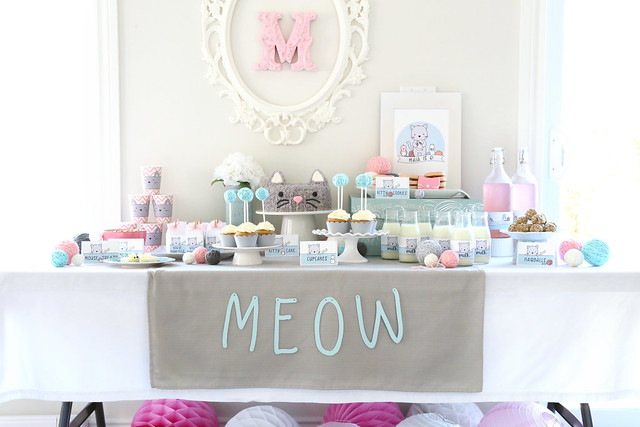
I'm also sharing the kitty party that I hosted for my 6 year old Maia today, using the images from Kitty's Favorite Things, on the Just ME Prints blog - CLICK to see!

♥.


2
Back to Top