Showing posts with label shaker cards. Show all posts

Die cut shaker tag | VIDEO | Natalie Elphinstone

I couldn't help it! The first time I laid eyes on that cute Panda Die from the latest release I just knew it had to be made into a shaker tag. Who's with me?!

One thing that makes this shaker tag different from most is that each individual shaker component is separate from each other. Meaning each eye is a separate window, as is each ear, and the nose. The sections don't mix with each other which opens up so many more possibilities! In fact, next time I make this I'd love to fill each part with different mixes of sequins. I would make the eyes a different colour to it's ears and nose. Or fill all 5 with a different colour like a colour wheel! Wouldn't that be cool?!


There were many ways I could have gone with this but I decided to keep the design fairly clean and simple, and the colours fairly traditional on this occasion. I also opted to turn it into a tag instead of a card for something different. The Classic Tag 2 die set is the perfect size to fit the whole of the Panda head on it to make it the real focal point, whilst leaving just enough space around the edges to do a touch of embellishing. I chose one of the sayings from the So Many Sentiments stamp set and used two colours of ink to create a subtle ombre effect which matches the colours of the Wild Orchid sequin mix. 


In my video today I'm going to share how I created this tag from start to finish. It's so much easier than you might imagine!


Products Used:
Neat and Tangled Panda Nice and Neat Die
Neat and Tangled Classic Tag 2 Nice and Neat Dies
Neat and Tangled So Many Sentiments Stamp Set
Neat and Tangled Wild Orchid Sequin Mix

xxx
Natalie 
4

November Release Redux Cards by Taheerah

Hey everyone, happy Wednesday! It's Taheerah here today to share some cards featuring the November release!

It seems that my release package wanted to travel the world a bit and got lost in Mexico! I was so sad to miss out on sharing some Release Week projects, but once my replacement package finally arrived I couldn't wait to tear it open and get stuck in! So although I didn't get a chance to join in with the other talented DT ladies, that just means I've got the limelight to share them with you now!


Totally swoon-worthy, right?!

Let's start with the first card:


For this one I used the May Your Holidays Be stamp set and combined it with the girl elf from Elfs And Their Shelf. I threw in an older set too called Happy Ornaments to turn it into a scene!


I cut out the centre of my main ornament and turned it into a fun shaker pocket! And I loved trimming the banner in two so that I could have it loop behind the ornament, and to have that cute little elf perched on it as it swings!


Next up, it was time to take the Scandinavian Prints Christmas set for a spin:


I created my own patterned paper right on my card front, stamping with a non-traditional colour palette!


Little added details for the stars and snowflakes came courtesy of the May Your Holidays Be and Elfs And Their Shelf sets respectively. The sentiment from Santa's Wonderland is the perfect finishing touch!


Speaking of Santa's Wonderland, I really wanted to play with it on its own too, and then I came up with a really cool and unique idea...


I used partial die cutting to create a snowglobe! I die cut most of the circular ornament from the May Your Holidays Be dies, then used the banner from the same die collection to create the base!


I created a fun shaker scene using the penguin, North Pole and snowflakes stamps. It was quite labour intensive to think through and put together, but the end result was so worth it!!


I used the Merry And Bright dies for the sentiment, doubling up my die cuts- one with black on top of gold, and the other reversed! There are so many fun details and lots of dimension in this beauty and I'm so proud of it!


And finally, possibly, my favourite was saved 'til last:


I built a super-fun scene using lots of different sets! Santa's Wonderland, Elfs And Their Shelf, Beary Merry and Into The Woods all feature here, and they go together perfectly!!


I curved the shelf stamp on my acrylic block to make a sled!! Then I got busy piling on the presents and little extras, and coloured everything with colouring pencils. The deer from Into The Woods makes a perfect Rudolph to tow this sled! I masked off all my images after colouring then ink blended my sky over them, having first heat embossed my snowflakes. Some shimmer, glitter and a gold cord tied everything together perfectly. Whoever gets this card is definitely on the Nice list!


I hope you loved these release projects as much as I loved creating them! The November release is probably one of my most favourite to date, with a few of the new products out of stock currently - so make sure you sign up to notifications for your favourites to know when they're back in stock! Thanks for stopping by!
8

His & Her Holiday Cards with Nina-Marie


Hello crafty friends, it is Nina-Marie here with you today, sharing a set of cards that are perfect for that special him or her on your Christmas list this year!

Most card designs can be adapted to fit either a feminine or masculine feel, and this set is a great example of how simple that can be.

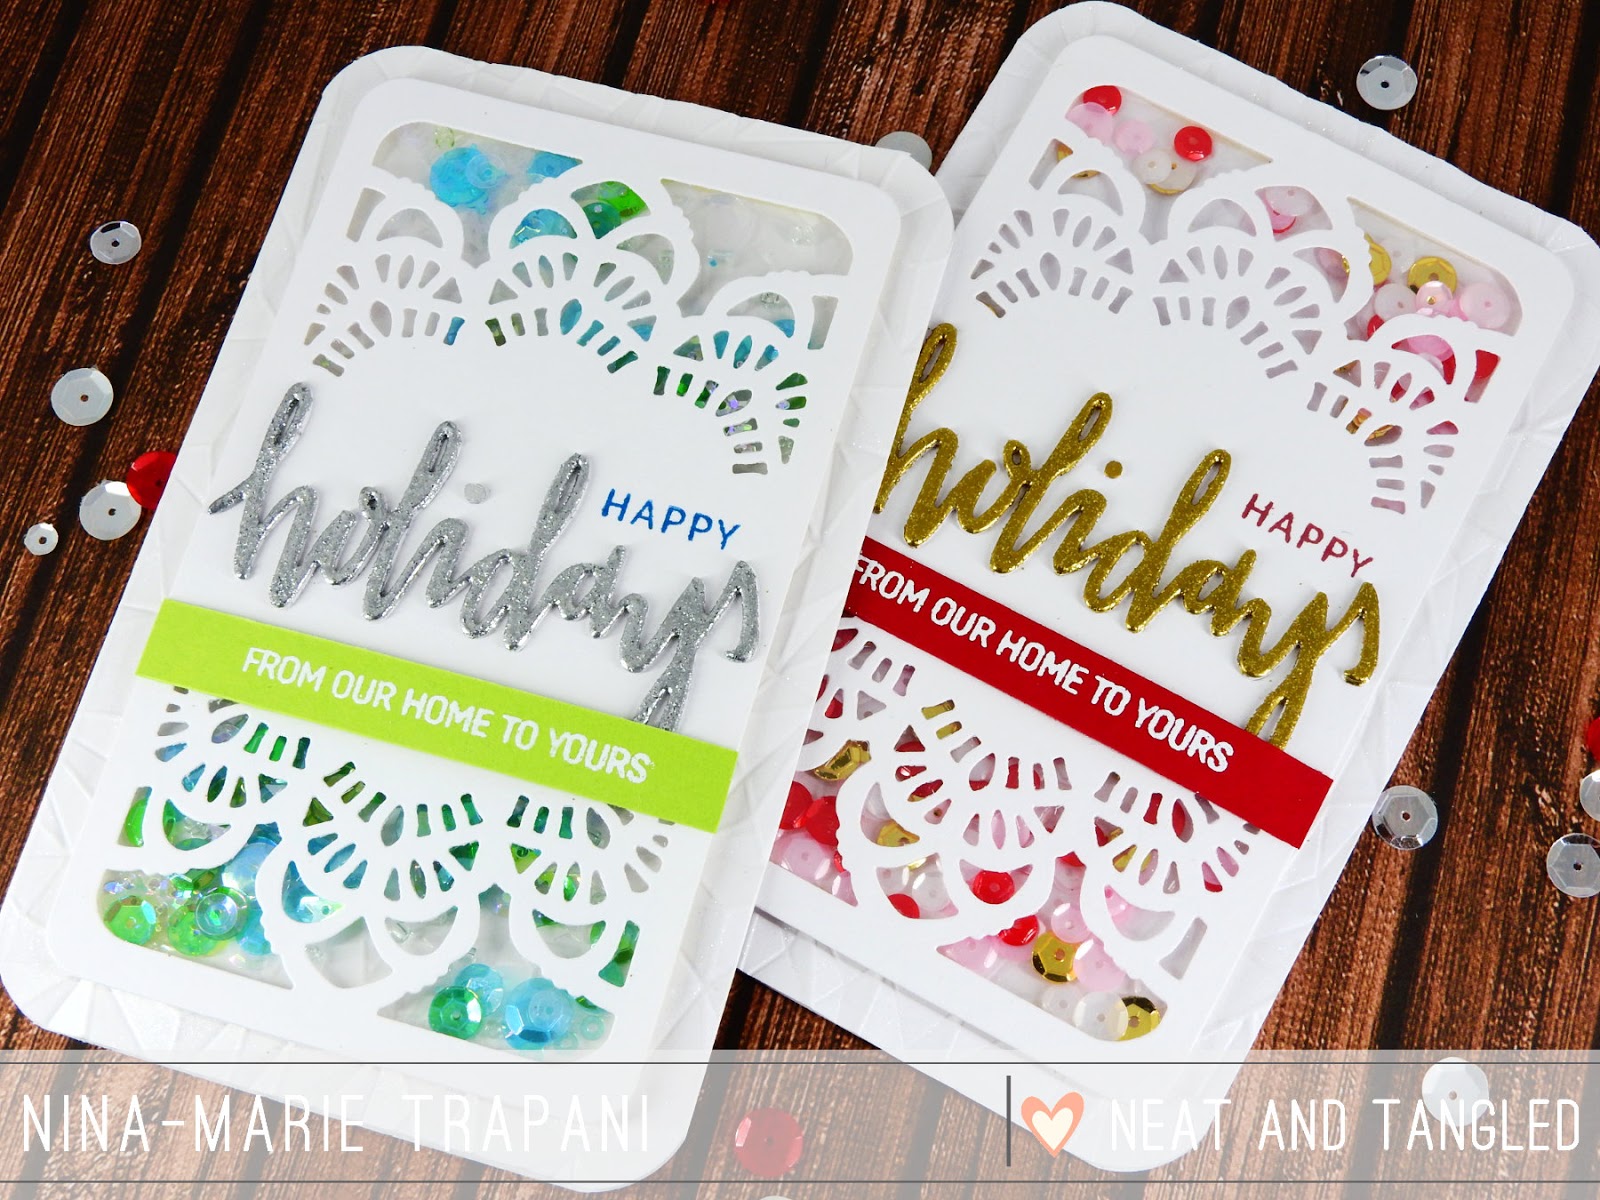
I love making shaker cards, and our Doily Tag die is a perfect window to put in front of an assortment of pretty sequins, don't you think? I started off by die cutting the tag from white cardstock and applied a piece of acetate behind it to be my window. I then cut small strips of foam tape to place around the outside edges of the doily tag die; this creates the shaker well for all the sequins I place inside.

The sequins I used for the shaker are from the Phosphorescence and Caribbean Dream mixes from Lucy's Cards, and also the Full of Love mix and Gold sequins from Neat & Tangled.

I popped the shaker up off of a white card base that I embossed with a faceted We R Memory Keepers
embossing folder; the texture on the white card adds the right amount of detail without being distracting.


On both cards I die cut the word "holidays" from white cardstock four times and adhered them together to be more dimensional. For some color and sparkle, I heat embossed them with silver and gold embossing powders from Tonic Studio's Nuvo product line. The holidays die cut and the coordinating sentiments are from Neat & Tangled's Happy Holidays stamp and die set.

To fit the two different genders, I used a red and pink color scheme for the feminine card and green and blue for the masculine version.


Finally, I used some Wink of Stella clear glitter and added it over top of the white card base... the extra shimmer is an optional detail but I think it really adds that perfect finish to the card.


I hope this has inspired you to see how easy it is to switch colors around on a card to make it fit for either a guy or a girl! Thanks so much for spending some time with me today and I will see you again very soon!

SUPPLIES


10

Maple Thanks Shaker Card Video with Sveta Fotinia!

Hello  everyone!

Sveta is here and I want to share with you my autumn shaker card.
I made it using our newest Maple Thanks dies along with the sentiment from Maple Thanks stamp set. I prepared a video of the whole process that you can find in the end of this post.
The main plus of this die set for a shaker cards is that the outline die is a little bit bigger then the one with veins, so it gives the most easy and quick way to make a shaker with foam sheet. Please check the video to see what I'm talking about.
I filled my shaker with mix of sequins from our shop: Pumpkin Mix, Buttercream Mix, Summer Sun Mix. Colors of orange, yellow and brown are so warm and cozy!
This shaker card was the easiest in my life thanks to Maple Thanks Nice&Neat Dies, so I encourage you to try this set in your works - you will get as much joy as I had!
Enjoy video!
Thanks for watching and subscribing on our channel.
11
Back to Top