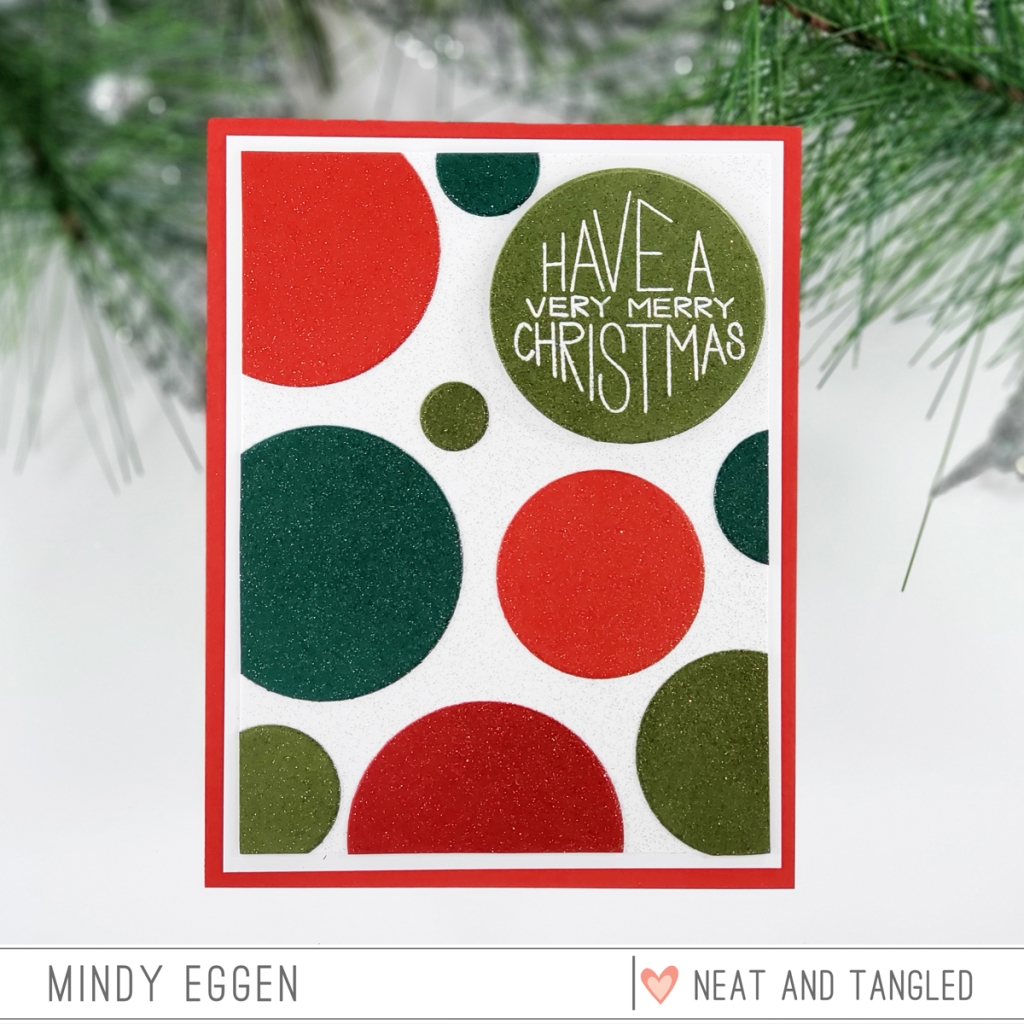
Welcome everyone! Mindy Eggen here with you and today we are going to play with circles to make a super easy-peasy Christmas card. I was inspired to make this card from some journaling cards I've seen online that are used in December Daily albums.
I'll be using the Circular set from the November Release. Actually, I'll be using just the coordinating die of this stamp set. You could certainly stamp or heat emboss the images but I am going for just circle die cuts on this one.
I started by die cutting the Circular die set using Fresh Asparagus, Christmas Pine, Red Hot and Cherry Red card stock from Gina K Designs. I toyed with the idea of adding sentiments to a few of the circles but in the end I decided to just add it to one.
On the Fresh Asparagus circle, I stamped a sentiment from the Gift Box Christmas Sentiments in embossing ink. Then heat embossed with white embossing powder. This stamp set actually works quite well with the Circular Stamp set even though they were designed for a different shape. I'm also totally in love with this font!
Using a piece of Neenah Solar White card stock measuring 3 3/4" x 5", I started to randomly place my circles down. Once I was happy with the placement and spacing, I attached them using a tape runner. The sentiment piece I popped up with foam squares to make it stand out a little bit more from the rest.
TIP: If you ever question your placement when making backgrounds like this, take a picture. I will then pull it up on my computer and take a look at it. Sometimes we need to see it in a different setting to really get a good look at the placement.
Once the circles are attached, I'll trim off any pieces hanging over. Then I'll spray my front panel with Gold Glitter Dust.
After that is dry, I can attach it to a panel measuring 4" x 5 1/4" to give a white border. Lastly, I can add it to a card base made from Red Hot card stock to pull the reds together.
SUPPLIES
Below you will find links to the products used. Click the icon to start shopping. Compensated Affiliate links are used at no additional cost to you. Your support helps me to keep bringing you new projects and videos. Thank you!
Welcome everyone! Mindy Eggen with you today to share a sweet and simple holiday card.
This card is featuring the Holiday Baking stamp set which have you checked out the price on this set??? It's on sale at a huge discount!! It's such a great set to add to your holiday stamp sets. Be sure to check out THIS POST from Danielle on some amazing savings and little shipping delay.
I stamped my images onto Neenah Solar White card stock with a copic friendly ink and colored with copic markers. Then used the coordinating die to cut them out with my Gemini Jr.
I die cut out a snowy hill from white card stock and attached to a background created with pattern paper from the Snowy Day Remix Collection.
Next, I just arranged my images onto my snowy hill. They are ready to bake some goodies!
I finished off by stamping a sentiment onto the card front with Versafine Black ink. Quick and simple but oh so sweet!
I love stretching my stamps to turn a non-holiday stamp set into a Christmas card like this card I made with Jump For Joy!
This card was easy to put together, with no complicated masking techniques. All I needed to change the stamp into a holiday card was a white pen & scissors!
Hi there crafty friends! Just when you think you are done with your holiday cards, there is always one person you think of to make a card for. That is what always happens to me this time of year. Today, I thought I'd share one of my favorite quick and easy ways to add a couple more cards to your holiday card stash in just a few minutes.
Today, I am going with a little bit of a non-traditional (but still festive) color palette of black and gold. To create these cards, I cut a piece of 8 1/2 X 11 Neenah Solar White card stock into 4 panels, and cut them out with the rectangle from the Card Front Designs dies to give the panel a finished look.
Once the panels were cut, I took out some of my favorite stamps from the Scandinavian Prints Christmas set. I stamped a sentiment onto the bottom of each panel. Then, I created a tiny scene on each one, mixing the stamped images in black and gold with some cut images from different black and gold printed and glitter papers using the Scandinavian Prints Christmas Dies. When the panels were complete, I adhered each of them to a white card base using foam tape.
It is so easy to make these types of quick and easy cards with any combo of small stamps, dies and sentiments. I always figure when I have all the stamps and dies out on my table, that I should create more than one.
Wishing you all a very Merry Christmas and all the best for 2019! SUPPLIES:
Hi friends!
As Christmas draws quickly upon us and there is much to do I wonder if you've finished making your cards yet? I wanted to inspire you today with some new techniques to try with one of your favourite classic Neat and Tangled stamp sets - Art Deco.
The Art Deco stamp set isn't an overtly Christmas set, but it does have some sentiment options to match the holiday season, and it's such a classic design that it really works well for so many different themes. A worthwhile investment stamp if you ask me!
I wanted to use the main grid design background image as a starting point, and then use the large square block to create the appearance of a plaid pattern. Plaid is such a great holiday pattern don't you think? I love it most at this time of year!
I tried out two different versions in some reasonably traditional
Christmas colour schemes and I can't decide which one I like best!
I filmed the whole thing so you can watch my process. Now, like all my videos I try to keep it 'real life' - which means I start the camera rolling with an idea in my head and I literally just make it before your eyes. I don't edit out the mistakes, I simply roll with it and let you see how I then deal with it. So forgive me if I don't get 'perfect' results every time, but I kinda like it when the finished product looks slightly rough and rustic - I think it adds to the handmade charm of it.
I'd love to try out these techniques with a whole bunch of other colours too. What colours would you choose to use next?
I cut out a circle using a circle die and used the negative part to sponged the circle onto my card base using my Stormy Sky and Hickory Smoke Distress Oxide Ink pads. Then I took the circle I cut out and trimmed a piece from the top and the bottom in a wavy pattern to create a snow effect. I popped up the 'snow' on some foam dots for some extra dimension.
Now for the coloring. Here's a list of Copic Markers I'm using in the video tutorial.
I hope you found the video tutorial helpful. Please visit me over on my site, My Creative Scoop for more Copic Marker Tutorials, Videos and Online Classes.
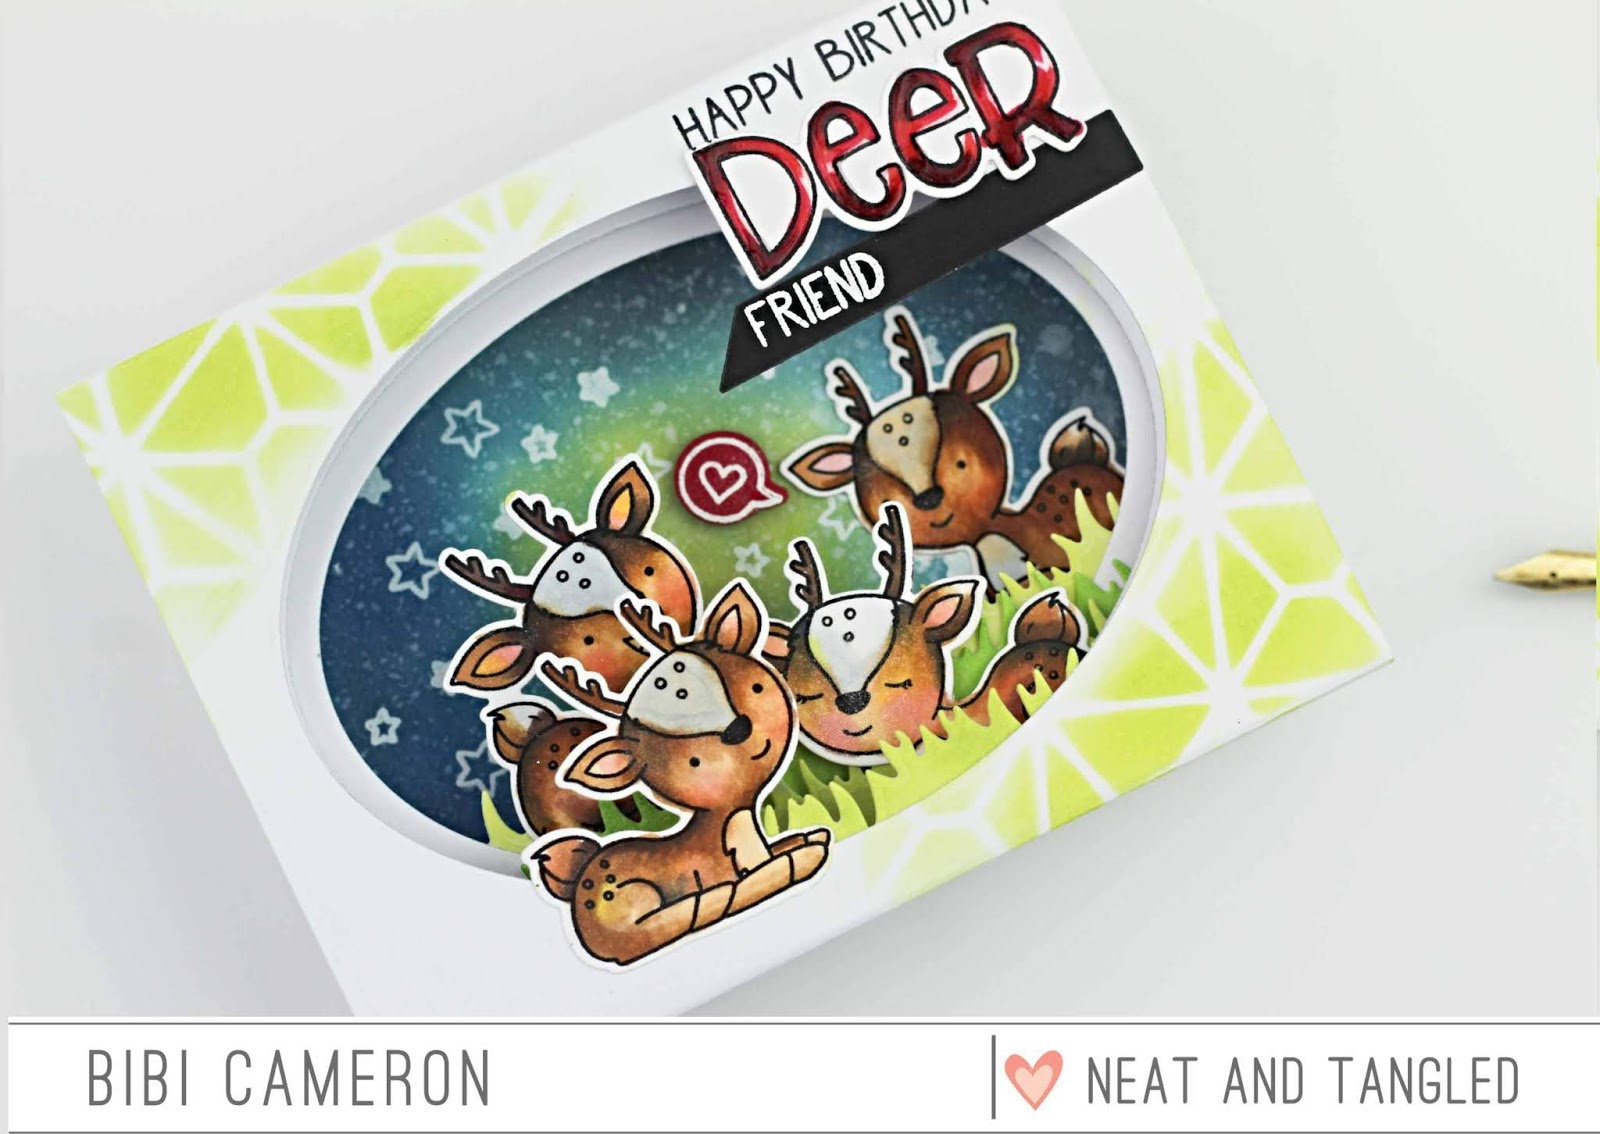
Hello from Scotland, it's Bibi Cameron and today I have loads of pictures and ideas to create extra cute diorama/shadow box cards using beautiful Neat and Tangled supplies from the latest releases.
In the video below I'm sharing the card making process, some tips and a formula to create this kind of cards in any size.
As I mentioned in the video. I used 300 grams and 240 grams paper to make these cards.
I thought that 300 grams paper could be to thick for this projects but you can make your own mind about what kind of paper you would prefer to use after watching my video. I'm still not sure what it is the best. I'm Ok with 300grams but I found easier to work with 240 grams or 270 grams paper for this kind of project. Just because the thick cardstock is very stubborn!
For the card above I used 240 grams paper. The front of this car measures 6"x6" inches and the card folded measures 7" width so that the envelope was customized to fit a 6"x7" inches card. I used an envelope punch board to make the envelope. it only takes 30 secs. This is my fav card size to create a nativity scene with images from Nativity Play and Angel Wings. I just feel I have more room to lay out elements.
I added colours to all the images in this post using Ciao Copic Markers ( Set B) and I added shimmer with a Nuvo Shimmer Pen.
You won't have any trouble to fit the cards inside the envelopes. They will be just a bit bulky I think that using 300 grams paper for cards that will be mailed could be a better option.
Here you can see how the card lay flat on the envelope and yes! This card is big. I love it!
Here is a card that will fit a C6 American standard envelope. Folded it measures 5-1/2 " x 4-1/4" inches. However, to fit the angels and Balthazar the card might need a larger envelope so I used a UK British standard C6 envelope but this was only because some of the die cuts are out of the frame. I used 300 grams cardstock to make this card. The 3rd layer of cardstock is made out of 240 grams cardstock.
Below another card idea, the layout is not vertical but horizontal also using 300 grams. You don't need to do anything different to put this card together, just turn around the paper and stick your images as they fit better or in any orientation.
I also used Cubic Simply Stencil and Distress Oxide Inks to add interest to front panels of the cards.
The front if this card measures 5-1/2 " x 4-1/4" inches and folded it measures 5-1/2 " x 5-1/4" inches. It will fit in a 6"x6" envelope or you can customize envelope to perfect size using an envelope punch board.
So here is the formula for a 4 layers Shadow Box Card - Diorama Card FRONT AND BACK PANELS PAPER SIZE
WIDTH:
To calculate the width of the paper you need to add the envelope / or card front width + desired box depth. If you want your shadowbox to be 1" deep you need to score the paper 1" from both ends. If you want a slim shadow box card e/g. 1/2"inch you should apply formula above and score the paper 1/2" from both sides.
LENGHT:
For a square or rectangular card, you can choose your desired length... any length is ok but keeping proportions.
INSIDE PANELS OR INSERTS SIZE
When you add layers of paper into your shadowbox, the walls of your box became thicker and thicker so that the inserts should be slightly narrower and when you adhere them into your card they will keep straight and they won't bend inside so that the card will fold flat.
Off course, this is not something I read in a book. It is just my own personal formula to make the job easy. Although I have to accept that I can easily skip any of the steps and my cards will be wonky.. it is fine tho.. perfection and handmade sometimes are not a good match :) lol.
The inside panels or inserts pieces do not need to have the same width and depth than the exterior box but they can have the same length as the box if you want to. I like it that way but depending on what you are planning to do you can do different staff with shorter inserts... e.g. add stripes of grass, clouds etc into your cards.
1. To calculate the size of the insert that goes behind the front panel you need the next formula: Envelope /card front width - minus 1/8" inches To calculate where to score folding lines at both ends of your panels, you need to divide the depth of your box by two (2).
2. To calculate the size of a second panel behind the front panel of the box you need the next formula: Envelope / or card front width - minus 1/2 of the box depth measurement - minus 1/8" inches To calculate where to score the folding lines at the end of your panels you need to divide the depth of your box by four 4.
I explain all this a bit better in the video . Soundss a bit confusing but that's the math to create a perfectly shaped shadowbox or diorama card.


