Showing posts with label Santa's Ride. Show all posts

One layer cards for the Holidays

Hello everyone!

Sveta is here today and I'm going to show you two simple one layer cards. There are just a few more days in the year to send some love to our friends and relatives that are far away from us. One layer cards are very suitable for envelopes and posting: lightweight and without any dimension.


For the first card I created a stamped background using the pretty deer from the Santa's ride stamp set and colored it with watercolor pencils. I chose the large main sentiment from the Very Merry stamp set and completed it with a little one from the Winter Wishes stamp set. Glitter on the "Merry" word was the final touch for card.


For the second card I used the ornaments from the Happy Ornaments stamp set and colored them with watercolor brush pens, also adding some snow from the Winter Wishes stamp set and glitter.


Here are a few close-ups:


Wishing you a Very Merry Christmas and a Happy New Year!
4

Advent Calendar Extravaganza with Taheerah Atchia


Advent Calendar Extravaganza is -the- festive event of the season! This ‘hop with a twist’ was dreamed up by Taheerah Atchia and features surprise destinations each day! Joining in the fun with Taheerah are over 60 special guests - each serving up some fantastic Christmas inspiration! Just like an Advent Calendar, you’ll never know where you’re going to be visiting next until you ‘open the door’!

And that’s not all! With 25 *amazing* sponsors taking part as well, your crafty wish list is bound to get a boost with a chance to win a prize EVERY SINGLE DAY!!

Join in the fun every day at taheerah-atchia.com to see what special surprises wait behind the door!

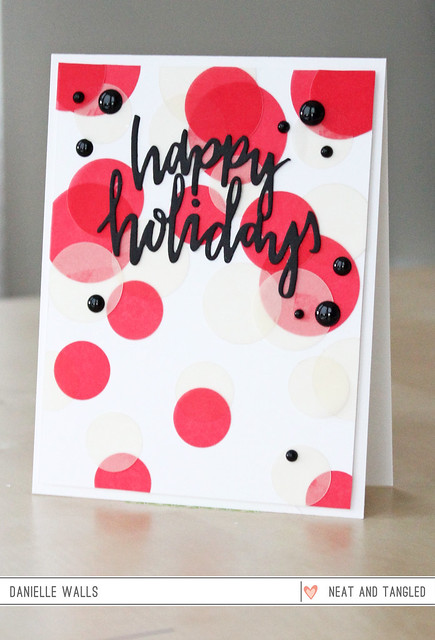
Danielle created a classy Christmas card using our Happy Holidays dies and some Bokeh Vellum Circles! She combined red and cream vellum circles in a variety of sizes to create the effect. To finish it off, she added a few black enamel dots!
Happy Holidays

And here's Taheerah's project:


I had so much fun combining Santa's Tags with Merry Little Christmas to make this adorable tag! I stamped the arms of the little girl, upside-down, first, then inked up all but her arms and stamped again - this made her look like she's throwing her hands up in the air instead of having them down at the side, a completely different look!


I wanted it to look like she was throwing all the presents in the air at you, so I adhered all the presents with varying dimension, with the biggest gift (from Santa's Ride) having the most so it really looks like it's coming at you! So much fun!


It’s not a party without a prize - and with prizes every day there are several chances to win! Today’s prize is supplied by us, Neat & Tangled and we're giving away a $25 gift certificate - so you’ll definitely want to get your hands on it! Simply leave a comment on this post to enter - then head back to taheerah-atchia.com and leave a comment there too to double your chances! Don’t forget to grab the other surprise destinations from Taheerah’s blog and head over to them to leave comments there as well to improve your odds even more! You have until 7am EST on Thursday 31st December to leave all your comments! 
Don’t forget the Advent Calendar Extravaganza runs from 1st-25th December inclusive so make sure you visit taheerah-atchia.com every day for fabulous inspiration and amazing prizes every single time! Merry Christmas!

166

Eat, Drink & Be Merry

I admit, I (and this is Yana, btw) love sentiments. Fun sentiments, unique sentiments, quirky sentiments. I can buy a stamp set just because it has one good sentiment stamp. And a good sentiment can really change the look and a feel of a card. 

As I was planning my next holiday project I wanted to step aside from the traditional Merry Christmas and Happy New Year and use something new. There's nothing wrong with these sentiments, but sometimes I just want to step outside the box and use something completely different. 


Do you ever feel this way? The Eat, Drink & Be Merry sentiment from the Very Merry stamp set was perfect for my today's project. Its large enough to be a focal point of a card and it also combines two different fonts what go well together (and this is always a plus in my book).
7

December Guest Designer: Carissa Wiley

Hello friends!

So happy to welcome another Friday! And today we have our first post from December guest, Carissa Wiley! I love her style, her ability to add so much detail and dimension amazes me!

I know you will love what she has to share!
_________________________________
Hi everyone!  It’s Carissa here and I’m excited to be sharing here on the Neat & Tangled blog.  I’ll be creating a few projects this month using some fabulous products from Neat & Tangled.  I hope you enjoy!

Today I’ll be using the Santa’s Ride stamp set and coordinating dies to create a fun holiday card.  Christmas is coming soon, and I’m still busy making cards to share with family, friends, teachers, coworkers…and the list goes on.  

I started by stamping my images, the sleigh, present and bag full o' gifts, using Memento Tuxedo Black Ink.  I did some simple Copic coloring to color my images (I'll list the colors used below) and then ran them through my Big Shot with the coordinating dies.  This gives perfectly cut images every time.  I love the option of having coordinating dies with my stamp sets, because it gets me more mileage out of my stamps.  
I toyed with the idea of making this a one-layer card by masking each of the images, but in the end, I decided I would color and die cut each of the images.  This gives a bit more dimension to the card.  If you want to keep your project a little flatter for mailing, masking may be the way to go.  When masking, always work from the foreground of your scene to the back.  In this case, I would stamp the sleigh, and then stamp the present and then the bag o' gifts, masking each one along the way. 
I did end up doing a little masking for this card.  I used a nesting circle die to cut a mask.  I used some Eclipse Masking Paper, but you could use some thing typing paper with removable adhesive if you don't have masking paper.  In order to get perfect placement of my mask, I positioned the positive space (the circle portion) of the mask on to my card front, and then applied the negative space of the mask (the part with the window).  This allows me to see exactly where my window will be on my card front.  Then I removed the positive mask (the circle portion) and did a little ink blending to create my sky.
I left the mask in place to apply some embossing paste to this area as well.  By leaving the mask in place, I'll end up with snow just in that circle area.  I used a stencil and some white embossing paste.  I applied the embossing paste rather thick so that my snow had lots of dimension.  Once I removed the stencil, I added some Prisma glitter over the top of the embossing paste.  This adds a little sparkle to my snow.  I left that to dry for about 30 minutes before moving on.

I used some Metallic Platinum Sparkle Embossing Powder to emboss my sentiment and create a coordinating strip of glitter paper for the edge of my card.  Using embossing powder to create coordinating paper is a great way to pull your card together and give it a cohesive look.  Just apply your ink directly to the paper, add your embossing powder and heat.  It's also fun to apply the embossing powder to small embellishments on your card too!
I did something I don't normally do on this card.  I stamped a sentiment on the inside.  I usually leave the inside of my cards blank so that I can write a note, but I love the way that Believe and the word magic tie together.  I still believe in the magic of Christmas. :)

I finished the card off by adding some embellishments.  I added some mini bells and some greenery to the back of my sleigh.  So festive!  And to add some sparkle to my sleigh, I gave it a generous coat of Wink Of Stella.

I've created a video tutorial walking you through the creation of this card.  You can check that out over on my YouTube channel or over on my blog.

Thanks for stopping by today!  I hope you've enjoyed this project.  And until next time, I hope you have a fabulous day!
Carissa
2

Santa's Sleigh


We're fortunate to have Alice Wertz back for one last post today.

She put her amazing coloring skills to work to create this adorable Christmas scene featuring our new Santa's Ride stamp set and coordinating dies.

A sweet doily heart and some strategically placed sequins perfectly embellish the card.


Thanks so much to Alice for all her wonderful work the last few months, we have so enjoyed your creations!
3

More November Release goodness!

Hi everyone!

Mayuri here to share my projects for the November release - I didn't get to take part with the DT because I was off filming a class for Craftsy! But, I had to play with the new stamps and dies, and show you what I came up with ;-)

First up, its Bright Baubles:

©Candles in the Garden. Neat and Tangled November 2015 Release - Bright Baubles / Happy Holidays

This card uses one of my favourite techniques, where I take one image and stamp it repeatedly with Distress Inks. Here, I laid down an oval mask in the centre of a card base and used the christmas tree branches to stamp all the way around.

©Candles in the Garden. Neat and Tangled November 2015 Release - Bright Baubles / Happy Holidays

I then removed the mask and stamped the large sentiment from Happy Holidays with black dye ink in the centre. I paired it with one of the smaller sentiments from the same set and created a few Glossy Accent embellishments with the small bauble images from Bright Baubles. Next up, Christmas Journaling:

©Candles in the Garden. Neat and Tangled November 2015 Release - Christmas Journaling

For this card, I stamped one of the sentiments from the set with black dye ink onto a piece of the Cosmo Cricket 'Just Add Watercolor' paper, which I'd already added some colour to. I filled the sentiment in and stamped a couple of the stars from Happy Holidays.

©Candles in the Garden. Neat and Tangled November 2015 Release - Christmas Journaling

I also die cut some stars and hearts from the panel using the new Little Bits dies before foam mounting it to a card base. I had already sponged some Delicata Golden Glitz ink on the base so that it would show through the little die cut apertures! To finish, I die-cut a sentiment using the Happy Holidays die from some gold foil cardstock. Here's what I came up with for Happy Ornaments

©Candles in the Garden. Neat and Tangled November 2015 Release - Happy Ornaments / Happy Holidays

This card was really fun, quick and easy to create - I began by white heat embossing the decorative bauble from the set onto a piece of cardstock, and simply smooshing an acrylic block on top! First, you cover the acrylic block with a few dots of ink (reinkers or Dylusions Ink Sprays work really well), and mist with water. Then, you quickly stamp with the acrylic block on top of the embossed area - when you remove the block, the ink starts to move around and blend together!

©Candles in the Garden. Neat and Tangled November 2015 Release - Happy Ornaments / Happy Holidays

To finish, I added a sentiment from Happy Holiday and a few sequins! Here's my card showcasing Little Angel:

©Candles in the Garden. Neat and Tangled November 2015 Release - Little Angel / Classic Tag 1

I used the Classic Tag 1 die to create a tag out of a Distress Inked panel from my stash, and then stamped the Sunburst image with Versamark ink. I lightly brushed the stamped areas with gold Perfect Pearls for some sparkle! I used the Seeing Stars die to add a layer of die-cut stars beneath the tag and adhered both to the card front. 

©Candles in the Garden. Neat and Tangled November 2015 Release - Little Angel / Classic Tag 1

I stamped a sentiment beneath the tag from Little Angel and then stamped the angel image onto watercolour paper. I coloured her in with Distress Inks before die-cutting her out with the matching die and foam mounting her to the tag to finish. Here's my last card, using Merry Little Christmas:

©Candles in the Garden. Neat and Tangled November 2015 Release - Merry Little Christmas / Sanata's Ride

A simple bit of 'messy' watercolouring can make any stamp set go so far, and that's what I did here. I began by stamping a sentiment and the presents from both Merry Little Christmas and Santa's Ride with Archival Jet Black ink, and then adding some loose ink splats with Distress Inks. For some interest, I also went in with a white gel pen to add a bit of detail.

©Candles in the Garden. Neat and Tangled November 2015 Release - Merry Little Christmas / Sanata's Ride

That's everything for now! I really hope you enjoyed my take on the November Release!

Thanks for stopping by ;-)

6

Wishing You Peace, Joy, Love & Laughter


Hi, everyone! It's Emily here today and I'm sharing a holiday card using three stamp sets and two of the coordinating die sets. All of the Copic-coloured images are from Santa's Ride. I love that jolly Santa! The skinny tree is from Bright Baubles and the die cut ornaments are from Little Bits. The custom sentiment was created with Happy Holidays.


To ground all of the images, I cut a strip of black cardstock and adhered it to the bottom of the front panel. I wanted to create added visual interest so I used a brush to paint white gesso around the edges of the card base. It frames the scene and highlights the silver glitter ornaments.


Thanks so much for stopping by!

Sources:

5
Back to Top