Showing posts with label Kay Miller. Show all posts

Warm Winter Wishes with Kay


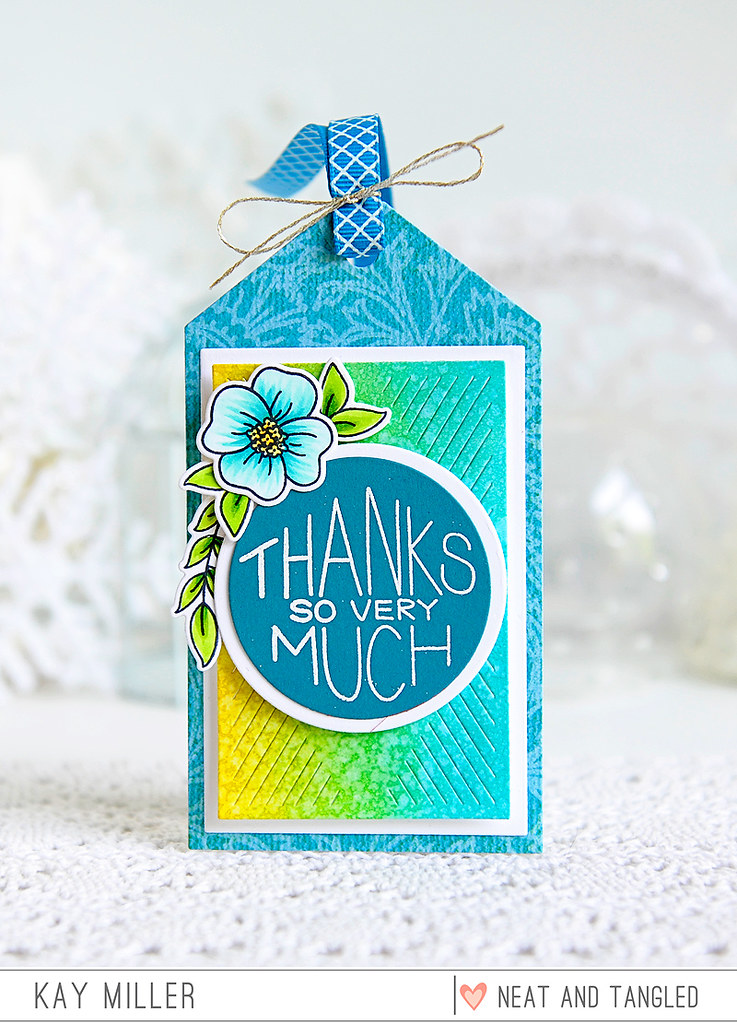
Hi there! I have a fun tag to share with you today that I created with some of my favorite winter products from Neat and Tangled!


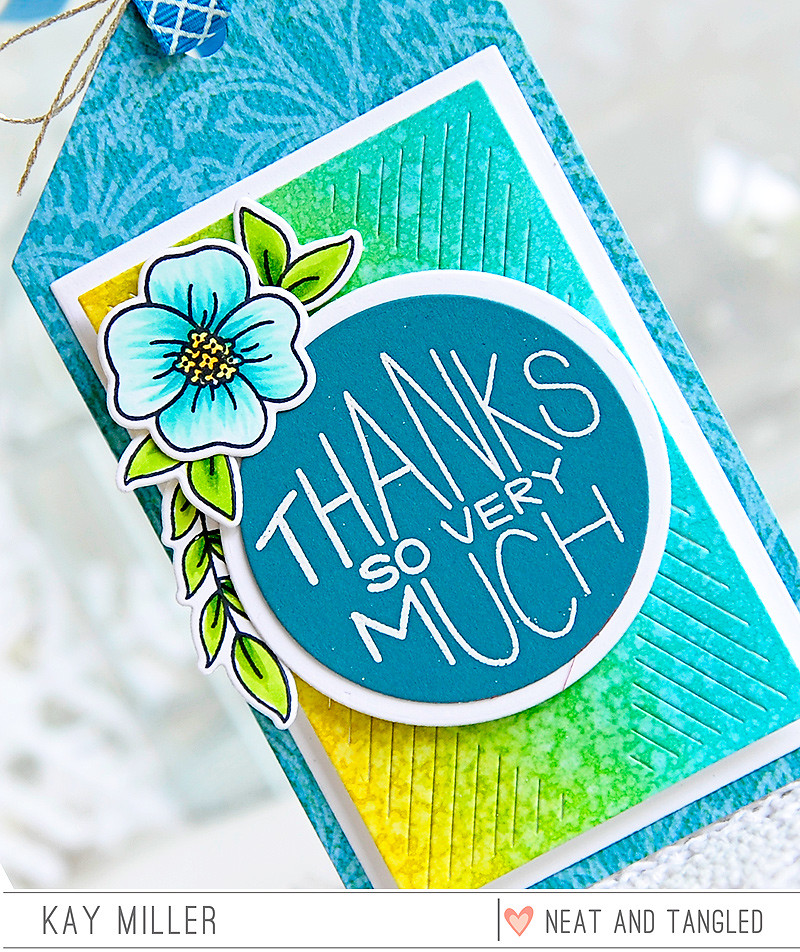
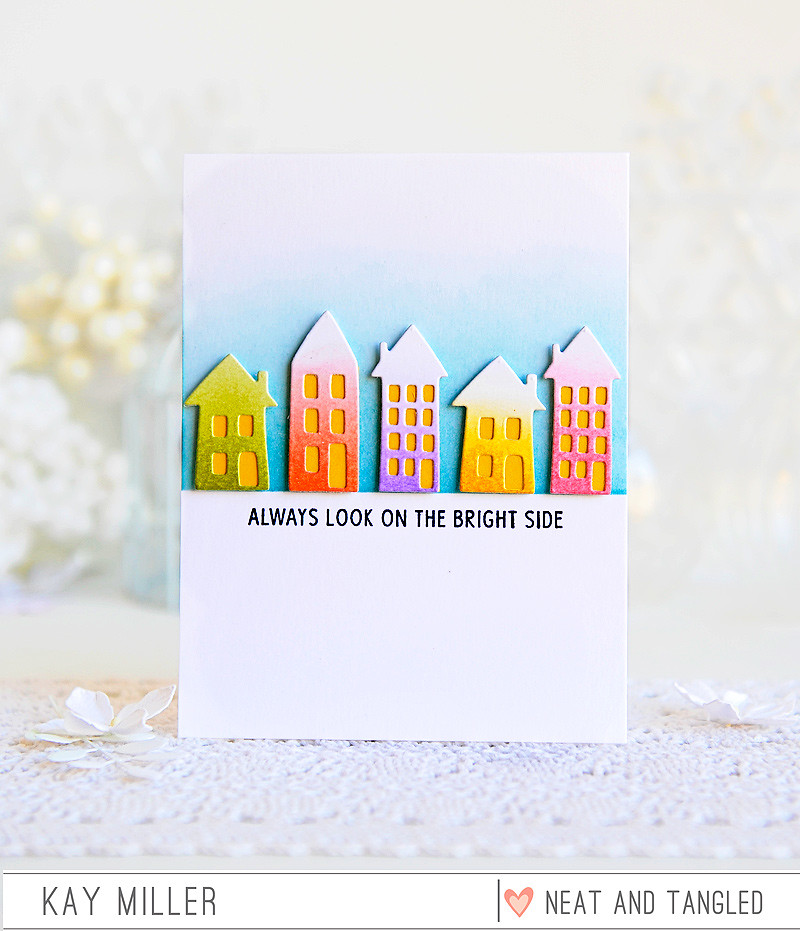
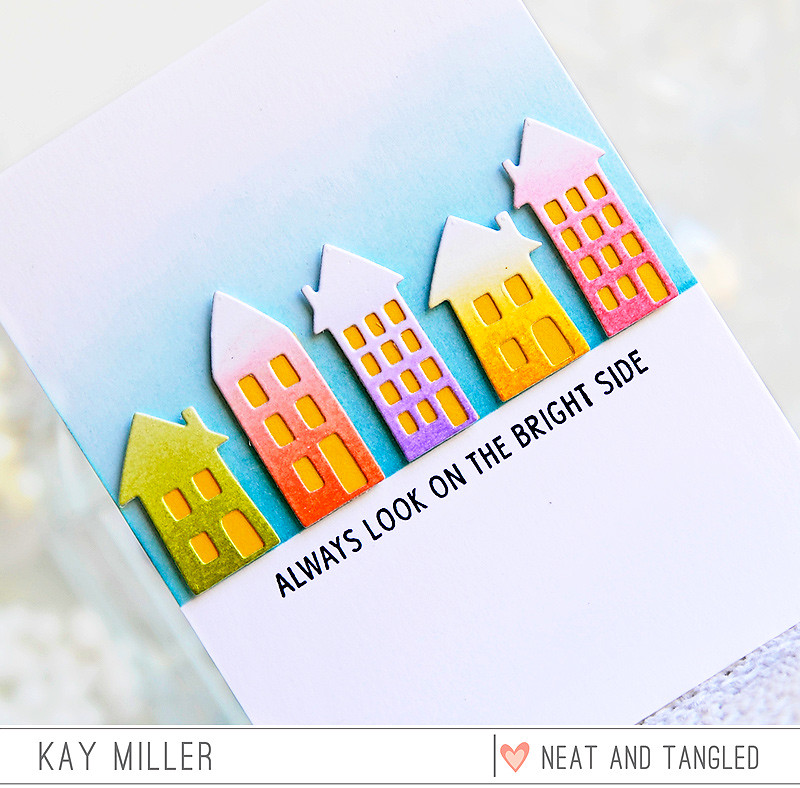
For the tag itself, I used the Build A Tag dies.  I cut the tag out of white card stock, then blended some purple distress ink along the bottom portion.  I then cut out a snowy hill with the Stitched Slopes dies and glued that along the bottom of the tag. 


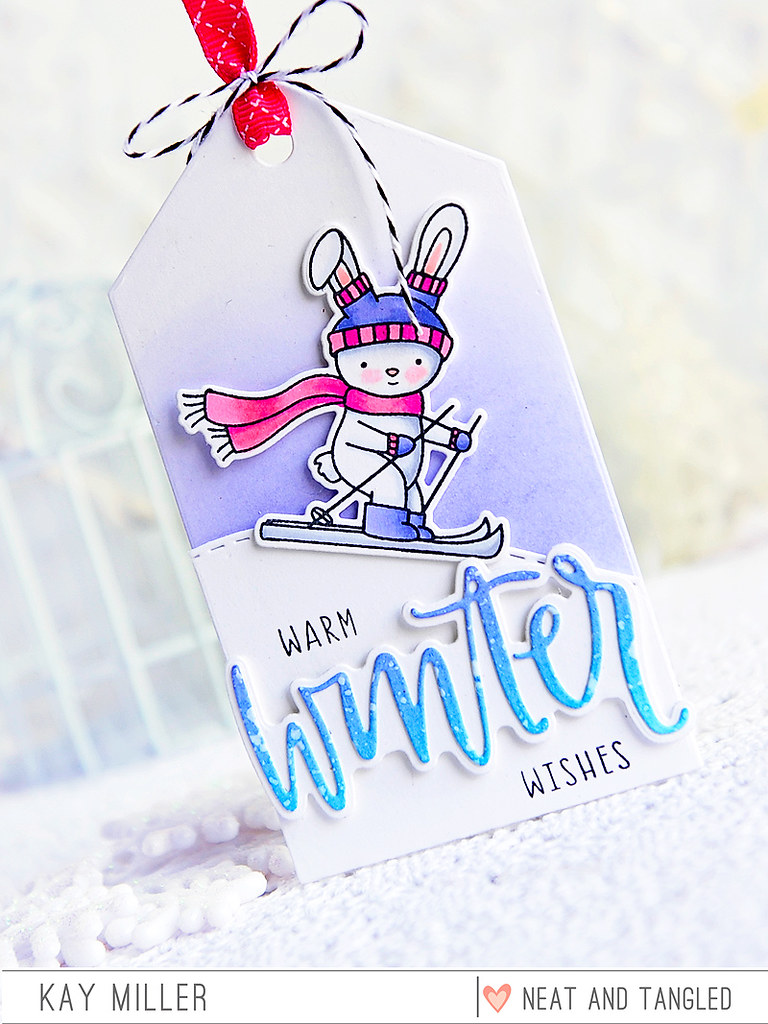
The Winter sentiment I die cut with the Hello Winter Dies. I blended some distress inks onto paper and sprinkled with water before die cutting. The warm wishes sentiment is from the Stay Cool stamp set, and I stamped this above and below the winter die cut. The bunny was colored with Copic markers, cut out with the coordinating die, and adhered with foam tape.

Supplies Used:

Hello Winter Dies
Stay Cool Stamp Set
Bunny Slopes Stamp set
Bunny Slopes Dies
Stitched Slopes
Build A Tag Dies

I hope you have enjoyed my tag today! 
Thanks so much for stopping by!

Kay :)

4

Nativity Play with Kay


Hi there! I have a sweet Christmas card to share with you today featuring the adorable new Nativity Play stamp set along with the Radiating Star Stencil and Joyful Sentiments from last year, that I just love!


I started by stenciling the background with the Radiating Star Stencil. I used yellow dye ink with a little bit of red in the center, on Bristol Board Card stock. I then stamped the sentiment from the Joyful Sentiments a little to the right of the star.


The adorable little images were colored with Copic markers, cut out with the coordinating dies, and adhered with foam tape. 

Supplies used on this card:


I hope you have enjoyed my card today! 

Thanks so much for stopping by!

Kay :)

2

Oh Deer with Kay


Hi there! I am sharing a card with you today that I created with the adorable new Oh Deer Stamp set along with the Hello Fall and Birch Leaf stamp sets. All of these products are from the Neat and Tangled September release and are available in the store now!


So for my background,  I blended some Rusty Hinge Distress ink onto Canson Bristol Board card stock and misted with water.  When this was dry, I stamped my sentiment from the Birch Leaf stamp set along the bottom with black ink. 


I colored the super cute little deer from the Oh Deer Stamp set and the leaves from Hello Fall with Copic markers, cut them out with the coordinating dies, and adhered them to my card with foam tape. 

Products used for this card:

Hello Fall stamp set
Hello Fall Nice & Neat dies
Oh Deer stamp set
Oh Deer Neat & Nice dies
Birch Leaf stamp set.

I hope you have enjoyed my card today!

Enjoy your week!

Kay :)

7

Thanks So Very Much Tag with Kay


Hi there! I'm excited to share with you a tag that I created with some of the fun new products from the August release!

I used the new Thanks So Much stamp setFloral Frame Stamp setFloral Frame DiesBuild a Tag Dies and the Gift Card Box Addition Dies.


I cut the tag base out of some patterned paper that  I had on hand. I then blended some distress inks onto card stock and cut the piece from the Gift Card Box Addition dies. I added the white background layer to the back and adhered this to my tag front. 


I heat embossed the Thanks so very much sentiment on blue card stock with white embossing powder, and cut it out with the circle die included in the Build A Tag die set. I cut the white circle out to mat it with, and adhered this to my tag with foam tape.  The flowers and leaves are from the Floral Frame stamp set. I colored the images with Copic markers, cut them out with the coordinating dies, and adhered them to the tag with foam tape. To finish it off, I added some ribbon through the hole at the top and tied some sliver thread around it.

Products used for this project:

Gift Card Box Additions - Nice and Neat Dies
Thanks So Much Stamp Set
Floral Frame Stamp set
Floral Frame - Nice and Neat Dies
Build A Tag - Nice and Neat Dies

 I hope you have enjoyed my card today! Thanks so much for stopping by!

Kay :)

5

Hello With Kay


Hi there! I hope you are enjoying your summer! I have a fun card to share with you today featuring some beautiful products from Neat & Tangled!

Today my card uses the beautiful Friendly Florals stamp setFriendly Florals DiesHello There die and The Doily Envelope Nice and Neat die.


For the background, I blended some Worn Lipstick Distress Ink onto watercolor paper and sprinkled with water and blotted.  I cut the Doily Envelope die out of white card stock, added foam tape to the back and adhered this to my background. I cut the Hello die out of white card stock as well, and adhered it right above the doily with liquid adhesive.


The floral cluster was colored with Copic markers, cut out with the coordinating die, and adhered to the doily with foam tape.

Products used for this card:


I hope you have enjoyed my card today!

Thanks so much for stopping by! 

Kay :)

4

Magnolia with Kay


Hi there! Kay here, and I have a fun card to share with you today featuring the beautiful Magnolia stamp set from the Neat And Tangled June Release!


This card turned out to be one of my all time favorites I do believe! I love the colors I used for this. I used Bristol Board card stock and I stamped the magnolia randomly all over the 4.25 x 5.5 piece with waterproof black ink. I then watercolored the flowers with Distress Markers. When I was done with the watercoloring, I splattered the whole thing with some Vintage Photo Distress ink mixed with water.


The sentiment is from the Many Sentiments stamp set. I heat embossed it with white embossing powder on black card stock, and cut it out with the banner die that is included in the Scalloped Dies set. I adhered it to my card with foam tape.

You can find the products I used for my card by clicking the links below.

Magnolia stamp set
So Many Sentiments Stamp set
Scalloped Dies

I hope you have enjoyed my card today!

Thank you so much for stopping by!

Kay :)


6

On the Bright Side with Kay


Hi there! I have a card to share with you today using some of the fun new products from the May Neat & Tangled Release along with a couple of my favorite older products!


For my card today, I have used an image from the adorable Paint Night stamp set and Paint Night Dies, Hello Summer, along with a sentiment from So Many Sentiments and my all time favorite stencil, Radiating Star.


So I created the pretty background for this cute little girl by stenciling some orange and yellow ink using the Radiating Star Stencil.  For the little girl, I stamped the sunshine image from the Hello Summer stamp set onto her pad of paper, colored it all with Copic markers and cut it out with the coordinating die. 


I stamped the sentiment form the So Many Sentiments stamp set along the bottom, then adhered the little girl with foam tape. 

I hope you have enjoyed my card today!


Thanks so much for stopping by!


Kay :)


6

Have Courage with Kay


Hi there! Kay here today and I have a card to share with you today featuring the beautiful Have Courage stamp set and Coordinating dies, from the Neat & Tangled April Release.


For the background I used Peerless watercolors and a large watercolor brush. I just took the brush and swiped my paint up from the bottom left corner. I didn't wet the paper first, it was more of a dry brush stroke and super easy to do.  I then colored the beautiful ginkgo image with Copic markers and cut it out with the coordinating die. I trimmed the background down to 5.25x 4 and mounted this to an A2 top folded white card base with foam tape. 


I then adhered the gingko image with foam tape as well. I heat embossed the sentiment with white embossing powder on black card stock, cut it out with the banner die from the Scalloped dies and added that across the bottom of the gingko with foam tape. I added a few sequins from the Peacock Feathers sequin mix to finish it up!

I hope you have enjoyed my card today!

Thanks so much for stopping by!

Hugs,

Kay :)
2

Happy Easter with Kay


Hi there! Kay here today and I have a fun card to share with you today made with some Spring products from Neat & Tangled!

I am just now getting into the Spring mood and wanted to do some Easter cards. I chose the cute Cottontail Cutie stamp and Coordinating dies and Hello Spring!


So what I did for my background was, I stamped the large text stamp from Hello Spring with different colors of pastel inks using the MISTI stamping tool. I then layered some green plain paper across the bottom. Then I took the Scalloped Dies and cut this out. I adhered this to my white card base with foam tape.


I then colored the cute images from Cottontail Cuties with Copic markers, cut them out with the coordinating dies, and adhered them with foam tape.


I stamped the Happy Easter sentient from Cottontail Cuties with black ink, cut it out with a banner dies from the Scalloped Dies set, and adhered that over the bottom of the panel with foam tape.

I hope you have enjoyed my card today!

Thanks so much for stopping by!

Kay :)


4

Fun Spring Scene with Kay

Hi there!

I am finally getting over the winter and Christmas stuff and wanting to jump into spring! I have a card to share with you today that I actually used a winter product, but made a spring card! I absolutely loved the Warm Winter Scene Cover Plate when it came out, and used it several times for my winter and Christmas cards. It's one of my favorites, so I wanted to be able to use it for other types of cards too. I paired it up with the new Many Sentiments stamp set and some bright colors for a fun springy card!


I used plain white card stock for the whole card and all of the die cuts. I cut the houses out with the Warm Winter Scene Cover Plate and blended distress ink onto them for the color. I glued some yellow card stock pieces behind them to show through for the windows and doors.


For the background, I put a piece of Painter's tape across the bottom portion and blended some blue distress ink over that. I removed the tape and stamped the sentiment below it. I added all of the houses along the bottom edge with some foam tape.

So many fun things you can use this Cover Plate die for!

I hope you have enjoyed my card today! Thanks so much for stopping by!

Kay :)


Supplies used:


5

Neat & Tangled / Tonic Collaboration - Day 2

Hi Friends!  Welcome back for Day 2 of our collaboration with Tonic USA!  Each day this week we will be sharing projects featuring N&T and Tonic products on both the Neat & Tangled and Tonic USA blogs, there are also two big prizes to be won.

Here at Neat & Tangled we'll be selecting one lucky comment from our collaboration blog posts to receive a $75 credit to spend at Tonic. AND, Tonic will select a commenter from their blog to win a $75 credit to the Neat & Tangled store.

Today Kay and Danielle are sharing with us. 

First we have Kay:

My card today uses the Magical Day stamp set and dies and the So Many Sentiments stamp set from Neat and Tangled, along with some beautiful Pink Opal Glimmer Paste from Tonic Studios!

This is my first time using the Glimmer Paste and let me tell you, I want to run out and buy one of every color now! That stuff is so fun! I also had the pleasure of using the Tim Holtz Stamping Platform for the first time. I love it!


I used the Geometric Blooms stencil and spread the Pink Opal Glimmer paste over the top of it to create this sparkly pretty background for my unicorn.


I colored the unicorn with Copic Markers and cut it out with the coordinating die. I stamped the sentiment from So Many Sentiments stamp set onto black card stock. It was heat embossed with white, then cut out with the banner die from Scalloped Dies.  I adhered the unicorn and the sentiment with foam tape to the beautiful sparkly Glimmer pasted background!


Really such a fun and easy way to fancy up a card! I'm hooked! :)

Next up is Danielle:

Hello friends! I am absolutely obsessed with the Nuvo Jewel Drops - these dry with a translucent finish which are gorgeous! I typically use them to create droplet like embellishments on my cards, but I wanted to do something different for today!

I took out my Geometric Circles stencil and placed it over my card front. I squirted three pretty big blobs of Nuvo Jewel drops (in Limoncello, Pale Periwinkle, and Rose Water) around the middle of the stencil, and used a plastic card to scrape it across the stencil to make it smooth. I didn't worry about neatly covering the whole front, as I wanted a more free form look to the pattern. I also didn't worry about the colors mixing, as I was hoping they would blend together a bit. You can see the results below!

I love how soft and lovely this turned out!  I then finished it off with some sentiments from the So Many Sentiments stamp set. 

Because of how the Nuvo Jewel Drops are designed, they dry with the most dreamy translucent, shiny finish!

I hope this inspires you to use your products in new ways!

51

Beavers Eh with Kay

Hi there!
I have a super fun card to share with you today featuring the  adorable set from the January Neat & Tangled Release called Beavers Eh. This set has the cutest images and sentiments!


I combined two of the cute  beaver images along with the trees from the Lumberjack Love set to create this little outdoorsy scene. I thought it would make a perfect Valentines card! I used Salty Ocean Distress ink for the sky then blended some Mermaid Lagoon along the bottom. I had intended for that to look like a lake behind the grassy hill, but it really doesn't much. Oh well... I used Mowed lawn Distress ink for the grassy hill.


All of the images I colored with Copic markers and cut out with the coordinating dies. The trees I tucked behind the hill and glued with liquid adhesive. The beavers I adhered with foam tape in front.


I stamped the sentient on some white card stock and cut it out like a banner. I then adhered that to the top portion of the card with foam tape.


I hope you have enjoyed my card today! Thanks so much for stopping by!


Kay :)


6

Warmest Wishes with Kay


Hello everyone! I hope you are enjoying the holiday season! I have another wintery Christmas card to share with you using some fun stamps and dies from Neat & Tangled. I mixed several different sets here to create this cute scene! I used Merry Kisses, Wild Ones, Lumberjack Love, Holiday Baking, and Into The Woods.


For the background, I used Smooth Bristol Board and blended some Evergreen Bough and Pine Needles Distress inks, then sprinkled with water and white acrylic paint.  I added a snowy hill at the bottom, and a sentiment from the Merry Kisses stamp set at the top.
All of the images were colored with Copic markers, cut out with the coordinating dies, and adhered with liquid glue. The two little animals and bird in front, I adhered with foam tape for a little dimension.


I added lots of Stickles to the trees, candy cane, present and pudding, but it's hard to tell in the photo. In real life this card sparkles and shines!

I hope you have enjoyed my card today! Wishing you a wonderful Holiday season!

Kay :)


6

Joyful & Triumphant with Kay


Hello! We are just a few days away from Thanksgiving here in the states and the holiday feeling is definitely in the air around our house! I've been making lots of Christmas cards with all of the fun new holiday products out there and I have a cute one to share with you today using some of the new November Neat & Tangled release.


For this card, the little boy, who is the star of the show, is from The Christmas Pageant stamp set. The tree is from Lumberjack Love, the present is from Fa La Llama, and the snowflake is from Holiday Baking.  


For the background I did something fancy. I don't normally do fancy, glittery, blingy stuff, but for Christmas I sometimes go all out. I used some embossing paste and I mixed some Lindys Magicals Jingle Bells in with that and spread it through the Radiating Star Stencil. I have totally fallen in love with hat stencil! Before the texture paste was dry, I sprinkled it with fine glitter.


All of the images were colored with Copic markers and I added some stickies to each of them for some more glittery bling-ness! I took a piece of white card stock, cut a circle in it, stamped the sentiment from the Joyful Sentients stamp set, and mounted this over my stenciled background with foam tape.  All of the images were adhered with foam tape, and I added a few sequins from the Snowfall Sequin mix.

I hope you have enjoyed my card! Have a wonderful week!

Kay :)


6

Warmest Wishes With Kay


Hi there Kay here and I have a fun little snow scene to share with you today that I created with some adorable stamp sets from Neat & Tangled.  I absolutely love all of Elena Roussakis's designs, and what is fun is that you can mix and match elements from all of the different sets!


So for my card today I used Lumberjack LoveGet YetiFa La Llama and Merry Kisses. I created my background with Distress Oxide inks blended on Bristol Board and sprinkled with water. When this was dry, I glued it down to a horizontally folded white card base.


I created some snowy hills layering one higher up in the background and popping up the front one with foam tape. I then colored all of the cute images with Copic markers and added them to my scene. Some of the trees and mountains were tucked right under the edges of the snow and the little characters in front were popped up with foam tape.


The sentiment is from the Merry Kisses stamp set. I stamped that with Versa Mark ink, and embossed it with white embossing powder. 

Neat & Tangled Products used:


Thank you so much for stopping by! Have a great rest of the week!

Kay :)
5

Oak Leaf with Kay Miller


Hi there! Kay here with a card to share with you that I created with the new Oak Leaf die and Oak Leaf stamp set from the September release. Is it getting cool where you live yet? It is here, and I so love it! Fall is my favorite time of year, and fall cards are some of my favorites to make. I love the colors of fall!


I am in love with the Oak Leaf die! There are so many creative ways you can use this die. For my card today, I watercolored a piece of watercolor paper with fall colors, then splattered with water and with some of the different colors of watercolor too. I then used the die that has the cutouts to cut out my watercolored piece.


I did not punch out the pieces, I left them in and glued this down to a brown leaf base cut with the solid leaf shape. I then cut the white piece out and adhered this over the top.  Next I took two shades of card stock, the red and the green and cut the solid leaf die out of the center of each. I then cut them in half diagonally and used the bottom of the red piece and the top of the green piece.


I glued the leaf down flat to a white card base, then I popped the green and red pieces up with foam tape, so the leaf is a bit recessed into the card.  I embossed the sentiment from the Oak Leaf Stamp Set onto dark brown card stock, cut those out, and added them with foam tape. I also added a few drops of Nuvo Crystal Drops Pale Gold.

Oak Leaf Nice and Neat Dies
Oak Leaf Stamp Set

Now hopefully that will put you in the mood to create some fun fall projects for your friends and family!

Thanks so much for stopping by!

Kay :)

7

Thankful Autumn with Kay


Hello! I'm here to share a card with you that I did with some fun Neat & Tangled products! I know, I know, it's another fall card. I figure if people can make Christmas cards all year, then I can make fall cards all year too :) Besides, it seems like Christmas sneaks up on us so fast, that Fall kind of gets squished out and left behind. Can't have that now!


For this card, I'm using the Triangle Patterned Builder diesMaple Leaves Journaling Card, and Maple Thanks. The paper is from Doodle Bug Design.


I started by cutting  a lot of the smallest triangles from the Triangle Pattern Builder Dies,  out of the fall colored patterned papers. I then drew a diagonal line across my white card base, and started piecing my quilt design. Once I had one row down against the line, lining up the other pieces by eye was a chinch!


After I got all of my pieces glued down, I stamped the sentiments from the Maple Leaves Journaling card along the edges of some of the squares. Then I cut the Maple Thanks die out of white card stock and glued that down at an angle.

Thank you so much for stopping by today! I hope you have enjoyed my card!

Kay :)


6

Mermazing With Kay Miller

Hi there! Kay here with a fun card to share with you created with the adorable Mermazing stamp set and Mermazing Nice and Neat Dies.


 It was love at sight when I first saw this stamp set, and the sentiments are too cute!


I started by creating a watercolored background using watercolor paper and Peerless watercolors. I left some white along the bottom for the sand to make it look like a little underwater scene.


I colored all of the images with Copic markers and cut them out with the Mermazing Nice and Neat dies. I did some highlights on the mermaid's hair with white acrylic paint.


I adhered all of the colored images to my watercolored background with foam tape and added some clear accent dots to look like bubbles.

I hope you have enjoyed my card today! Thanks so much for stopping by and enjoy your weekend and week ahead!

Kay :)

Stamps: Mermazing
Dies: Mermazing Nice and Neat Dies
4
Back to Top