Showing posts with label Grateful Heart. Show all posts

Finding Inspiration in Previous Projects with Daria Grushina [Part 2]

 Hello dear Friends! 

Daria here. To continue my thought on finding inspiration from previous projects, I wanted to share one more card. It uses the same supplies:  Grateful Heart stamp set with coordinating dies, patterned paper, gold embossing powder and a few gold sequins. 

The only thing I've added is die-cut letters for the sentiment. 

I think, this card has the same feel as a previous one. At the same time, it is different: design, scheme, colours. It is more monochromatic with just a touch of color behind the letters. 

I again started with heat embossing beautiful flower cluster from Grateful Heart stamp set in Gold embossing powder. Die cut it and foam mounted over a patterned panel from Modern Graphics paper pack from Julie Ebersole. 

Then, I've added die-cut letters for the sentiment in gold glitter paper along with a little pink behind. They were made using Classic Block Alpha by Ellen Hutson. But you may use any letters you have on hand. 

Gold sequins add that extra shine and movement to the card. 

Can you tell me, which of the three cards made as an inspiration from one another you liked the most? Or may be you also have a similar creative process?

Thanks so much for stopping by, and see you next time,

xoxo,

D.

3

Finding Inspiration in Previous Projects with Daria Grushina

Hello-hello awesome people,

Daria here. It is been a while.  At my previous post, I've shared with you this card


It was a super simple and fast to make project.  While writing about this card, I also got an idea of another card, using photos of the project as an inspiration. To say the truth, it happens with me a lot. I start to make something and wile making a card I've often got a completely different idea in the process or afterwards. Does it happen with you too?


So today, I am again going to share a card with  Grateful Heart stamp set. I started with heat embossing beautiful flower cluster from Grateful Heart stamp set in Gold embossing powder. Die cut it and foam mounted over a panel I made from coloured cardstock. I think pink and grey are just made for each other and look so good together. 


I also used a patterned paper from Modern Graphics paper pack from Julie Ebersole. It always give a right contrast and modern feel to any card project. 


Sentiment is from the Floral Frame stamp set, and also heat embossed in gold. I finished it up with one sequin in gold. 

That's for today.  Thanks so much for stopping by, and see you next time,

xoxo,

D.

7

Super Simple Thank You Card with Daria Grushina

  Hello-hello awesome people,

Daria here. Today, I am sharing a super simple and fast to make project. Again, I am working with  Grateful Heart stamp set. Love when image speaks for itself and already is a gorgeous focal point. So, I've decided to go with the image, gold embossing and simple, almost minimal design. 


I started with heat embossing beautiful flower cluster from Grateful Heart stamp set in Gold embossing powder. Die cut it and foam mounted over a grey cardstock base. Sentiment is from the same stamp set, and also heat embossed in gold. I finished it up with a few sequins in gold. 


With this design, it is super easy to mass produce Thank You cards. Moreover, it will work with any color scheme. I made a few photos to show how good this image would look with different colours of background. 


You may even choose to use pattern or embossed paper. 


While thinking about this post, I also made another card, using photos of the project as an inspiration. I will share it next time. Meanwhile, I will be happy to see what you create. If you get inspired, be sure to tag us in social media.


Thanks so much for stopping by, and see you next time,
xoxo,
D.


3

Diamond Pattern Card with Daria Grushina

 Hello-hello dear people,


Daria here. For my today's post, I've created a diamond pattern using Geometric die set and little flowers and leaves from Grateful Heart stamp. And I really like the way it turned out. 


I started with stamping and colouring small flowers and leaves from Grateful Heart stamp. Then, I die cut the flowers with  coordinating dies, along with several diamond shapes from Geometric die set. 

I arranged these geometric shapes over my card base and then worked on each flower cluster individually. I adhere every cluster using both glue dots and foam squares. 


When all of my individual pieces were done, I adhered them with foam tape to the card base. 

I also added a sentiment from  Typed Sentiments stamp set and placed on a banner from Skinny Stripes dies. A few sequins in Crystal Clear added a little bit of shine. 


As I had a lot of extra flower let, I've decided to do second card. For my second card, I went with a design I tried earlier, but with a little twist. I leave the link here, so you may check it out.  I arranged flowers, added leaves, and adhered everything with foam tape. I left little borders on the sides to mimic the frame. 


I placed a little sentiment from Typed Sentiments stamp set over a short banner from Skinny Stripes dies on the side, picking from one of the flowers. 


A single gold sequin attract attention to the sentiment and gives a little more interest to the card. 


That's it, hope you like it and may be will give a try. 
Thanks so much for stopping by, and see you next time,

xoxo,
D.

6

Grateful Heart Thank You with Cheiron


Hi there crafty friends, it's Cheiron here and today I have a card for you using the Grateful Heart stamps and dies. It's a quick and easy card, with some quick Copic coloring on the flowers and a Distress Ink panel as the background.


I blended Tea Dye Distress Ink onto a panel of Distress Watercolor cardstock, and also splattered some Tea Dye Ink mixed with water onto the panel. Once it was dry, I stamped the sentiment.

I stamped the flowers onto a piece of Neenah cardstock and colored them in with Copic markers, then adhered them to the panel with foam tape. Super quick and easy and reminded myself that coloring and cutting a ton of these flowers would be great to have on hand for future cards!


SUPPLIES:
1

Lots of Strips Card with Daria

Hello-hello Awesome People!

Daria here. This morning, I had quite an experiment. I went life over instagram to assemble this card. It was my first experience in life streaming, so I was quite nervous. But, I wanted to share with you the process, so you may find it as an IGTV video. Thanks so much for everyone who could join and support me. For my card, I am using  Grateful Heart stamp and Skinny Strips die set.


I started with die cutting lots of banner shapes with Skinny Strips die set from white, coloured and gold copper cardstock. Paper comes from Over The Rainbow Assorted Cardstock Pack and from Gold metallic cardstock.


I arranged the stripes over a card base and glue some of them with glue tape and some with foam tape. This gives different levels of dimensions.


I stamped the flower cluster from Grateful Heart stamp in black and glue its parts over my background. The sentiment is from Butterfly Beauties stamp set, stamped over one of the banners i made earlier.  As a finishing touch, I have added a few sequins in Crystal Clear. 


Thanks so much for stopping by, and see you next time,
xoxo,
D.


Supply list:

Grateful Heart, Neat & Tangled Clear Stamps
Grateful Heart, Neat & Tangled Dies
Skinny Strips, Neat & Tangled Dies 
Butterfly Beauties, Neat & Tangled Clear Stamps 
Over The Rainbow Assorted Cardstock Pack 

56

Negative Die-cutting for Layering with Daria Grushina

Hello-hello Awesome People!

Daria here. Today, I am again playing with Grateful Heart stamp and Butterfly Beauties die.  This card was inspired by my previous project, that you can ind here. I used negative die cutting for a card with patterned butterfly. Then Kelly Latevola transformed  this idea into four amazing projects. 
You may find Kelly's post and video is here. So, it was Kelly, who inspired me and made me thinking, may I change it further. 


I was watching her video and had a thought: what if to use the same idea in reverse and to colour not the peaking part but the whole front panel. 


So, I took the little flower bud from Grateful Heart stamp set and stamped in over a panel of white cardstock to make a patterned look. I added a few dots here and there to fill the space in between the images. for this matter, I used these stamp sets: 


Then, I coloured all the buds with watercolour pencils and added some Wink of Stella marker to blend it out. I die cut butterfly using Butterfly Beauties die from my panel and also from light blue cardstock from Over The Rainbow Assorted Cardstock Pack and from Gold metallic cardstock.  I am using negative parts of the die for my project. I cut the negative parts from blue and gold paper in two pieces and then adhered them behind the coloured panel. I used foam tape to make layers and dimension with peeking effect. 


The sentiment is from the Grateful Heart stamp set. After stamping a sentiment, I cut off little parts from my negative die cut to make the sentiment more readable. As a finishing touch, I have added a few sequins in gold. 

That's it. Hope you liked it.  Thanks so much for stopping by, and see you next time,
xoxo,
D.

3

A Friend Like You with Koren Wiskman


Hello everyone, Koren here with a vibrant card today, featuring several of Neat & Tangled's products. This card really pops and it's a fun way to use your floral stamps without coloring them.

Background:
I started with two pieces of cardstock both cut to 4 3/4 by 3 1/2. I used the pink and teal colors from the 
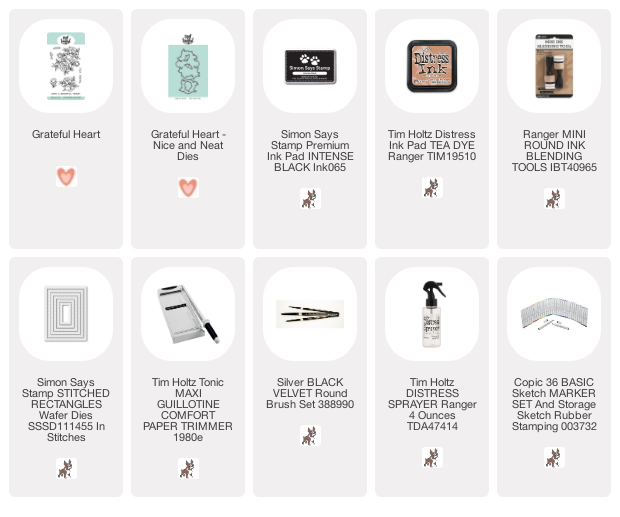
Neat & Tangled Cardstock Assortment Pack.  I loaded one panel at a time into my Mini MISTI with the largest floral stamp, from Neat & Tangled's Grateful Heart stamp set, aligned within it. I stamped it twice, once on the pink panel and again on the teal panel, both in the exact same spot.

I took the teal panel and the Neat & Tangled Butterfly Beauties Die, and aligned the die to be cut towards the upper right center of the teal panel. Once the butterfly was cut into the teal panel I adhered a piece of Judikins Heat Embossable Window Plastic directly behind the panel with Nuvo Liquid Deluxe adhesive.

To create the window pocket for the sequins to live in, I added thin strips of foam adhesive all along the body of the butterfly. Doing this helps the sequins stay within the confines of the window where you can see them. I added the same adhesive to the rest of the panel.


The sequins used on this card are from Simon Says Stamp. They are called Flowering Clover and have beautiful tones of pink and greens to go well with this cards color palette. Once the sequins were added I stuck the pink panel to the back to enclose all of my beautiful sequins.

Sentiment:
To create the cluster of sentiments I have arranged here on my card, I took the hot pink color cardstock from the Neat & Tangled Cardstock Assortment Pack and stamped "a friend like" and "is rare" both from the Neat & Tangled Moon Magic stamp set. I stamped it with Nuvo Clear Mark embossing ink and heat embossed it with Simon Says Stamp white embossing powder. I then used my paper trimmer to cut it down into small strips. This is actually all one sentiment but I masked the parts of the sentiment that I didn't want to stamp with a short piece of tape (or you can even use scrap paper to mask it).

The "you" word die is from Neat & Tangled's Just because word die set. I cut is using several of the same colors already used on the card plus one very bright green that I pulled from my stash. If you look closely, you can see different color layers in the side of the word die.


The strips were popped up using foam tape and the word die was adhered using liquid adhesive. To finish off the card I used a few of the Flowering Clover sequins on the outside of the shaker pocket surrounding the sentiments.

I hope that I have inspired you to create something today.

Koren


1

Four Card Set Using Positive and Negative Die Cuts with Kelly Latevola

Hello Crafters! 

It's almost Friday! 
Or is it? 
It's hard keeping the days straight right now. 

I have been spending quite a bit of my card making time trying to create encouraging cards for those wonderful people out there working still keeping our world turning. Consequently, I've been all about making multiples. 


My amazing teammate Daris recently put up this beautiful card using the negative of our Butterfly Beauties Die and it had me all kinds of inspired! I decided to take it one step further and use both the positive and negatives from my die cuts to create four cards. 


This card is the CASE of Daria's which started it all. I used the largest die from our Geometric set and turned it on it's side. Once I die cut it out I used it as a frame for the lovely Grateful Heart Stamps
I stamped several of the flowers on white cardstock to create my focal point. Try using a pencil to lightly trace the frame shape on your background to make sure all the pieces get filled it completely and you don't have any empty stamping spots. 


I used the positive piece to create an accent style focal point. I stamped the flowers all over the entire piece filling up the space. Once that was done I went back in with a dark gray and colored in all the spaces in between. This gives the piece more of a presence on the card. I used the die to create a frame on both cards by tracing around it with a black pen. The "frame" help finishes the card off. 


I love how both cards turned out. They are the same but different. Which one do you prefer? 


For my next card I used the largest die from our Circular set to die cut through the bottom ride of the card. I cut another circle in the next size down for my sentiment. I used that frame trick again but this time I added in some glitter paper to change the design up and of course add some sparkle! 


The last card can be done one of two ways. I actually used my positive as a mask to stamp my flowers around the circular shape but you could actually stamp them as usual and just pop your stamp up over top, no masking required. I opted for a black circle to make the focal point a bit more bold but any complimentary color would look great! 


 The purple one gets it's extra flair from the soft blue halo around it but I thin I'm a bit partial to the pink because of that glitter paper :) 


I think each one will be really happy in their new home showering a healthcare worker, grocery store employee, delivery truck driver with love. So many essential workers out there! 

You can see all the cards being made in the video below.


Last but not least the Neat & Tangled 25% off Sale is still going on! 


Danielle is amazing and is going to keep the sale going as long as possible. You can shop it here! Don't forget it counts towards already discounted sales items too! 

Thanks so much for stopping by! 


Supplies: Affiliate links are used
Neat & Tangled Grateful Heart
Shop at:
SSS | NT
Grateful Heart Nice and Neat Dies
Shop at:
SSS | NT
Neat & Tangled CIRCULAR
Shop at:
NT
CIRCULAR NICE AND NEAT DIES
Shop at:
NT
Neat & Tangled GEOMETRIC
Shop at:
NT
GEOMETRIC Nice and Neat Dies
Shop at:
NT
OVER THE RAINBOW ASSORTED CARDSTOCK PACK
Shop at:
NT

Sakura WHITE GELLY ROLL Medium Point Pens Set
Shop at:
SSS | HB
EK Success WRITING PEN FINE TIP
Shop at:
SSS
Neenah Classic Crest 80 LB SMOOTH SOLAR WHITE
Shop at:
SSS | SB | HB
Fiskars PREMIUM CUT LINE Paper Trimmer 12 Inches
Shop at:
SSS | SB
Tombow MONO MULTI Liquid Glue
Shop at:
SSS | SB | HB
3M Scotch DOUBLE-SIDED FOAM TAPE Permanent
Shop at:
SSS
Copic Sketch Marker RV02 SUGARED ALMOND
Shop at:
SSS | DB
Copic Sketch Marker RV04 SHOCK PINK
Shop at:
SSS | DB
Copic Sketch Marker RV09 FUCHSIA
Shop at:
SSS | DB
Copic Sketch MARKER C7 COOL GRAY
Shop at:
SSS | DB
Copic Sketch Marker YG01 GREEN BICE
Shop at:
SSS | DB
Copic Sketch Marker YG03 YELLOW GREEN
Shop at:
SSS | DB
Copic Sketch Marker YG17 GRASS GREEN
Shop at:
SSS | DB
Copic Sketch Marker YG67 MOSS
Shop at:
SSS | DB
Copic Sketch Marker V01 HEATH
Shop at:
SSS | DB
Copic Sketch Marker V04 LILAC
Shop at:
SSS | DB
Copic Sketch Marker V06 LAVENDER
Shop at:
SSS | DB
Copic Sketch MARKER V09 VIOLET
Shop at:
SSS | DB
Simon Says Stamp LARGE GRID PAPER Pack Pad
Shop at:
SSS
Precision Heat Embossing Tool Gun
Shop at:
SSS | SB | HA | HB
Tsukineko Versamark EMBOSS INK PAD
Shop at:
SSS | SB | HB
Inkadinkado EMBOSSING MAGIC Powder Bag
Shop at:
SSS | SB | HB
Simon Says Stamp EMBOSSING POWDER WHITE Fine Detail
Shop at:
SSS
Copic Sketch Marker Y08 ACID YELLOW
Shop at:
SSS | DB
Copic Sketch MARKER B06 PEACOCK BLUE
Shop at:
SSS | DB
ZIG Wink of Stella GLITTER CLEAR Brush Tip Marker
Shop at:
SSS | SB | HB
Copic Sketch Marker RV69 PEONY
Shop at:
SSS | DB
Copic Sketch Marker B02 ROBIN'S EGG BLUE
Shop at:
SSS | DB
MISTI PRECISION STAMPER Stamping Tool Kit
Shop at:
SSS | SB
MINI MISTI PRECISION STAMPER Stamping Tool Kit
Shop at:
SSS | SB
Copic Sketch Marker R32 PEACH
Shop at:
SSS | DB
Copic Sketch Marker R35 CORAL
Shop at:
SSS | DB
Copic Sketch Marker R29 LIPSTICK RED
Shop at:
SSS | DB
Copic Sketch Marker R59 CARDINAL
Shop at:
SSS | DB
Ranger Studio Paint ARTIST BRUSHES
Shop at:
SSS | SB
Silver BLACK VELVET Brush Size 2 Round
Shop at:
SSS | DB
Copic Sketch Marker Y02 CANARY YELLOW
Shop at:
SSS | DB
We R Memory Keepers TRIM AND SCORE Board
Shop at:
SSS | SB
Copic Sketch MARKER b04 TAHITIAN BLUE
Shop at:
SSS | DB
Copic Sketch Marker B00 FROST BLUE
Shop at:
SSS | DB
Copic Sketch Marker B0000 PALE CELESTINE
Shop at:
SSS | DB
Simon Says Stamp Cardstock SILVER GLITTER
Shop at:
SSS
Spellbinders PLATINUM 6 DIE CUTTING AND EMBOSSING MACHINE
Shop at:
SSS | SB | Spellbinders
Hero Arts Intense Black Ink Pad
Shop at:
SSS | SB | HA
Therm O Web PURPLE TAPE
Shop at:
SSS
Tonic Studios Glitter Cardstock Sugar Crystal
Shop at:
Tonic USA | Tonic UK
1
Back to Top