Hi there crafty friends, it's Cheiron here today with a fun 4th of July card for you using the Hexastar Cover Plate. For this festive card, I created a background using some of my favorite red and blue Alcohol Inks . Once it was dry, I cut a piece of white cardstock using the Hexastar Cover Plate die and adhered it to the alcohol ink panel with foam tape.
To finish my card, I cut a bunch of Lucky Stars dies and stamped and embossed them with the Tinsel Embossing powder as well. I arranged them in a cluster around the top and the bottom of the sentiment. I know someone who has a 4th of July birthday, and this will be the perfect card to celebrate them. If you are celebrating this week, I hope you have a terrific 4th!
Daria here. I am so happy to have time to play with the products that I love. Initially, I wanted to make something with Llama Stitching Dies and felt.... But, something went completely different, lol.
While all my felt was on the table, I've decided to unite different textures of felt, paper, and gold glitter paper on one card. For the background, I again used Modern Graphics paper pack from Julie Ebersole. I took Triangle Pattern Builder die set and die cut triangles from coloured cardstock, coral felt and a glitter paper. To make open glitter triangle, I placed triangle dies one inside the other and die cut together with one run. Sentiment is from Just Because stamp set. All the triangles are foam mounted. Here is what I ended up with.
I also think these triangles will look super cool with just different colours of felt.
I am a lover of very clean and minimalist cards. That is my try on it. Pattern paper, coloured cardstock and a tiny stripe of coral felt. Sentiment is from Celebrate stamp set. I finish it up with a glitter heart made with a die from Love You dies set.
I like this color combo so much, that I plan to play with it more...
Thanks so much for stopping by, hope you've liked those ideas and will give them a try.
Have a wonderful day,
D.
Today is the third and final day of our collaboration with Et Cetera Papers. Et Cetera Papers produces specialty real wood papers and products, and several team members are working with these papers this week.
The Et Cetera Papers team will also be working with our products, so you'll want to stop by their blog as well. At the end of the week we'll be drawing a winner from comments on our collaboration posts for prizes. We'll be drawing a winner here on the Neat & Tangled blog for the $25 prize pack you see below (which consists of adhesive backed real wood cherry and birch veneer papers and as well as real wood envelopes), and Et Cetera papers will be drawing a winner for a $25 Neat & Tangled store credit.
OK, let's take a look at today's projects. First up today is Keeway:
Hello, it's Keeway! For my card today, I am working with the birch wood adhesive sheet as my base layer of the card. It is difficult to see in the picture, but the birch wood sheet has a very cool wood texture that really adds quality to the card.
I wanted to keep the card clean and simple, and with Spring amongst us, I thought would be great to bring out Itty Bitty Welcoming Committee stamp set! I love this adorable sheep and bunny holding a banner that you can fit a sentiment to any occasion.
I blended some turquoise bottom up, and blue and pink from top to center on a smooth white cardstock and die cut a circle out for the background. I then stamped 'It's Your Birthday' from the Celebrate stamp set at the top. I adhered this background directly to my birch base card.
I then adhered my image in front of the background with foam tape to complete the card. A simple and adorable birthday card.
I'm so happy to present you my projects for our collaboration with ETC Papers! For both cards I used the Cherry Tape Roll as it fits my pine trees perfectly. If you have a bigger die to cut you can go with Cherry Wood Paper Sheet. Both are adhesive and so easy to use!
I made two funny Valentine cards based on my first associations with wooden paper and the tree dies Neat & Tangled has.
The second card is more "cute funny". I used the Sailmates stamps set to add faces to my wooden trees. The sentiment from the Lumberjack love stamp set is way too cute and soo perfect for the characters I made.
The other thing that I liked about these ETC Papers goodies is that in addition to the fact that the wooden sheets as well as the tape are self-adhesive, they have coordinating envelopes. I'm sure that cards made with them will impress anyone who gets them.
We hope you've enjoyed our Et Cetera Paper projects. Be sure you leave comments on all our collaboration posts to be entered to win the prize pack, and do the same over on the Et Cetera Papers blog to see what they have to share and to be entered to win a credit to the Neat & Tangled store.
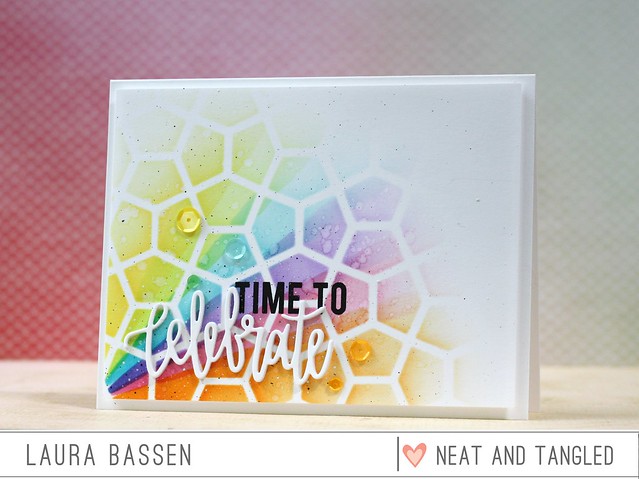
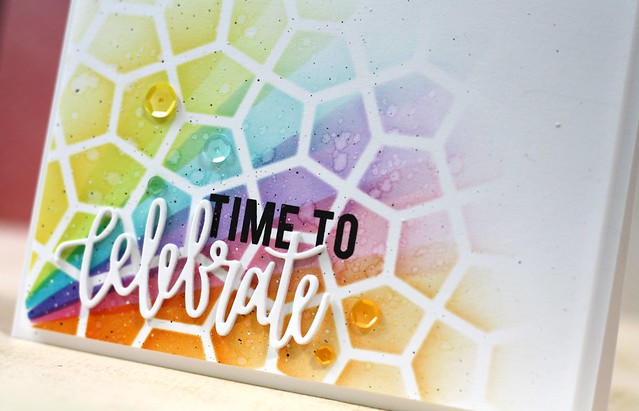
Hi there! Laura here and today I have a fun, colorful project featuring the Celebrate die, Celebrate Stamp set & Pentagon Stencil.
I created a fun pattern on pattern background by masking "rays" with post-it tape over top of the Pentagon Stencil.
Here's a video to show you how I created this card.
Our September Guest Designer, Julia Altermann is back today with a wonderfully clean and simple card. Here's Julia to tell us all about it: Hello crafters! It’s Julia and I’m back with an new project for Neat & Tangled. Today, I am keeping it clean and simple, but with a pop of color. Check it out!
I wanted to create the illusion of a separate space on the card where my sentiment would appear, so I masked off everything but that space. By stamping partially on my mask, the word “Everything” from the Celebrate stamp set would be cut off in the middle, and it would create an optical illusion. Gotta love what masks are capable of :) I die cut the word celebrate from gold paper and glued it with Tombow Mono adhesive right on top of my stamped background – it’s great to see how you can use a bold sentiment stamp to create your own background pattern. I used Ranger Raspberry Sorbet for the intense stamping, and My Favorite Things Pink Lemonade for the soft impressions.
For the finishing touches, I used my Stardust Gel pen to trace the faux edges of my patterned area, and then added some sequins with Glossy Accents and a Fine Tip Applicator.
Thank you for stopping by today! I hope you got inspired! See you again next week!
——— S U P P L I E S ———
• Celebrate - Nice and Neat Dies
• Pink Blush Sequins
• 4mm Pink Blush Sequins
• Neenah Solar White 110lbs
• Ranger Dye Ink Raspberry Sorbet
• My Favorite Things Pink Lemonade
• Sakura Gelly Roll Stardust AMZ
• MISTI
• Tombow Mono Glue
• AMZ Glossy Accents
• Ranger FINE TIP APPLICATOR for large Glossy
• Post-it® Labeling Tape, 2 Inches x 36 Yards, White
• Sizzix BIG SHOT MACHINE
• Sizzix Magnetic Platform
• HA Scrubber Pad
• HA Ultra Clean Spray, 2oz.
Here we are on Day 4 of our Cosmo Cricket collaboration week! Each day this week we're sharing projects featuring Cosmo Cricket and Neat & Tangled. We hope that you are enjoying the projects as much as we have been enjoying the products!
Every good collaboration need a couple prizes, right? We've got a great bundle of Cosmo Cricket goodies to share with one of you. Just leave a comment on each post this week and we'll pick a winner and announce them next week.
Cosmo Cricket also has a prize to share, so be sure to stop by and check them out on Facebook and Instagram.
Today Nina-Marie, Taheerah, and Mayuri are sharing with us. First up is Nina-Marie:
Hi friends, it's Nina-Marie here with you, sharing a fun set of cards that feature the gorgeous Cosmo CricketArt Deck papers, along with some of the newest Neat & Tangled stamps and dies!
I created three different cards using the Art Deck papers and I even have a video tutorial for you, showing how I did it! Each card shares the same technique, which is shimmer watercoloring with Distress Inks.
In the video below, I'll be showing you how I created my own shimmer watercolors to paint over the emboss-resist patterns that are printed onto the Art Deck papers.
This first card features this stunning flower, which looks amazing once colored in with the watercolors.
I paired the flower with the new Doily Tag die and a sentiment from the Celebrate stamp set (both new products from Neat & Tangled).
My second card showcases the fun "dream big" constellation-styled sentiment that had a ton of gold dots surrounding it. This immediately made me decide I needed to create a galaxy background for this paper.
I paired this paper with the Scored Shapes dies from Neat & Tangled... the dimension of these stars popping off the galaxy looks fabulous!
My final card features this encouragement quote that has some beautiful gold foiling on some of the letters.
To see how all of these cards came together, be sure to watch the video below! If you enjoy, please give it a big thumbs up and subscribe to our channel for more inspiration! For a complete supply list, please stop by my blog.
Now it's over to Taheerah for a quick and easy card featuring one of the pieces from the Art Deck Papers, paired together with stamps from Painted Hello and Faceted:
Some very quick watercolouring and splatter over the LOVE panel brought it to life, and then I stamped the solid hello sentiment with Versafine ink.
The card base also got some love to match it with the letters. I stamped the base with the large facet stamp from Faceted, heat embossed it with white embossing powder, then watercoloured it with watered down gold mist for a complimentary finish that doesn't distract from the main panel.
But check out that shimmer! :)
And last but not least, Mayuri has a project to share:
The Pixie Paint bottles of coloured powder pack a huge punch and I had so much fun playing with them:
I began by creating a fun background panel - firstly, I spritzed a piece of lightweight watercolour paper with water, then laid down the Geometric Blooms stencil on top before tapping out some of the Harbor coloured Pixie Paint.
The paint reacted beautifully with the stencil and the water - I removed the stencil and spritzed a little more water to move the paint around a bit more, and heat set the panel when I was happy.
I trimmed the panel down and foam mounted to a white card base before stamping the skunk from the Little Stinker set with Versafine Onyx Black ink, all ready to colour in!
I used some ZIG Clean Color Real Brush Pens to colour in the little animal, stamped a sentiment from the same set, trimmed him out and foam mounted him to the card front. To finish off, I added some sequins from the Gold Mix selection.
So much wonderful inspiration today!
Be sure to leave a comment and come back tomorrow for the final day in our collaboration. At the end of the week one lucky commenter will win a Cosmo Cricket prize pack!
Welcome back for Day 2 of our Cosmo Cricket collaboration week! Each day this week we'll have two or three team members sharing projects featuring Cosmo Cricket and Neat & Tangled. The team has enjoyed working with Cosmo Cricket projects immensely and it shows, we have so much great inspiration to share with you this week!
Every good collaboration need a couple prizes, right? We've got a great little bundle of Cosmo Cricket goodies to share with one of you. Just leave a comment on each post this week and we'll pick a winner and announce them next week.
Cosmo Cricket also has a prize to share, so be sure to stop by and check them out on Facebook and Instagram.
Today Emily and Daria are sharing with us. First up is Emily:
My card features the Swatch Sticks, which are essentially adorable and portable watercolour sticks! The set comes with 12 colours and a water brush. They flow seamlessly from one colour to the next for a perfect ombre rainbow effect. I partially die cut the stitched circle from the Making Waves Dies, as well as the waves from Mermazing, and you can see in the photo below that only the top half of the dies are cut, allowing just the tops of them to be popped up with foam tape.
After wetting the cardstock with the water brush that comes with the set, I swiped the Swatch Sticks directly across the sun, as well as the waves and the darker water on the sides of the sun. I used one colour at a time, starting from the lightest colour in the set to the darkest red. Then I used two turquoises and two blues for the water.
Basically, I used two sticks and four colours each, for both the sun and the water. I also used the water brush that comes with the set to do some light blending between the colours but I didn't have to do too much. Wetting the cardstock before applying colour did most of the work for me! I smooshed the colours on my Ranger craft sheet and used the water brush to colour the whale and starfish from Mermazing.
Next up is Daria:
Hi, everyone, for today's post, I come up with three simple to make, but still eye-catching cards. Seriously, I just couldn't stop playing with Cosmo Cricket goodies... They work so well with Neat and Tangled sentiments.
I wanted to show how to make simple yet bright cards using Cosmo Cricket Art Deck Book.
To start of, I choose three designs from the Art Deck Book, and colored them with different mediums: distress inks, watercolors, Cosmo Cricket Swatch Sticks and Pixie Paint.
While my colored panels were drying, I heat embossed different sentiments from Neat and Tangled Awesome and Celebrate Stamps Sets.
The Love Card turned out very graphic and modern. To achieve that look, I colored only some sections of the letters. I think, the sentiment "Me & You" in black and white compliments it nicely.
I also die-cut Awesome Nice and Neat Dies from gold metallic cardstock to add to one of my cards. It turned out very soft and elegant.
And of course, I couldn't pass on making a dreamy starry background. With pre-resisted cards from Cosmo Cricket Art Deck, it took only a few minutes to make.
So, I made three different cards. Which one you like the most? :) Btw, they are turned out to be square ones - 4 1/4 x 4 1/4 to fit colored panels perfectly :)
I made a processing video, as it is mostly coloring, I haven't done a voice over, but I hope you will enjoy, feel free to ask any questions - I will be happy to help.
I had a lot of fun playing with Cosmo Cricket goodies... And there are still plenty of designs left... Awesome when you need a fast card... You can find a full list of supplies on my blog.
Be sure to leave a comment and come back tomorrow for more inspiration from our Design Team. At the end of the week one lucky commenter will win a Cosmo Cricket prize pack!
We're excited to be introducing Julia Altermann as our guest designer this month. Julia is so talented! She is an amazing colorer whether you are talking Copics, paint, ink, pencils, she can do it all with fantastic results. She loves to experiment and work with different mediums and she has a wonderfully graphic, CAS, whimsical style. In addition, she has a very active YouTube channel where she documents her process. She's treating us to videos all month long! Here's Julia with this week's card:
Hello crafters! This is Julia from Just One More Card and I have the honor of guest designing for Neat & Tangled this month! I want to start off with a fun technique that you can do even if you don’t have all the supplies I am using.
I am using the Journaling Alpha dies to cut letters to spell out the word AWESOME and I am stacking the same letters on top of each other a few times, just so they will get dimension and look prettier on the card. You can use Tombow Mono glue to stack them, or add double sided adhesive to the back of your sturdy paper before die-cutting it.
To create the effect as if the letters had been dipped into gold, I used Flitter Glue and a foam applicator to add glue to parts of the letters. To create a more natural look, I’m making sure that I don’t have a crisp line but it’s rather messy before I apply my Gilding Flakes. With my scrubby tool, I can take off the excess and that leaves me with the polished letters which I can adhere to my card base.
To complete my statement on the card, I stamped one word from the Celebrate stamp set with Versafine ink and my MISTI just above the die-cut letters.
But what if you don’t have Gilding Flakes? No reason to panic, here are a few alternative methods you can achieve this look:
- Use your Versamark ink pad to apply sticky ink to your letters, then pour gold (or any metallic) embossing powder on top and heat emboss.
- Use watercolor card stock and any kind of the new fancy metallic watercolor sets to create the dipped look.
- Print a ragged-edged area of black laser ink on paper, die cut your letters so they cut only partially into the black area, and then use foil to apply the gold look.
Thank you for stopping by today! I hope you got inspired! I’ll be back with more fun projects this month and I’d love to hear from you here in the comments or on my YouTube channel to hear if you liked the project. Cheers!