Showing posts with label Celebrate Dies. Show all posts

Red White and Blue Celebrate Hexastar Cover with Cheiron


Hi there crafty friends, it's Cheiron here today with a fun 4th of July card for you using the Hexastar Cover Plate. For this festive card, I created a background using some of my favorite red and blue Alcohol Inks . Once it was dry, I cut a piece of white cardstock using the Hexastar Cover Plate die and adhered it to the alcohol ink panel with foam tape.


I stamped the Celebrate and embossed it with Ranger Silver Tinsel Embossing powder and then cut it out with the Celebrate dies and foam taped that to the alcohol ink panel.


To finish my card, I cut a bunch of Lucky Stars dies and stamped and embossed them with the Tinsel Embossing powder as well. I arranged them in a cluster around the top and the bottom of the sentiment. I know someone who has a 4th of July birthday, and this will be the perfect card to celebrate them. If you are celebrating this week, I hope you have a terrific 4th!

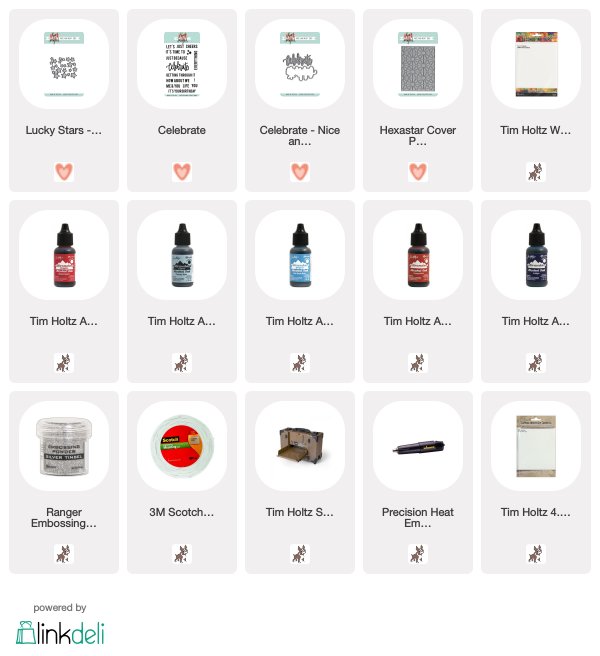
SUPPLIES:
2

Magnolia Two Ways with Daria

Hello Dears,

Daria here. So glad you are joining me today. It turns out we are all in the team are big fans of our new Magnolia stamp set. You may scroll down to previous posts to see what Kay and Bibi made with these beautiful flowers. As for me, I've decided two play with some coloring too this time.


I stamped a half letter sheet card stock with Magnolia flower and then colored it with Zig Clean color Brush markers.  It is very basic coloring, but I like the look. Then, I cut it in two pieces and got front panels for two card.


For one of it, I die-cut the flower with coordinating dies many times from post-it notes and made some masks. I glued them on top of colored flowers and then ink-blended Broken China Distress ink. Love how bright it  turned out.


For the second card, I've decided to go for a more clean look, and left the panel as is.


To finish the cards, I used sentiments from Awesome and Celebrate stamp and die sets. I keep using them over and over again.


I also added Nuvo Drops in White and Crystal Clear Sequins.


I hope you liked that simple ideas and will give them a try. Be sure to tag us in social media. It is always so rewarding to see what you create. 

Hugs, Daria. 

***
Neat&Tangled Products used: 


6

Celebrate!

Hello there!
Mayuri here, popping by to share a card using the Celebrate dies. This one was super easy to create - I can see myself using this method to create a whole stack of cards, each one being slightly different from the next.
©Candles in the Garden. Neat and Tangled September 2016 - Celebrate.
I began by making a background panel using Distress Inks and a few splashes of water. I smushed a couple of the smaller ink cubes onto my craft mat, spritzed with water and swiped through a panel of white cardstock.
©Candles in the Garden. Neat and Tangled September 2016 - Celebrate.
I didn't want an overly inky background, so I made sure some parts stayed white - I only needed enough to hold the die-cut sentiment. Once I was happy with my inky splodges, I heat set the panel, trimmed it down to the same size as my card base and then die-cut the sentiment through the middle.
©Candles in the Garden. Neat and Tangled September 2016 - Celebrate.
I wanted some gold to show through behind the die-cut panel, so I adhered a piece of gold foil cardstock to a white card base and then foam mounted the inky panel on top.
©Candles in the Garden. Neat and Tangled September 2016 - Celebrate.
To finish, I added a couple of sequins from the Gold Mix.
Thanks for stopping by :-)
2

Time to Celebrate with Laura

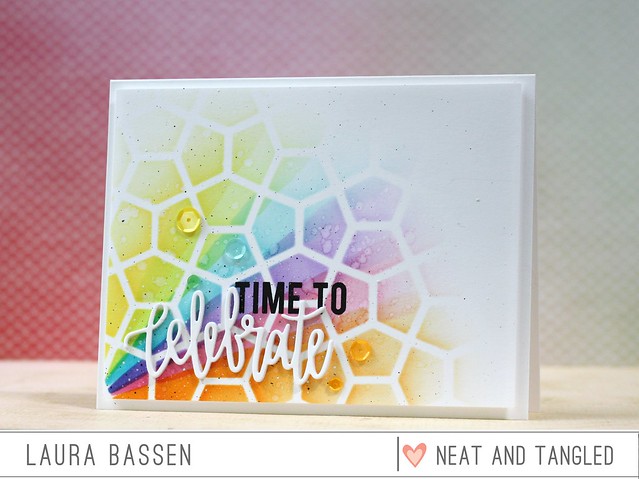
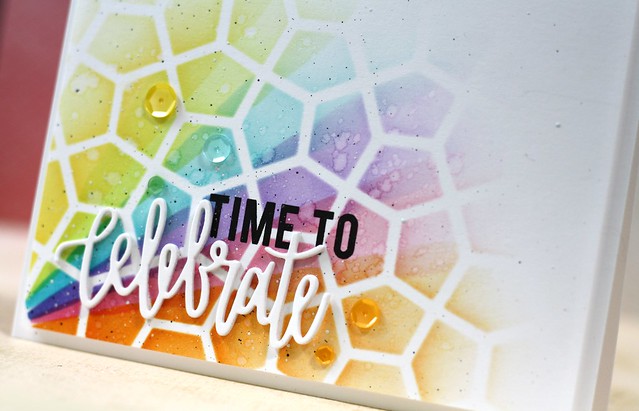
Hi there! Laura here and today I have a fun, colorful project featuring the Celebrate die, Celebrate Stamp set & Pentagon Stencil.Neat & Tangled-Celebrate
I created a fun pattern on pattern background by masking "rays" with post-it tape over top of the Pentagon Stencil.
Neat & Tangled-Celebrate
Here's a video to show you how I created this card.
Thanks so much for stopping by!
11

Celebrate with Julia Altermann

Our September Guest Designer, Julia Altermann is back today with a wonderfully clean and simple card. Here's Julia to tell us all about it:
Hello crafters! It’s Julia and I’m back with an new project for Neat & Tangled. Today, I am keeping it clean and simple, but with a pop of color. Check it out!

I wanted to create the illusion of a separate space on the card where my sentiment would appear, so I masked off everything but that space. By stamping partially on my mask, the word “Everything” from the Celebrate stamp set would be cut off in the middle, and it would create an optical illusion. Gotta love what masks are capable of :)
I die cut the word celebrate from gold paper and glued it with Tombow Mono adhesive right on top of my stamped background – it’s great to see how you can use a bold sentiment stamp to create your own background pattern. I used Ranger Raspberry Sorbet for the intense stamping, and My Favorite Things Pink Lemonade for the soft impressions.

For the finishing touches, I used my Stardust Gel pen to trace the faux edges of my patterned area, and then added some sequins with Glossy Accents and a Fine Tip Applicator.

Thank you for stopping by today! I hope you got inspired! See you again next week!

——— S U P P L I E S ——— • Celebrate - Nice and Neat Dies • Pink Blush Sequins • 4mm Pink Blush Sequins • Neenah Solar White 110lbs • Ranger Dye Ink Raspberry Sorbet • My Favorite Things Pink Lemonade • Sakura Gelly Roll Stardust AMZ • MISTI • Tombow Mono Glue • AMZ Glossy Accents • Ranger FINE TIP APPLICATOR for large Glossy • Post-it® Labeling Tape, 2 Inches x 36 Yards, White • Sizzix BIG SHOT MACHINE • Sizzix Magnetic Platform • HA Scrubber Pad • HA Ultra Clean Spray, 2oz.
5

Cosmo Cricket Week - Day 3

Neat & Tangled-Little Stinker

We are already halfway through our Cosmo Cricket collaboration week!  Each day this week we're sharing projects featuring Cosmo Cricket and Neat & Tangled.  We hope that you are enjoying the projects as much as we have been enjoying the products!

Every good collaboration need a couple prizes, right?  We've got a great bundle of Cosmo Cricket goodies to share with one of you.  Just leave a comment on each post this week and we'll pick a winner and announce them next week.

Cosmo Cricket also has a prize to share, so be sure to stop by and check them out on Facebook and Instagram.

Today Laura and Elena are sharing with us.  First up is Laura:

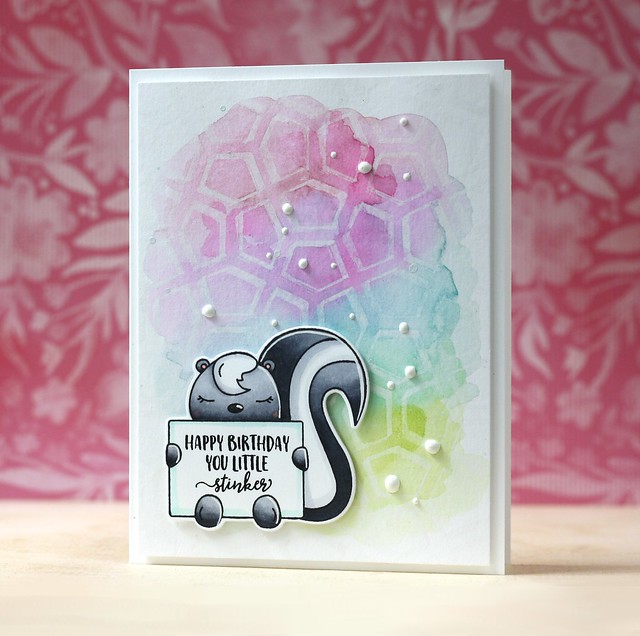
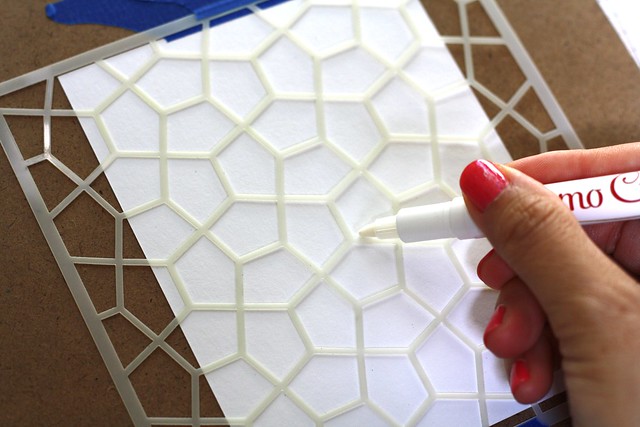
For my card, I used the Cosmo Cricket Resist Pen along with the Pentagon stencil for the background, tracing the stencil openings onto watercolor cardstock.

Neat & Tangled/Cosmo Cricket collaboration

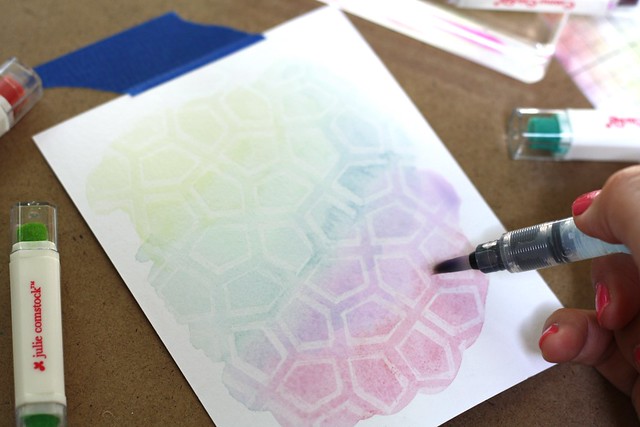
Then I used several of the Swatch Sticks to paint over the resist pattern. I dapped the swatch sticks onto an acrylic block and my water brush to pick up the color and control the intensity.

Neat & Tangled/Cosmo Cricket collaboration

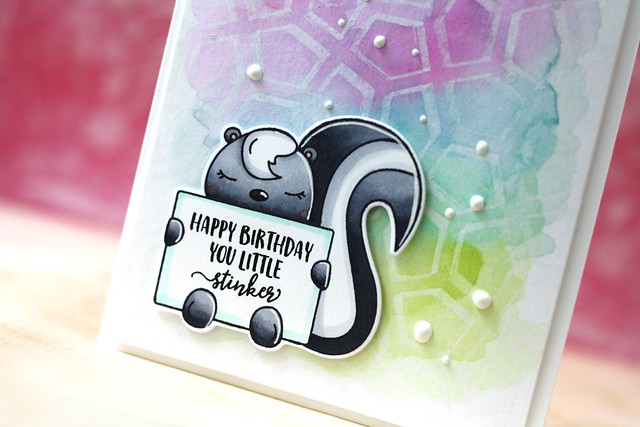
I added this sweet skunk image from Little Stinker along with a few accents using Glacier White enamel accents.


Neat & Tangled-Little Stinker

Next up is Elena:

Hi there!  For my first card, I stamped and colored elements from Mermazing and set them against watercolored backdrop. I adore these new products from Cosmo Cricket. They are made for watercoloring dummies like me! 


I used the watercolor brush to spread a little water around, then sprinkled some Pool Pixie Paint onto the piece, and basically my work was done.


I blended out the background a bit and added some flecks of lighter and darker paint to give depth to the scene.

My next projects are a little tag duo. I played around with the Candy Pixie Paint for both. On this tag, I used the Resist Pen to add polka dots to the bottom half of the tag, let it dry, and then watercolored with the Pixie Paint over-top.  When everything was dry, I used a brown pen to add doodly circles around each polka-dot.

I added the little girl image from Better Together, and the new script Celebrate die to finish off the tag.


For my last tag, I did more of the same: doodled polka-dots with the Resist Pen and watercolored over-top with the Candy Pixie Paint. I added the Hooray wreath a little bird (from Kitty's Favorite Things) to finish off.


Be sure to leave a comment and come back tomorrow for more inspiration from our Design Team.  At the end of the week one lucky commenter will win a Cosmo Cricket prize pack!
54

Cosmo Cricket Week - Day 1


Hey everyone!  We're so excited to be featuring Cosmo Cricket this week.  Each day this week we'll have two or three team members sharing projects featuring Cosmo Cricket and Neat & Tangled.  They pair so well together and I know you're going to love what you see, our DT has had a blast playing with these fun goodies!

Every good collaboration need a couple prizes, right?  We've got a great little bundle of Cosmo Cricket goodies to share with one of you.  Just leave a comment on each post this week and we'll pick a winner and announce them next week.

Cosmo Cricket also has a prize to share, so be sure to stop by and check them out on Facebook and Instagram.

OK we're kicking off the week with Sveta and Miriam.  Here's Sveta:

Hello!  I'm so exited to share my projects for our Cosmo Cricket collaboration! I must confess that I didn't know about their products and I'm really impressed with them.

For the first card I picked this "love from the first sight" bird with gold foiling on watercolor paper from the WIP Book Art Deck. To color this bird I used Pixie Paint Ruby  and Swatch Sticks. The last has a waterbrush included in the set so it's perfect for "to go" or "traveling" crafting (painting). I used the Scandinavian prints stamp set to create my background and for the sentiment. I think it coordinates with bird's lines perfectly. 


For my second project I played with the Just Add Watercolor Blank Tags and super amazing Pixie Paint Ruby and Pixie Paint Harbor. You should try these paints because they a pure magic! They are so easy and fun to work with and the shimmer is breathtaking. This paints gave me an opportunity to create a little cosmos on a tag. Of course cosmos needs stars and I used our latest Lucky Stars Nice and Neat die. For the sentiment I also used the super clever die set Celebrate Nice and Neat Die from our Birthday celebration release.


I really enjoyed to work with these unique products and hope you have a lot of fun and are inspired by this Cosmo Cricket and Neat & Tangled collaboration week!

Next up is Miriam:


Hey everyone!  I'm really excited about this week!  The Cosmo Cricket products pair so well with Neat & Tangled, and I had a great time creating today's projects.

First up, a card featuring Doily Tag and our Celebrate die.  The Resist Pen is used for just that, you can write on paper and then watercolor and the written portion will resist the watercolor.  BUT, you can also use it as an embossing medium.  Now since you write it and it almost comes out like a liquid glue, it's not an even surface, so if you are looking for that, this isn't the best application for you.  Here I wanted a more textured uneven surface, so this was perfect.


I added a bit of color to the center of the tag using some Swatch Sticks, and then added a bit of splatter with a Dylusions Ink Spray.

For the background, I used an older Cosmo Cricket 12x12 paper with resist patterns.  This particular pad isn't available any longer, but there is an 8x8 and a newer 12x12 pad.  I again used swatch sticks to add a light wash to the paper and a bit of splatter.

The patterned paper was adhered to a dark gray mat, and I popped the doily tag up with foam tape after adding the Celebrate die which was cut three times, once in gold mirrorboard and twice with cream cardstock.  A few gold sequins finished it off.


Next up a simple card using one of the designs from the WIP (Work in Progress) Art Deck.  I love this little deck of designs, there are a variety of sizes and it's great for quick and easy cards.  For this one I chose this sweet little tag, and then added some stamped flowers from the Paper Cut Flowers set.  Rather than use regular ink, I colored the stamp with Swatch Sticks, spritzed it a couple times with water and stamped.  I like the soft, loose feel you get with this technique.

Once I was done stamping, I used the waterbrush that comes with the Swatch Sticks and added color just around the word wildflower so it would stand out.


OK, that's all for me today, but be sure to leave a comment and come back each day this week, at the end of the week one lucky commenter will win a Cosmo Cricket prize pack!


46

Black and White with Pops of Color


Hey friends, it's Nina-Marie here with you today featuring some of the newest Neat & Tangled stamps and dies in a fun birthday card!


I love rainbows and bright happy colors; they make you want to smile when you see them! In today's card, I've used black and white to my advantage, allowing the neutral colors to let my rainbow sentiment and bright, round baubles to take center stage... the impact of the colorful elements against a neutral background is really incredible!


I started off my card by die cutting the stars from the new Lucky Stars die set all over the left side of my white card panel. After cutting the stars, I placed a piece of silver glitter paper behind the stars and stamped some smaller stars among the larger ones using silver ink.


My celebrate sentiment (from the new Celebrate die set), is die cut using white cardstock that I colored with Copic markers in a rainbow color scheme; I layered a total of six of these words together to create a more solid sentiment. I also placed the outline for the word celebrate behind the die cut words and glued it directly to my card. Next I heat embossed a coordinating sentiment from the Celebrate stamp set in silver onto black cardstock. I cut the cardstock into a banner and popped it up off my card panel.


My colored baubles are die cut using the circle dies from the Scandinavian Prints die set; I love the whimsical feel of the circles and thought these would be a great fit for my card, adding to the festive feel. I colored the circles with Copics, covered them with clear Spectrum Noir sparkle, adhered them to my card with a mixture of foam and liquid adhesive, before finally adding a coating of Glossy Accents over top for a nice finishing touch.

I hope you enjoyed my inspiration for creating bright, happy cards using the new Lucky Stars dies and Celebrate stamp and die sets! Thanks for stopping by and spending some time with me... I'll see you again very soon!

SUPPLIES: 


SaveSave
5
Back to Top