Showing posts with label Beary Merry. Show all posts

Medallion Flower Builder with Ardyth Percy-Robb


It's been so much fun having Ardyth Percy-Robb as this month's guest designer!  Her projects have inspired us each week, and we think you're going to really like what she's prepared today.  Here she is with all the details:

Today is my final post as the October Guest Designer. I've had so much fun this month, and I want to say a big thank you to Danielle and the team for inviting me!

This week, I used a leaf stamp from Medallion Flower Builder to create a snowflake. I started by creating a mask using the 6 petal flower in the set. I placed it onto a white panel and used it as a placeholder and guide for stamping the 6 arms of the snowflake. (And that just saved me a whole lot of math! LOL!)

I used a rock-n-roll inking technique with 3 blue inks to create some visual interest and then finally I over-stamped each image with embossing ink before sprinkling sparkly embossing powder over.

I used the darkest blue ink and a sentiment from Beary Merry and embossed it as well.

I blended the lightest blue ink around the edges of the card to complete the frosty look.

You can see how it all came together in the below video:


I hope you've been inspired by something I've done this month! Thanks again, Neat & Tangled, it's been a blast!
6

Masking Scenes with Guest Designer Ardyth Percy-Robb


Happy Friday!  We're welcoming back our October guest designer Ardyth Percy-Robb today, and wait until you see what she's created, we love the thought and planning and execution of this card!  Here's Ardyth with all the details:

Good morning! It's Ardyth here, and I'm excited to be back with my second post as the October Guest Designer!

Today I've created a fun winter scene using images from 5 different stamp sets (Beary Merry, Get Yeti, Santa's Wonderland, Oh Deer, and Into the Woods), some masking, ink-blending and Copic colouring!

I started by creating a rough 'sketch' of my card on a scrap piece of paper, by stamping the images where I wanted them - no masking, just quick layout planning. I worked out in my mind which images were in front and which were behind and numbered them, in the order I would need to stamp and mask them.


Then I had to cut out all those masks! Once I had that all finished, I stamped the images, in the correct order and placed their masks over top. 

When the scene was completely masked, I created snowdrifts with some post it tape and blue Catherine Pooler ink. Then I blended more ink over the top of the card to create a bright blue sky.

Then came the big reveal - I've been doing it for years, but it's still magic when all the masks come off!

Next was a whole lot of Copic colouring. I kept it simple - a bit of shading for dimension and a limited colour scheme. I added details with a white gel pen and some glitter glue for sparkle!

Here's a video:

6

Christmas and Cocoa with Heather Meeson


Happy Friday friends!  Not only are there only 10 days left until Christmas, but today is the last day our December guest Heather Meeson is with us.  This month, and year, are flying by!  Heather has a great idea for some quick and easy gift giving today, take a look:

For my last guest designer post, I’ve got a last-minute idea for gifting hot-cocoa.

Mine is sized to work with a cocoa packet that’s tall and skinny, but you can easily adapt it to work with any size you have.


To create this pocket all you need to do is a little scoring:

· Trim cardstock to 8” (wide) x 8 1/2” (tall)

· Create the “spine” by scoring at 3 3/4” and 4 1/4”

· Rotate cardstock and score at 6 1/8” and 6 5/8” (this creates the inside pocket)

· Trim excess cardstock under the left panel (front cover) and spine, this leaves only the pocket on the right side

This image shows what your scored paper will look like:

Once the pocket card was created, I added a candy cane to the outside spine with a glue dot and wrapped twine around to hold it closed.


The final step was to add the layer with the yeti scene; popping it up with foam adhesive to accommodate the twine underneath. The Yeti is from the Get Yeti set and the snowdrifts were created using the Stitched Slopes dies. My favorite bit is the candy cane (from the Beary Merry set) in the yeti’s hand (which I added by making a tiny cut with an xacto knife). The sentiment is also from Beary Merry.
8

Christmas Wreath with Yoonsun


Happy Friday all!  We are glad to be welcoming our guest designer, Yoonsun Hur, back to the blog today, but sad that this is her last post for us this month.  It's been a pleasure and today's card will definitely make you smile!  Here's Yoonsun:

Hello crafty friends, TGIF! It’s Yoonsun here and I am back with my last card as a guest designer with Neat & Tangled this month. Time really flies!!

For my card today, I used the adorable Beary Merry & Into the Woods stamp sets. I love these cute sets so much!!


I created my own Christmas wreath using these two sets. First I placed a circle die on an A2 sized watercolour paper panel, traced a circle very lightly with a pencil. I then stamped leaves from the Into the Woods set along the circle line with black pigment ink. I coloured the stamped leaves with Mowed Lawn & Peacock Feathers Distress inks and water brush. Next, I stamped acorns, ginger bread, candy canes on a separate watercolour paper with black pigment ink, watercoloured them with Distress markers, and then fussy cut them. 


I stamped the sentiment and other cute images from the Beary Merry set under the wreath image using black pigment ink, watercoloured the images with Distress markers as well. Once the panel was dry, I mounted the panel on white care base using double-sided tape first, and then decorated the wreath with the acorns, ginger bread, candy canes using foam tape.  


Thank you so much once again for inviting me to be this month guest designer. I really hope you guys like my Christmas cards. Have a wonderful weekend!!
6

Introducing October Guest Designer - Yoonsun Hur


Happy Friday!  We are so excited to be welcoming Yoonsun Hur as our guest designer this month.  Yoonsun is an old N&T friend and we are always thrilled when she can be with us.  Here's a bit about Yoonsun:

Hello Everyone! I'm Yoonsun Hur a South Korean-born Australian and I currently live in Sydney with my gorgeous husband. I love being creative!! I really love making cards with various and awesome stuff. I have been working as a Graphic designer since 2000 and this career has helped me in many ways when designing cards. I endlessly want to make various attempts and share my creativity with you.

Today I want to share with you my fun Christmas card with so adorable Beary Merry Stamp Set and the Merry and Bright Nice and Neat Die.


I started by stamping cute polar bear and candy cane from the Beary Merry set on watercolor paper using black pigment ink. I then watercolored and fussy cut them. You can use the matching dies to cut stamped images. It is so much easier than use scissors. ;)


For the snowy night background, I ink blended on watercolor paper panel with Mermaid Lagoon, Faded Jean, Seedless Preserves, Black Soot Distress inks and mini blending tool, and then added white ink splatters all around the panel. For the sentiment, I die cut the word “Merry & Bright” from white card stock fine times, and then stacked them up using glue pen.


Once the panel was completely dry, I mounted it on white card base using double-sided tape first, and then added the sentiment die cut and the polar bear holding a candy cane on the card front using foam tape.


I had a great time with this adorable stamps & dies!

That’s it for today. Thank you so much for stopping by. Have a wonderful weekend!!
5

Merry & Bright with Background Stamping

Hohoho! Happy holidays dear friends! It's Keeway here today to share one last holiday inspiration for your cardmaking needs.


I love working with small stamps to create self-stamped backgrounds. When you have multiple stamps illustrated by the same designer, everything would match like it was all part of the same set! I decided to work with the Beary Merry stamp set and Elfs and Their Shelf stamp set, both illustrated by our talented DT Elena.

I used various of the smaller stamps, rotating in random fashion, and stamp them on watercolor paper. I stamped the scribbled asterik stars in all the open space in between the images. And then colored in the images with Zig Clean Color Markers.


I finished the card with a large sentiment die, Merry and Bright. I absolutely love working with this sentiment die because the outline die provides the perfect, seamless background to help the words stand out boldly, even with a busy background.

Happy holidays!
5

Very Merry Christmas with Amy Yang


Our 15K instagram winner Amy Yang is back today with her final project.  We've so enjoyed having her with us this month, and we know you guys have too.  Here's Amy with all the details:

Hello there! Amy here with my final post as a special guest for December. Before I start, I'd like to thank Neat and Tangled for this great opportunity. I loved working with your products and enjoyed this experience.

Today I have for you a Christmas card using the Box Die, Beary Merry stamp set and the coordinating Beary Merry Nice And Neat Dies.


I started by die cutting the box using white cardstock. I love how this box added interest and dimension to my card. I used the star cluster from Beary Merry and stamped it using versamark ink. Afterwards, I embossed it using white powder. I used mermaid lagoon distressink and applied it to the front of the box as well as the inside. I then stamped and colored my images on white cardstock with copic markers and die cut them with coordinating dies. 


On the bear’s scarf, I used white gelly roll pen to add some lines to give it a knitted look. Then I had him hold the mug, took the other images and placed them inside the box using double sided tape.


At this point I decided to use Kraft paper as the front panel of my card. I used the sentiment “have a very merry christmas" and embossed it with white powder. I adhered the box and the bear to the front of the card. I added two layers of foam tape to the bear so that he can be in the front of the box. To finish, I added some sequins from Ocean Waves Sequin Mix.

Thank you for stopping by!

Thanks again to Amy for all the inspiration she shared with us this month!  Be sure to follow Amy on her blog or Instagram, you won't be disappointed!  And if you aren't yet, make sure you follow us as well @neatandtangled.  You never know when another guest designer spot might be up for grabs!  ;)
6

Have a Very Merry Christmas with Amy Sheffer


It's Friday!  This means our December guest designer Amy Sheffer is back with us!  Here's Amy to tell us about this adorable Christmas card:

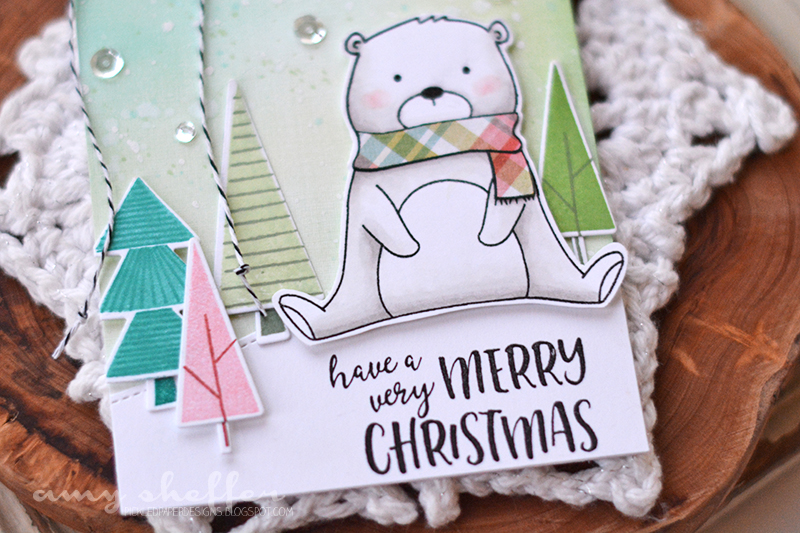
I have a thing for tree stamps -- funky trees, geometric trees, realistic trees, it doesn't seem to matter -- so naturally, I was smitten with Scandinavian Prints Christmas. Looking at all the different options takes me back to combinations and permutations in math class! I wonder how many unique tree designs you could actually stamp with this set?!


I decided to use some of these trees to create a scene for the adorable bear from Beary Merry. I'm often fairly literal with my scenes, as in skies are blue trees are green, etc., but today, I wanted to try something a little more fun and playful, so we have a minty green sky and pink and turquoise trees. To get the speckled sky look, I started with ink blending, then splashed a little water (which lifts some of the ink and leaves lighter spots), then added ink splatters, and finished with some opaque white splatter for the look of falling snow.


My bear is colored with Copics, except for the fun plaid scarf, which is paper pieced. I love how the Beary Merry diepartially cuts the bear's paws so that he can be holding something, but I also think he looks pretty fab all by himself (which worked out well since I don't have the Beary Merry dies yet).

I finished the card with a few sequins in the sky and some black and white baker's twine for embellishments.


I just adore this sweet fella and his whimsical wintry forest! See you again next week!
12

have a beary merry NOEL.

Hi there!

Elena here with a Christmas card featuring the sweet bear from Beary Merry.


I stamped and then colored the bear with soft brown copic markers (E51, E53 and E55.)

Then, I used the Journaling Alphas to cut out the letters to spell NOEL. I live in Montreal and we are very bilingual. I need cards for those french-speaking teachers and neighbors!

I love how the die set for Beary Merry allowed me to tuck the middle letters into his arms. It's just so cute!


Next, I used the large rounded rectangle from the Succulent Journaling Card die set and cut 2 layers: one out of white cardstock and another out of a pale aqua.  I used the Lucky Stars dies to cut stars out of the white layer, so that the aqua would show through.

I used some wooden stars and a kraft card base to reinforce the soft brown of the bear.

A white gel pen was used to add finishing touches to the letters and the bear.

I hope you like it! Thanks for stopping by!

♥.

8

November Release Redux Cards by Taheerah

Hey everyone, happy Wednesday! It's Taheerah here today to share some cards featuring the November release!

It seems that my release package wanted to travel the world a bit and got lost in Mexico! I was so sad to miss out on sharing some Release Week projects, but once my replacement package finally arrived I couldn't wait to tear it open and get stuck in! So although I didn't get a chance to join in with the other talented DT ladies, that just means I've got the limelight to share them with you now!


Totally swoon-worthy, right?!

Let's start with the first card:


For this one I used the May Your Holidays Be stamp set and combined it with the girl elf from Elfs And Their Shelf. I threw in an older set too called Happy Ornaments to turn it into a scene!


I cut out the centre of my main ornament and turned it into a fun shaker pocket! And I loved trimming the banner in two so that I could have it loop behind the ornament, and to have that cute little elf perched on it as it swings!


Next up, it was time to take the Scandinavian Prints Christmas set for a spin:


I created my own patterned paper right on my card front, stamping with a non-traditional colour palette!


Little added details for the stars and snowflakes came courtesy of the May Your Holidays Be and Elfs And Their Shelf sets respectively. The sentiment from Santa's Wonderland is the perfect finishing touch!


Speaking of Santa's Wonderland, I really wanted to play with it on its own too, and then I came up with a really cool and unique idea...


I used partial die cutting to create a snowglobe! I die cut most of the circular ornament from the May Your Holidays Be dies, then used the banner from the same die collection to create the base!


I created a fun shaker scene using the penguin, North Pole and snowflakes stamps. It was quite labour intensive to think through and put together, but the end result was so worth it!!


I used the Merry And Bright dies for the sentiment, doubling up my die cuts- one with black on top of gold, and the other reversed! There are so many fun details and lots of dimension in this beauty and I'm so proud of it!


And finally, possibly, my favourite was saved 'til last:


I built a super-fun scene using lots of different sets! Santa's Wonderland, Elfs And Their Shelf, Beary Merry and Into The Woods all feature here, and they go together perfectly!!


I curved the shelf stamp on my acrylic block to make a sled!! Then I got busy piling on the presents and little extras, and coloured everything with colouring pencils. The deer from Into The Woods makes a perfect Rudolph to tow this sled! I masked off all my images after colouring then ink blended my sky over them, having first heat embossed my snowflakes. Some shimmer, glitter and a gold cord tied everything together perfectly. Whoever gets this card is definitely on the Nice list!


I hope you loved these release projects as much as I loved creating them! The November release is probably one of my most favourite to date, with a few of the new products out of stock currently - so make sure you sign up to notifications for your favourites to know when they're back in stock! Thanks for stopping by!
8

Wishing You Holiday Happiness

Hello crafty friends!

It's Keeway here today and I'm here to add some pixie holiday dust into your holiday cardmaking!


I just ADORE this Santa Claus from our Santa's Wonderland stamp set. He just brings a smile to my face just looking at him! I wanted to create a layout that was easy to replicate multiple cards as the winter holidays is one of those times you need to be able to make lots of cards.

I first started by creating a small rectangular wash of watercolor in the bottom right corner. I used a variety of greens and blues. I then stamped and colored my images on white cardstock with copic markers and die cut them with coordinating dies. Once I'm set on where to place my Santa and snowman, I stamped my sentiment intentionally over the image and background. The MISTI helped me stamp over the same spot a couple times to make sure my sentiment is nice and crisp.


I then used the star cluster stamp in the Beary Merry stamp set and stamped it across the card in dark blue dye ink. This created a feeling of pixie dust across the sky (like the sparkles of dust Tinker Bell leaves!).

I adhered my characters onto the card with foam tape, making sure that my sentiment is aligned perfectly. Hope you enjoy today's inspiration and can't wait to see what you create!

See you next time!


5

Happier than...


Hi ya!  It's Amy here with a card that was so much fun to make!  I managed to add six Neat & Tangled products, do you spy them?  I'll start on the bottom and make my way to the top!

First of all, I'm smitten with plaid and I'm not afraid to mix 'n match.  I created my bottom panel using the Scalloped die set.  The Classic Tag 1 is a must have.  Its a great versatile design.  I actually made mine a smidge longer but just diecutting another couple inches of the bottom of the tag and adhering the pieces together.  The box Nice and Neat die is so much fun and super easily to put together!  Kitty's Favorite Things is adorable, don't you agree?  Surprise!  She's holding the Santa mug from the Beary Merry set!


I'm a big fan of my Zig Clean Color Markers...that's how I colored the Kitty and the mug.  Check out the interior of the card:


The new Happier Than set always has me chuckling....


scalloped dies

classic tag 1

box nice and neat die

Kitty's favorite things


Thanks so much for stoppin' by!!!!

8
Back to Top