Showing posts with label just hello. Show all posts

Just Wanted To Say Hello

Hello, hello, crafty friends! How's your week going? I'm totally obsessing with gold! Gold patterned paper, gold foil, gold embossing, gold cardstock. Is there anything else gold? Please, don't tell me, lol!


If you've seen my last video tutorial for Neat & Tangled you might have noticed my other love - the Hello die. I just adore that scripty handwriting! 

For my card today I die cut the Hello die out of Gold Mirror cardstock, heat embossed a Just Wanted To Say sentiment in gold embossing powder onto a strip of white paper and adhered the die behind the sentiment. 

Since I knew I wanted to use this gold polka dot paper for my card I needed to come up with something that would help the die cut to stand out from the peach and gold background. I used a piece a vellum and simply layered that under the Hello. I intentionally placed it at an angle for a fun and dynamic look.


Peach and gold screams a girly card so I just had to add a couple of small flowers to this project. I heat embossed a few from the Paris set in gold, colored with Copics, cut out and adhered onto my card. Super simple but super fun!

Thanks for stopping by today!
Hope you have a fabulous day! 
24

September Guest Designer: Lucy Abrams!


Hello friends! Our September guest, Lucy, is back today with one final project for you! It has been so much fun having her with us! She has a super cute card for you today!
----------
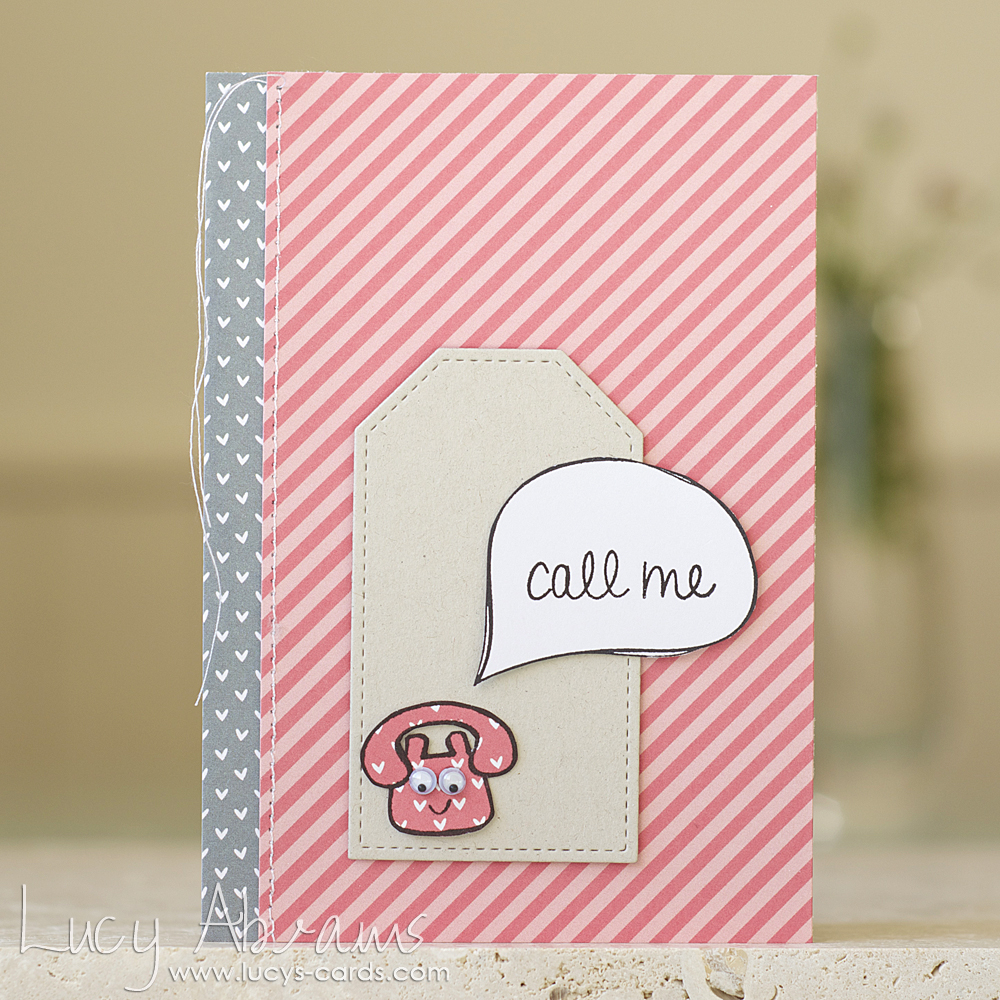
Hello. Today it's my final post for Neat and Tangled, and I'm sticking with my paper piecing them. I chose the sweet little telephone stamp from the Just Hello set, and decided to give it a happy face. I used the smiley face and speech bubble stamps from the Sketchy Cupcakes set. 
I love bringing inanimate objects to life in this way. :)
I'd like to send a huge thank you to Danielle for having me this month. It's been an absolute pleasure playing with your cute stamps Danielle!
----------
Don't forget our September release starts Monday the 22nd! We have 1 new sequin mix, 6 new stamp sets and some coordinating dies!
4

March Guest Designer: Lisa Spangler!

Hello friends! Thank you so much for all your wonderful comments and excitement for our March mini-release! My Favorite, Tiny Triangles, Pixie Dust Sequin Mix, and Spring Sequin Mix are all now available in the  shop!

I am here today with our last post from our March guest designer, Lisa Spangler! While I love seeing all our new products being used, it is always fun to see one of the very first sets, like Just Hello, getting some love :)
_ _ _ _ _ _ _ _ _ _ 

Hello there! It's Lisa Spangler, back with my last guest designer project. I've had so much fun being the guest designer this month! So sad that it's my last day. Thanks again to Danielle for having me. It really and truly is an honor. Now on to today's project! As soon as I spied the envelope in the Just Hello set I just HAD to make a set of notecards and matching envelopes with some BasicGrey patterned paper. Just had to be done!
I just took apart an envelope that I had handy to make a template, traced it on the paper and cut it out. Love how the double sided paper gives you a built in envelope liner!
To add a little interest, I stamped the envelope twice on the card front to make a shadow. Just stamp off on scratch paper before stamping on your card. I also edged the cards with a dauber in coordinating colors.
One last tip before I go! If you apply Tombow liquid glue and let it dry it becomes reposition-able! So I put some on the envelope flap and smeared it with my finger, then let dry. I'm going to add a little washi tape when I mail these to make sure the flap is secure. And that is that!

Thanks for joining me! xo
_ _ _ _ _ _ _ _ _ _

Thank you so much, Lisa, for joining us this month! It has been an absolute joy having you! :)
15

Hello Stud Muffin

Hello Neat and Tangled lovelies!

Katie Gehring here to share a card I made suitable for the the big and little men in your life!  Last weekend, I was at a youth football game and saw a little boy wearing a shirt similar to this one.


 I am not sure that I have ever called anyone a "stud muffin," but I think it's an adorable term of endearment.  I pulled out Sketchy Cupcakes and thought about how I could turn the muffin into a "stud muffin."

I made a card base from kraft cardstock and trimmed a panel of patterned paper and adhered it to the front. Next, I die cut a stitched rectangle from white cardstock.  I also die cut the word "stud" using some alphabet dies on black cardstock.

dsc_0475

I stamped the muffin top and wrapper onto cardstock and trimmed them out.  The stud part of the muffin was realized through the use of some bronze brad that have been in my embellishment stash forever.

I adhered the die cut letters and the studded muffin to the white rectangle and stamped "hello" from Just Hello to the card.


dsc_0476

This weekend, this card will be making it's way to Grayson Savery.  You may have seen Danielle's post a few weeks back that she has reopened the Happy Mail for Grayson campaign.  You can read all about it here, and more about Grayson here.


I hope that it brings a smile!  Have a great weekend friends!  Thanks for stopping by!

Katie

5

Hey, Girlfriend!

Hey Girlfriends ;) Danielle here.

I first wanted to thank you all for your tremendous support and excitement during last week's release! Your positivity is contagious, and while I can't respond to all comments I do read each and every one, and they always bring a smile to my face.

I apologize for the speed at which certain items sold out. I do my best to anticipate how popular particular items will be and stock accordingly, but every now and then I underestimate!  I have already placed a reorder for stamps. In the meantime please check with our friends at Simon Says Stamp as well as i {heart} papers, both carry a variety of Neat and Tangled now! All sequins will be restocked by weeks end!

How was your weekend? Ours flew by as usual. For all you mommies out there, I hope you enjoyed your special day!

I'm here to share a card I made a reeeeally long time ago for a publication call, but alas it was a reject! So now I get to share it with you all.  The colors and scallop pattern from the stamp remind me of the ocean, and now that the weather is warming I hear the beach calling :)
Hey Girlfriend
I stamped and white heat embossed the scallop pattern from Little Tangles on various colors of Hero Arts papers, cut them out, and adhered them to my card base. I then stamped the sentiment from Just Hello on a strip and popped it up on the card with some foam dimensional.

Hope your week is off to a great start!

xo
Danielle

Supplies Used


7

Nautical "hello"!

 
Hi everyone!  It's Amy K. here with a nautical card to share!!!!
 
If you follow trends at all then you may know that all things 'NAUTICAL' are in.  I've had this little idea in my head to do ever since Timeless Twine by Bella Creationz came out with their Natural Twine.  Don't you just LOVE that tiny Sailor's Knot??  I DO.......a LOT!  With the current release of Neat & Tangled's On the Strip 2 stamp set, this card came together soo easy!  I actually stamped a larger striped panel and just trimmed down to size.  My sentiment is selectively inked from the set:  Just Hello.
 
Nautical hi!

 Now for that sailor's knot........you all know Pinterest.  The site where hours upon hours of your day can go unaccounted for?  I used a tutorial found HERE however, I've made several of these years ago for a card so you can find sources pretty much anywhere on how to make these.  For my knot, I just used 4 equal strands of Natural Twine and followed this diagram!
 
Source:  Martha Stewart


Well, that's it for me today, but I'd love to hear what you think about my card today because well, I kinda like it!  Have a great Sunday!


{hi!}
Stamps:  On the Strip 2, Just Hello (Neat & Tangled Stamps)
Paper:  White, Pure Poppy (PTI)
Ink:  Enchanted Evening, Pure Poppy (PTI)
Twine:  Natural (Timeless Twine by Bella Creationz)
Misc:  Foam Adhesive


7

Love Letters

Hello! It's almost February and that means it's time to start stamping those Valentine's day cards!  Don't have any Valentine's day stamps?  No problem.  You can always pull out what you have, change it up a bit, and make that Valentine's day card.

I'm pulling out one of the older stamp sets from Neat & Tangled's first release: Just Hello.  I'm going to make that cute mail stamp shine with some creative customization.

Love Letters

I used a red and blue copic marker to make some small postal stripes along the top and bottom of the stamp. I grabbed a few heart stamps from my stash and stamped it over the mail and a simple sentiment to finish the card. It's now ready to be sent to that special someone!

-- pamela
10

Little Tangles Challenge #1: Say Hello!

Hi Friends!!

I am SO excited because today starts the first challenge over at Little Tangles (the official Neat and Tangled Challenge blog)!  The theme for this one is so appropriate :) It's to create a project to "Say Hello", introduce yourself!
Here is a card I made to play along :)
Hello! Little Tangles Challenge 1

I do hope that you will join in this challenge, nothing makes me quite as happy as seeing all of your Neat and Tangled creations :) You have until November 25th to enter, and the prize is a stamp set of your choice!

7

Guest Designer Stephanie Washburn!

I am so happy to have Stephanie here guest designing again! Her card is a serious stunner today!
* * * * * * *
Good morning! Stephanie here again today to share another project I made with these super cute stamps! I used Fresh Blooms and Just Hello on this card!
 neat and tangled hey girlfriend
I started by creating a bunch of masks of the small and large flowers from Fresh Blooms. I did this by stamping the images onto thin copy paper, cutting them out, and adding a little repositional tape to the back.
I started in the middle and stamped a large flower. I masked that flower and stamped a few more flowers around it. I continued this process, moving the masks around where I needed them, until the entire piece of cardstock was covered in overlapping flowers! LOVE the way it came out- I think it almost looks like patterned paper!
Then, I took out my Copics and colored the background a lavendar/gray color and the flower centers a golden yellow.
I cut the banner shape with my Silhouette Cameo and stamped the sentiment to finish it off!
Thank you SO much for having me as a guest this month! I have had so much fun playing with these stamps and sharing with you! I'd love for you to visit my BLOGor FACEBOOK PAGE!
Steph
13

Little Note Cards

Hello everyone! This is Pamela here. Hope you enjoyed yesterday's sneak peek #1! Today, I have 2 simple note cards stamped with my favorite Neat & Tangled stamp sets - Fresh Blooms and Just Hello.

This card just came to me when I saw the cute envelope stamp! I cut a scalloped edge from printer paper and used a sponge to create the sky background. I then die-cut a cloud from clear cardstock and hand-sew it on. It's a little hard to see from the photo but I've added some vellum wings to the envelope to make it look like it's flying!
N&T: Hello Mail

The second card is very similar in that it also uses the cute swirl from Fresh Blooms. Following Virginia's foot steps, I used the stamped swirl as a guide for me to glue the twine, giving the card some texture. I finished the card with the bee from the same stamp set with some vellum wings again!

N&T: A Little Note
That's all from me today. Come back tomorrow for some more inspirational ideas!

-- pamela
10

A Neat & Tangled iPhone upgrade

Hello all!

Katie Gehring here to show you how I upgraded my iPhone using Neat & Tangled stamps.

So you may have heard that Apple's iPhone 5 was available for purchase last Friday.  Me?  Not so much.  I was driving my kids to school before work and couldn't figure out why all these people were standing in line outside the AT&T store at 7 a.m.! I am not what you would consider an early technology adapter.  I received an iPhone 4 for Christmas last year, and although I love my phone, updating models was just not part of the plan at this time (litereally, I can't upgrade for another year). :o)

I strongly believe that part of the fun of phones, tablets and laptops these days is the ability to personalize and customize your technology and experience.  In honor of this new technology, I decided to use some of my crafting supplies and Neat & Tangled stamps to give my old iPhone a little upgrade.

I pulled out a few of my Neat & Tangled sets: Little Tangles and Just Hello.

dsc_0084

I also used a few other supplies:

dsc_0083

And you will also need one of these.

dsc_0087

I found this clear iPhone cover at Michaels.  It is created by Mark Richards Enterprises.  It was $3.99,  but you could use a coupon to bring down the cost even more.

I trimmed a piece of patterned paper to 2.25" by just a touch shorter than 4.5" and rounded the corners using the 3/8" corner chomper.  Using the phone cover as a guide, I traced oval where I would need to trim away the paper for the camera flash and lens.  I used my old Stampin' Up slot punch to start the oval and finished it with a craft knife- this is seriously the hardest part of the whole project.

Next, I selectively inked and stamped one of the tangles from Little Tangles onto the cardstock to make a phone cord.  I stamped the phone from Just Hello on a piece of aqua cardstock and trimmed out the handset and adhered to the "cord."

dsc_0086

I also stamped the sentiment from Just Hello onto the patterned paper and then slipped it into the cover and snapped my phone in place. Now I have a low cost, but high style and totally adorable cover for my iPhone that just may help me keep loving my old phone until I can upgrade!

That's all for me today.  Thank you so much for stopping by!

Katie

17

Noticed By Neat and Tangled!

Be sure to stop by tomorrow to see the announcement of our 4 new design team members!
- - - - - - - - - - - - - - - - -
I LOVE LOVE LOVE roaming around the blog/flickr world for your projects, and so I'm here again today to share some more awesome projects I've spotted :)  I've decided to officially call these posts "Noticed by Neat and Tangled" (thanks, Linda!). Grab this badge to post to your blog if you get noticed :)
Print
First up is this CAS stunner from Donna Mikasa!  I'm such a fan of her work, and making a banner of the envelopes from the Just Hello set? Genius!

How about these adorable ghosts from Halloween Scene by Patti! I LOVE how she used the fence on the top and bottom to create a border.

Halloween Ghosts

Laurie combined Little Tangles and Fresh Blooms to make this super sweet card! Doesn't it look like the little lady bugs are moving along the tangles? :)
Neat and Tangled

And who can resist the sparkly candy canes from Sweet Home by Steph?

Be sure to upload your projects to our Flickr group, or link to your blog posts on our Twitter and Facebook group!

See you tomorrow :)
11

What's Up Pac-man

Hi Everyone!
Chari here to share a fun card I created with the ghost from Halloween Scene. Who says ghosts have to be just for Halloween right? This cute little ghost reminded me of Blinky, Pinky, Inky & Clyde, the ghosts from Pac-man. And when I get a kind of cooky idea like that in my head it's really hard to not put it on paper. So here is my Pac-man themed card.

pacman

This makes a perfect masculine card, and any sentiment would work.  Or you could put a bow to create Ms. Pac-man.  How cute would that be with the "hey, girlfriend" sentiment form Just Hello right? I stamped out each ghost on white cardstock then colored them with copics and cut them out.  Pac-man is simply a 1" circle punched out of yellow cardstock with a pie piece shape cut out to make the mouth.  I embossed the sentiment on vellum with white embossing powder and the black background was embossed with a dot embossing folder, I thought it looked like the dots that Pac-man chows down on without being too busy.

I hope you all enjoyed my fun take on using the ghost image in a non-Halloween way. :)

SUPPLIES:
12

Just Some Notes!

Hi Friends!

Just a reminder that the Design Team Call is now CLOSED. Thank you so much for all of your amazing applications! WOW, you are all so talented and are truly making this decision impossible a challenge! I am so honored that so many of you want to be a part of this. And  I will be notifying EVERYONE who applied by Saturday.

Also, you can now grab our badge to post to your blogs!

And now on to some super cute little note cards by Mary Dawn! She actually made these for the release week, but I wanted to do them in a separate post because I thought they were so cute, and such a great idea! Wouldn't these be perfect to make as a set to give as a gift?  Or just to have on hand when you want to send a little note? Love this idea! Thank you so much MD for sharing :) They were all made using the Just Hello set.

just-hello-001-MDQ
just-hello-003-MDQjust-hello-002-MDQ

See you soon :)
7

YCU Challenge 13: Hot Trends

Hi Friends!

Danielle here today with the next challenge for Young Crafters Unite. This time it's all about being trendy!

This card was really fun to put together, and I think I included some hot trends for sure.  I went with arrows, hexagons, and a little washi for my project.  I also think that the color combo of aqua and red is still on point. I used the arrow and "what's up" sentiment from the Just Hello set :)

YCU 13: Trendy!


The winner of the challenge will receive a $20 gift certificate to the fabulous Simon Says Stamp!
Hope you'll join us!


7
Back to Top
