Showing posts with label Sparkle and Shine. Show all posts

Shine Bright!

Hello there!

Mayuri here to share a card using the Scalloped Cover Plate ;-)

©Candles in the Garden. Neat and Tangled April 2017 - Scalloped Cover Plate

The intricate nature of this die really made me want to pull out my laser transfer foils and double-sided adhesive sheets for a technique I've used before. I began by covering a piece of cardstock with the adhesive sheet and then running it through my die-cutting machine with the coverplate.

©Candles in the Garden. Neat and Tangled April 2017 - Scalloped Cover Plate

I separated the cardstock from the die very carefully as I didn’t really want the pieces to fall out – thankfully, they stayed put, but to be on the safe side, I also applied some packing tape on the back to hold everything together. I carefully peeled away the liner paper from the smaller shapes only, leaving the border intact and exposing the adhesive just in those areas. Then I laid down some silver laser transfer foil over the sticky areas and gently burnished with my fingers.

 ©Candles in the Garden. Neat and Tangled April 2017 - Scalloped Cover Plate

I lifted the foil sheet away leaving the silver to adhere to the shapes and I couldn’t believe how quick and easy the process was! I repeated this using copper coloured foil for the border to complete my background. I then foam mounted the piece to a white card base.

©Candles in the Garden. Neat and Tangled April 2017 - Scalloped Cover Plate

For the sentiment, I went back to an oldie but a goodie - the Sparkle and Shine stamp set! I stamped the sentiment with Versamark onto some navy cardstock, sprinkled with Silver embossing powder and heat set. I trimmed it out and foam mounted to the card front.

©Candles in the Garden. Neat and Tangled April 2017 - Scalloped Cover Plate

To finish, I added a mixture of sequins ;-)

Thanks for stopping by!
1

Interactive Light-Up Nebula Card with Chibitronics by Taheerah

Hey everyone, happy Monday! It's Taheerah here today to share a super-awesome card with a fun light-up feature!

We've been sharing some fun ideas lately using Chibitronics products, and I couldn't wait to get in on the act! For those of you who aren't familiar with them, Chibitronics are a great company who produce easy-to-use circuits kits that allow you to add a fun light-up element to your cards! It might sound a little technical, but honestly there's nothing to it!

I really wanted to create something with a space feel where the stars could light up! And I really wanted the stars to twinkle too. So in addition to the Chibitronics Chibi Lights LED Circuit Starter Kit I also invested in the Circuit Stickers Effects Pack to create a truly awesome card!

Here's what I came up with:

Light-Up Nebula Card by Taheerah Atchia

Got to say the Astrophysicist in me is geeking out heavily over this card!

Light-Up Nebula Card by Taheerah Atchia

I started by creating my front panel, watercolouring a nebula based on the famous Helix Nebula!

Helix Nebula - Infrared

Can you see the similarities?!

Light-Up Nebula Card by Taheerah Atchia

Once I'd got my depiction the way I wanted, I die cut 5 of the largest/brightest stars from the panel, using the Lucky Stars dies. I adhered some vellum behind the negative spaces to diffuse the light. Next I wanted to add a sentiment, so I pulled out my Sparkle and Shine set and heat embossed the 'Shine Bright' sentiment in white.

Light-Up Nebula Card by Taheerah Atchia

Next it was time to build the circuit! I watched a couple of videos to get an idea of how to set it all up, and there's a great tutorial on the Chibitronics blog for using the Effects stickers, so I used those together to design my circuit. I positioned the battery in the centre of my card so that pressing the sentiment would cause the stars to light up!

Light-Up Nebula Card Circuit - Switch Closing by Taheerah Atchia

Here's are some photos of the 'inner workings' of the card showing the circuit and battery housing.

Light-Up Nebula Card Circuit - Switch Open by Taheerah Atchia

And here's a short video showing that twinkling action! Isn't this card so fun?!


I hope you love this card as much as I loved creating it! If so let me know by leaving a comment below! Thanks so much for stopping by!

Supplies:
14

Get crafty with Francine – A different way to use the Hexastar die (video)

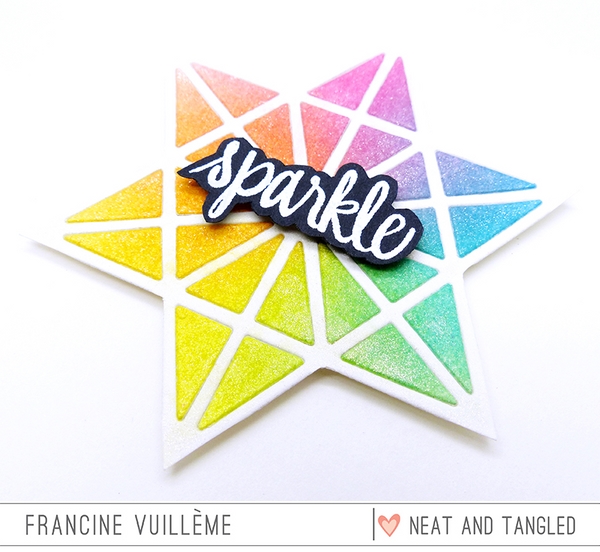
Hi everyone! Francine here with a new video tutorial! Here is my card:


Today, I wanted to show you how to use the Hexastar Cover Plate die in a different way! You can die-cut the plate from cardstock, use it as a stencil but also create new shapes as I did with the star. The sentiment is from the Sparkle and Shine stamp set. 

Watch the video below (or HERE) to find out how the card was created:


TIPS & TRICKS: with the inlaid technique, use dryer sheets to hold the pieces in place!


Here is the Hexastar Cover Plate die I used in the video: 


I hope you like what you’ve seen! Thanks so much for watching and happy crafting!

7

Get crafty with Francine - January card & video

Hi everyone! Francine here!

Today, I'll share my first video for Neat & Tangled with you! Here is my card:


I love the wonderful splatter from the Ink Splash stamp set! I decided to stamp it in rainbow colors using Distress inks. I also added a layer of Wink of Stella clear pen for more glitter and it looks beautiful! The paintbrush is from the Crafting is my Jam stamp set. I colored it with Copic markers. The sentiment is from the Sparkle and Shine set. 


Watch the video below (or HERE) to find out how I made this card!


I hope I've inspired you to stamp some rainbow splatters too! :-)

Don't forgot to stop back on Monday for the start of our January release week! You can get a first look at the new products HERE and HERE.

Thanks for watching and have a wonderful day! 

21

Sparkle & Shine


Hello everybody ! Amandine here, I am delighted to see you for Christmas !

Today I present you a card made with the set bright baubles !


For this card, I wanted a very colorful Christmas tree, and my distress associated with glossy accent gave me the perfect effect!


It is a very simple card, but a card full of life I find when viewed! What do you think ?


Hoping that this card inspires a last minute idea if you do not have a map on hand to offer! I'll see you tomorrow for another card to offer and I can not wait to unveil!

And if you ever celebrate Christmas tonight, I wish you all a very good Christmas Eve!


12
Back to Top