Showing posts with label Lucky Stars dies. Show all posts

Red White and Blue Celebrate Hexastar Cover with Cheiron


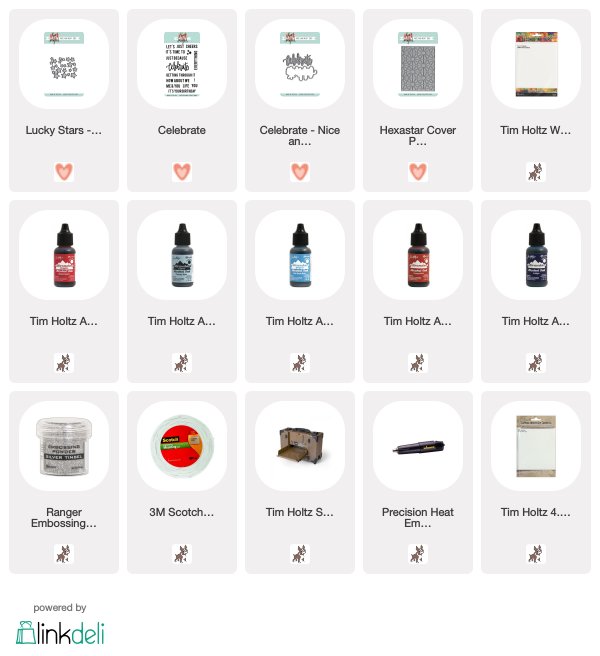
Hi there crafty friends, it's Cheiron here today with a fun 4th of July card for you using the Hexastar Cover Plate. For this festive card, I created a background using some of my favorite red and blue Alcohol Inks . Once it was dry, I cut a piece of white cardstock using the Hexastar Cover Plate die and adhered it to the alcohol ink panel with foam tape.


I stamped the Celebrate and embossed it with Ranger Silver Tinsel Embossing powder and then cut it out with the Celebrate dies and foam taped that to the alcohol ink panel.


To finish my card, I cut a bunch of Lucky Stars dies and stamped and embossed them with the Tinsel Embossing powder as well. I arranged them in a cluster around the top and the bottom of the sentiment. I know someone who has a 4th of July birthday, and this will be the perfect card to celebrate them. If you are celebrating this week, I hope you have a terrific 4th!

SUPPLIES:
2

Introducing our July Guest Designer - Lydia Fiedler


We so very excited to be welcoming Lydia Fiedler to the blog today as our July guest designer. She really almost doesn't need an introduction as she's a very familiar face in the industry, but here's a little more about her:

My name is Lydia Fiedler, and I live in Austin, Texas with my husband and two tiny feline overlords, Maddie and Splotchy. I'm employed full time as the Community Manager of Splitcoaststampers, and also do lots of freelance work in social media and marketing. I've been stamping since my early teen years, and still find more wonder and delight in paper arts every day. It's a joy to be a part of such a creative industry. I describe my style as CAQ - clean and quirky - and when I'm creating, I usually have a small black cat perched on my shoulders, and a true crime podcast playing. My favorite thing about papercrafting is that I believe it allows me to serve others in that small, magical way that only sending a handmade card to someone can do. I blog at www.understandblue.blogspot.com and I'm understandblue on Instagram, YouTube and Twitter.

We know you're going to love seeing what Lydia creates this month.  Here she is with all the details about this week's card:

Hey everyone! I'm thrilled to be a guest of Neat & Tangled this month. I met Danielle a few years ago, and have an immense amount of respect and affection for her, so her amazing stamps and dies are really just a bonus on top of our friendship. She's seriously an awesome person.

Anyway - let's talk about today's card. A lot of people when they create art, they listen to music, or stream their fave Netflix shows. I can't do that. Visual content and music are very distracting for me for some reason, but I have found that audiobooks and podcasts are perfect. I can concentrate on the story and also they keep me from overthinking my projects because I am sort of engrossed in the story.


My favorite genre is non-fiction, especially true crime, and I love the True Crime Sweden podcast, because the host gives a fun fact about Sweden at the end of every episode. A recent episode's fun fact was the Dala Horse, which I used on my card today. I fell in love with these little horses as a child - my next door neighbor was my pastor, and he was Norwegian, and had all sorts of Scandinavian art in his home, included Dala horses. 

I love Scandanavian design in general, and these little horses epitomize the best of that design. I love the clean lines of this stamp & die, so I kept it simple with Copic coloring and a white gel pen. I used the Lucky Stars die to add some sparkle.  The sentiment is from the Magnolia set.

I hope you have a great weekend! If you want to see my favorite podcasts, I have them all listed here
34

Christmas Pageant Twinkling Stars | Nancy Damiano

Welcome to the most wonderful time of the year! Today, let's take a closer look at the Christmas Pageant Stamp Set and Lucky Stars die.


The background design of this card was inspired by the ornaments in this cute little girl's tree "dress". I wanted to mimic the look of the twinkling lights and used tiny enamel dots in the center of the stars randomly. It gives the background a nice punch of color and texture. 


The little tree girl was colored with Zig Real Brush Pens and popped up with some adhesive foam. The snowflake was added to her hand and a present from Fa La Llama in the other.

Creating a simple card with a bit of twinkle is easy and fun with the Christmas Pageant stamp and Lucky Stars die!


6

Negative die cutting technique for Ahoy card with Sveta

Hello everyone!

Sveta is here to share an Ahoy card using the new Yo ho ho stamp set and Yo ho ho Nice and Neat dies in dark colors. 
I first prepared my characters: a pirate girl and a cat. I used watercolor paper, water resistance ink and watercolor brush pens. Then I die cut them using the coordinating dies.


Next, I took black cardstock and the Lucky stars Nice and Neat die and used a negative die-cutting technique to create a starry background. Then I used some ink spray for tiny light splashes. 


The next step was to arrange  the focal point background using the Making Waves Nice and Neat Dies: white cardstock for the background circle and the black one for the scene circle.


For the sentiment I die cut a little strip from the Kitty's Favorite Things Nice and Neat Dies from white cardstock and stamped three separate words from the Yo ho ho stamp set making one phrase.


Hope you enjoyed today's card. Wishing you a great week ahead.
16

have a beary merry NOEL.

Hi there!

Elena here with a Christmas card featuring the sweet bear from Beary Merry.


I stamped and then colored the bear with soft brown copic markers (E51, E53 and E55.)

Then, I used the Journaling Alphas to cut out the letters to spell NOEL. I live in Montreal and we are very bilingual. I need cards for those french-speaking teachers and neighbors!

I love how the die set for Beary Merry allowed me to tuck the middle letters into his arms. It's just so cute!


Next, I used the large rounded rectangle from the Succulent Journaling Card die set and cut 2 layers: one out of white cardstock and another out of a pale aqua.  I used the Lucky Stars dies to cut stars out of the white layer, so that the aqua would show through.

I used some wooden stars and a kraft card base to reinforce the soft brown of the bear.

A white gel pen was used to add finishing touches to the letters and the bear.

I hope you like it! Thanks for stopping by!

♥.

8

Cosmo Cricket Week - Day 1


Hey everyone!  We're so excited to be featuring Cosmo Cricket this week.  Each day this week we'll have two or three team members sharing projects featuring Cosmo Cricket and Neat & Tangled.  They pair so well together and I know you're going to love what you see, our DT has had a blast playing with these fun goodies!

Every good collaboration need a couple prizes, right?  We've got a great little bundle of Cosmo Cricket goodies to share with one of you.  Just leave a comment on each post this week and we'll pick a winner and announce them next week.

Cosmo Cricket also has a prize to share, so be sure to stop by and check them out on Facebook and Instagram.

OK we're kicking off the week with Sveta and Miriam.  Here's Sveta:

Hello!  I'm so exited to share my projects for our Cosmo Cricket collaboration! I must confess that I didn't know about their products and I'm really impressed with them.

For the first card I picked this "love from the first sight" bird with gold foiling on watercolor paper from the WIP Book Art Deck. To color this bird I used Pixie Paint Ruby  and Swatch Sticks. The last has a waterbrush included in the set so it's perfect for "to go" or "traveling" crafting (painting). I used the Scandinavian prints stamp set to create my background and for the sentiment. I think it coordinates with bird's lines perfectly. 


For my second project I played with the Just Add Watercolor Blank Tags and super amazing Pixie Paint Ruby and Pixie Paint Harbor. You should try these paints because they a pure magic! They are so easy and fun to work with and the shimmer is breathtaking. This paints gave me an opportunity to create a little cosmos on a tag. Of course cosmos needs stars and I used our latest Lucky Stars Nice and Neat die. For the sentiment I also used the super clever die set Celebrate Nice and Neat Die from our Birthday celebration release.


I really enjoyed to work with these unique products and hope you have a lot of fun and are inspired by this Cosmo Cricket and Neat & Tangled collaboration week!

Next up is Miriam:


Hey everyone!  I'm really excited about this week!  The Cosmo Cricket products pair so well with Neat & Tangled, and I had a great time creating today's projects.

First up, a card featuring Doily Tag and our Celebrate die.  The Resist Pen is used for just that, you can write on paper and then watercolor and the written portion will resist the watercolor.  BUT, you can also use it as an embossing medium.  Now since you write it and it almost comes out like a liquid glue, it's not an even surface, so if you are looking for that, this isn't the best application for you.  Here I wanted a more textured uneven surface, so this was perfect.


I added a bit of color to the center of the tag using some Swatch Sticks, and then added a bit of splatter with a Dylusions Ink Spray.

For the background, I used an older Cosmo Cricket 12x12 paper with resist patterns.  This particular pad isn't available any longer, but there is an 8x8 and a newer 12x12 pad.  I again used swatch sticks to add a light wash to the paper and a bit of splatter.

The patterned paper was adhered to a dark gray mat, and I popped the doily tag up with foam tape after adding the Celebrate die which was cut three times, once in gold mirrorboard and twice with cream cardstock.  A few gold sequins finished it off.


Next up a simple card using one of the designs from the WIP (Work in Progress) Art Deck.  I love this little deck of designs, there are a variety of sizes and it's great for quick and easy cards.  For this one I chose this sweet little tag, and then added some stamped flowers from the Paper Cut Flowers set.  Rather than use regular ink, I colored the stamp with Swatch Sticks, spritzed it a couple times with water and stamped.  I like the soft, loose feel you get with this technique.

Once I was done stamping, I used the waterbrush that comes with the Swatch Sticks and added color just around the word wildflower so it would stand out.


OK, that's all for me today, but be sure to leave a comment and come back each day this week, at the end of the week one lucky commenter will win a Cosmo Cricket prize pack!


46

Black and White with Pops of Color


Hey friends, it's Nina-Marie here with you today featuring some of the newest Neat & Tangled stamps and dies in a fun birthday card!


I love rainbows and bright happy colors; they make you want to smile when you see them! In today's card, I've used black and white to my advantage, allowing the neutral colors to let my rainbow sentiment and bright, round baubles to take center stage... the impact of the colorful elements against a neutral background is really incredible!


I started off my card by die cutting the stars from the new Lucky Stars die set all over the left side of my white card panel. After cutting the stars, I placed a piece of silver glitter paper behind the stars and stamped some smaller stars among the larger ones using silver ink.


My celebrate sentiment (from the new Celebrate die set), is die cut using white cardstock that I colored with Copic markers in a rainbow color scheme; I layered a total of six of these words together to create a more solid sentiment. I also placed the outline for the word celebrate behind the die cut words and glued it directly to my card. Next I heat embossed a coordinating sentiment from the Celebrate stamp set in silver onto black cardstock. I cut the cardstock into a banner and popped it up off my card panel.


My colored baubles are die cut using the circle dies from the Scandinavian Prints die set; I love the whimsical feel of the circles and thought these would be a great fit for my card, adding to the festive feel. I colored the circles with Copics, covered them with clear Spectrum Noir sparkle, adhered them to my card with a mixture of foam and liquid adhesive, before finally adding a coating of Glossy Accents over top for a nice finishing touch.

I hope you enjoyed my inspiration for creating bright, happy cards using the new Lucky Stars dies and Celebrate stamp and die sets! Thanks for stopping by and spending some time with me... I'll see you again very soon!

SUPPLIES: 


SaveSave
5
Back to Top