Showing posts with label blog take over. Show all posts

Blog Takeover - Chari Moss!


*Monday again already? At least I have something that will make your day a little better. The sweet and talented Chari from Little Miss Littleness is here guest blogging! She has made something super cute and handy for you in light of the upcoming holiday. It could be adapted to fit to any holiday or party which is great!  Hope you enjoy and make sure to swing by her blog and see all of her other wonderful creations. She really is inspiring!*

Hi everyone, Chari here.  I’m taking over super sweet Danielle’s blog for the day while she snuggles with a new little baby. Awww. I was honored when Danielle asked me to do a guest post for her while she took some time to settle in with the new little one.  I of course said “yes!” because I really love helping out and doing things for others when I can.  There is no greater feeling than the feeling of giving. 

Here in the US we are coming up on the Thanksgiving holiday this week.  It seems creating place cards for Thanksgiving dinner is a popular thing to do, however as much as I love Thanksgiving and spending time with m y Family during the holiday we have never been formal enough for place cards.  Most the time we leave the food on the counter and fill our plates like a buffet then find a place to sit (usually at multiple tables because there are so many of us).  Maybe it’s a mountain thing, I don’t know, but I do like the idea of each person having their own special place to sit even if my family doesn't do it.  So I decided to create a different take on place cards and make them more like party favors.

I don’t know about you, but I usually end up so stuffed at Thanksgiving that I don’t always have room for dessert.  So I created a place card on a little take out box that could be filled with a treat to be taken home and enjoyed later.  I found the little box at Michael’s, but really you could use any container you choose.  I used Lawn Fawn’s Turkey Day mini set for the turkey and sentiment.  The conversation bubble was drawn by hand and the turkey was stamped out on pattern paper from Studio Calico’s Autumn Press Paper pad.  I used Lawn Fawn’s Harold’s ABCs to stamp out the name and scrap green cardstock to create the grass. 

Big thanks to Danielle for letting me post for her readers today.  She always has such fabulous creations, I always enjoy seeing what she has created!  Have a fabulous day!
~ Chari

7
Happy Friday Friends! I'm so happy to have another fabulous guest blogger this week. She is the lovely Linda from Papertracer.  Find out a little about her and check out the amazing card she made to share with you all. Be sure to stop by her blog and check out all her other lovely creations!

Hi there!
I'm so excited and honoured that Danielle asked if I would add a little something to her *amazing* blog while she took care of that gorgeous bubba of hers! (Smart girl don't you think?!)

A little bit about me: I've always been interested in crafts, paper, stationary but I only really started scrapbooking about 3 years ago and cardmaking entered very soon after. Things got serious between us (me and the cardmaking I mean) quickly and now we're going steady :)

I've had my blog 
www.papertracer.blogspot.com for over a year now and I really love it. This crafting industry is full of such wonderful, generous, amazing people (like Danielle :)) and I'm so happy to be a part of it. 


I live in Melbourne, Australia (on the Southern tip of the Eastern side of the country) with my wonderful hubby and 2 gorgeous daughters--who are VERY interested in mummy's stamps and pretty papers! I lived in Japan for almost 2 years when I was 21 and wish I could go back there every day, it's an incredible place!
Thanks so much for 'having me' here and I hope you enjoy what I've made!
*hugs*


Products used : 
Hero Arts CL222 ClearDesign: Birthday Expressions (very old set I've had forever)
Copic marker
White cardstock
Acetate
Patterned Paper: Basic Grey Indie Bloom 6x6 paper pad.
Rock Candy Stickles
EK success open scallop paper punch
Gemstones

0

Gettin' Crafty with Jessica DeMaio

*So happy to have my friend Jess from A Simple Kind of Life taking over my blog today! She's not a paper crafter, but she is one of the craftiest DIY people I know, so I'm sure you will love what she's come up with for you today! Be sure to head over to her blog to check out all her other amazing projects and show her some love!*

Hi everyone! I’m Jessica and I’m taking over Danielle’s blog for the day to give her some time to snuggle with that new little love of hers.

When Danielle asked me if I would guest blog, I was incredibly flattered, but my initial thought was that I’m not a paper crafter, so what could I do? I think I do pretty well in the DIY department, so I decided to do something a little crafty for the home.

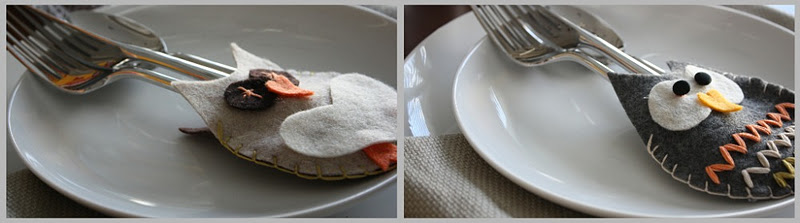
A few months back while shopping with my mom, I stumbled across these cute owl shaped silverware holders.

So adorable and only $1.99! I considered buying a set of six. They were so cute and such a great addition to any Fall table setting. The more I thought about it, though, I realized that I could make these on my own for less than $1.99 each. So I bought this one to use for inspiration and got to work.

The supplies I used were simple:
- Felt
- Embroidery thread
- Buttons
- Scrap paper to draw out some ideas

The felt was $.23 per sheet from Michael’s. I bought several in various fall-themed colors and had tons leftover when I finished. The embroidery thread cost only $.39  each. I bought four and have leftover. I also needed a pack of needles, $1.69 - 40% coupon = $1.01.The buttons cost nothing as they were from my stash I keep from clothes that I’ve bought that come with spare buttons.

First things first, I cut out the body of the owl. You can do this freehand or find an easy template online. You will need two silhouettes per owl holder in order to create the pocket.

Once you have your shapes ready, the next step is to decorate the cutout that you plan to use as the front.

I used various methods: felt shapes for eyes, wings, belly, etc., buttons for eyes, embroidered accents, and so on. Pretty much how ever you want your owl to look. You can use ribbon, fabric, anything you may have lying around.


I used hot glue to attach the accents pieces that I didn’t embroider directly to the felt.

Next part was the trickiest: sewing the back and front together to create the pocket for the silverware.

Now, I’m not a sewer. I have owned a sewing machine for three years and have yet to use it. I sort of self-taught myself this embroidery edge by looking up various tutorials on Google and YouTube. (like this blanket stitch tutorial: http://www.youtube.com/watch?v=eXkSE2TTF4s)

Once finished, you simply tie it off in a knot.
Then your owl looks like this:
I repeated this 5 more times to create a variety of different, Fall-esque owls.


Once finished, I simply slipped my silverware inside and set my table.


Big thanks to Danielle for letting me take over her blog for the day!
Happy crafting! J
7

Blog Take Over!

Hi All! I'm happy to have the lovely and talented Joy Taylor of Less is More take over my blog today while I keep myself busy doing baby stuff. Joy's blog was one of the first I stumbled upon in my crafting journey and she has been such an inspiration.  I am now lucky enough to consider her a friend. I know you will love what she has created, and be sure to head over to her blog to check out all her other wonderful creations!


Joy here, taking over sweet Danielle’s blog today whilst she takes care of the new little bundle of hers.

I have to say a huge congrats to the Walls family on the new arrival of their sweet boy, I hope he brings you much love and enjoyment as the years unfold.

I was kindly asked by Danielle a number of months ago if I could take over her blog for her so as her wonderful readers would not be waiting long periods of time in between her posts and I was honoured and jumped at the chance and immediately thought why not.  I mean that is what the crafting industry is all about right?  The kindness is shared around….so here I am with my creation to share with you all.

As Christmas is dawning upon us I thought it would be fitting to drag out some of my stamps that I never got to use last year and create a card for you all.

I used lots of PTI on this card, what with the card stock being stamped with the Polka Dots to the Mat Stack and lots of embossing to the little Gingerbread Man and buttons with finally a sentiment….yes all PTI…I  love their products!!

This would make a great card to replicate and punch out several for these designs ready to post off to all those family members and friends…

I really hope that this card inspires you to get out all those stamps that you have not created with for awhile and get those Christmas cards created.

Huge thanks goes out to Danielle for allowing me to take over her blog for the day, it was a lot of fun and I hope that we can do this again some time in the future…

Be sure to always pop back in here as this girl is one talented artist and I know that she has some fun things planned for you all to view…

Have a wonderful crafty day everyone!

Hugs,
Joy

5
Back to Top