Showing posts with label Merry and Bright Dies. Show all posts

Merry & Bright Homespun Christmas Card


Hi friends!  Miriam here today to share a card using some older N&T holiday products. 

This card features the Star Cover Plate.  This design can be very modern, but can also take on a homespun, quilted feel.  Today I chose to go with the latter.  

I pulled out a very old 6x6 pad (Pink Paislee's Merry & Bright collection), and picked out a couple more neutral prints - one with small sprays of flowers/leaves and one with a sheet music background.  I also chose an almost solid red print, with some quilted looking stars on it, and cut the cover using each of these patterns.

Just like with quilting, you can get very different looks just based on which prints you choose to use in each part of your pattern.  Since I wanted a more neutral look, I used the red print in the center stars since that's the shape that gets used least.  

The pieces were inlaid into my 'webbing'.  This part is a little fiddly, but the results are so pretty it's worth it. 


I had inlaid all the pieces into the webbing from the print with the little sprays of flowers, but I thought the design wasn't standing out enough.  To remedy the situation, I cut the cover again from some white cardstock that is a bit thinner than my normal card base cardstock.  This was adhered over top of the inlaid design.  To really make sure it was adhered well, I ran the entire piece through my Big Shot between the cutting plates.  This is one of my go-to trips when creating inlaid cards as it helps to make sure everything is tightly adhered.  As you can see, you can't really tell that I added that extra layer of cardstock webbing.


For the sentiment, I used the Merry & Bright sentiment dies.  I love these.  When it comes to holiday cards, if I've got a really pretty background that I don't want to cover up too much of, this is what I reach for.

The sentiment was cut from red cardstock and adhered to the sentiment outline piece cut from white cardstock.  The entire piece was then popped up over my background.

Since there are plenty of pieces of patterned paper left after creating this card, you could definitely crank out two more...that is if your dog hadn't decided to take a stroll through your workspace (the floor) scattering pieces everywhere....

That's all for me today.  Thanks for stopping by!
5

Merry & Bright Leaves with Yoonsun Hur

TGIF!  Today our October guest designer, Yoonsun Hur, is back with us showing us how you can stretch your fall sets to cover other occasions.  Take a look:


Hello crafty friends, Yoonsun here and I am happy to be sharing another Christmas card using the Maple Thanks stamp set and the Merry and Bright Nice and Neat die. Maple Thanks is technically an autumn set, but we can also use it for Christmas projects too. Why not?


Before stamping, I tore the top & bottom part of the watercolor panel. I then stamped maple leaves from the Maple Thanks set onto the panel using Antique Linen Distress ink, and coloured the stamped leaves with some Distress markers: (Red) Candied Apple, (Green) Crushed Olive & Lucky Clover. The background was coloured with Tumbled Glass Distress ink and a wet paint brush.


Once the panel was dry, I heat embossed the maple leaf images over each of the 4 coloured leaves in white – I didn’t do white heat embossing before coloring on purpose. I just wanted to make snow-covered leaves.


For the sentiment, I die cut the word “Merry & Bright” from kraft card stock five times, and then stacked them up using a fine tip glue pen. Finally, I mounted the background panel on a side-folded kraft card base using double-sided tape first, and then added the sentiment die cuts using foam tape.


Thank you so much for stopping by. Have a wonderful weekend!!
6

Introducing October Guest Designer - Yoonsun Hur


Happy Friday!  We are so excited to be welcoming Yoonsun Hur as our guest designer this month.  Yoonsun is an old N&T friend and we are always thrilled when she can be with us.  Here's a bit about Yoonsun:

Hello Everyone! I'm Yoonsun Hur a South Korean-born Australian and I currently live in Sydney with my gorgeous husband. I love being creative!! I really love making cards with various and awesome stuff. I have been working as a Graphic designer since 2000 and this career has helped me in many ways when designing cards. I endlessly want to make various attempts and share my creativity with you.

Today I want to share with you my fun Christmas card with so adorable Beary Merry Stamp Set and the Merry and Bright Nice and Neat Die.


I started by stamping cute polar bear and candy cane from the Beary Merry set on watercolor paper using black pigment ink. I then watercolored and fussy cut them. You can use the matching dies to cut stamped images. It is so much easier than use scissors. ;)


For the snowy night background, I ink blended on watercolor paper panel with Mermaid Lagoon, Faded Jean, Seedless Preserves, Black Soot Distress inks and mini blending tool, and then added white ink splatters all around the panel. For the sentiment, I die cut the word “Merry & Bright” from white card stock fine times, and then stacked them up using glue pen.


Once the panel was completely dry, I mounted it on white card base using double-sided tape first, and then added the sentiment die cut and the polar bear holding a candy cane on the card front using foam tape.


I had a great time with this adorable stamps & dies!

That’s it for today. Thank you so much for stopping by. Have a wonderful weekend!!
5

NT / Benzie Design Collaboration Day 3

Hi there! Welcome back for day 3 of our collaboration with Benzie Design!  Benzie specializes in felt, with 90 colors available in their house wool blend and 36 colors of homemade felt pom poms, but they have lots more to share including various 'felt-fetti' die cut shapes, kits, felt notions/tools and more.  This week (Monday - Thursday) we'll be sharing some projects featuring Benzie products.

There are also giveaways!  We'll be picking one lucky commenter to win the Carnation Collection felt pack and Atomic Pom Poms pictured below.  Be sure to also stop by the Benzie blog as they'll be posting on Monday and Tuesday and will select one lucky commenter to win a $25 credit to the N&T store.  Winners will be announced over the weekend.


Today we have both Elena and Miriam with us.  Up first, Elena is sharing with us a quick and easy holiday packaging idea:


When I saw the Felt-Fetti Holly kit in their store, I knew I could whip up some very festive Christmas packages!

I used a trio of red and white striped gift bags that I had on hand, the Felt-Fetti Holly shapes, the Neat and Tangled Merry and Bright die, and our Classic Tag 2 shape.


If you don't enjoy hand-stitching you could easily used a hot glue gun to put it all together, but I think it added so much cuteness to the simple tag!

I adhered it to the top of the tag, added the beautifully handlettered Merry and Bright sentiment, and finished off the tag with a strip of green paper to balance out the green holly leaves.


To attach the tag to the bag, I opted for a really homespun look: I folded the bag and clipped it closed with a tiny red clothespin. I love that look.

Next up is Miriam:

Hey everyone!  I had so much fun creating with Benzie felt.  I created two cards today, for the first card, I selectively cut the large flower from the Succulent Cover Plate from three shades of green.  Before I die cut the pieces, I backed them with white cardstock.  This adds reinforcement and allows you to adhere the pieces easily to your card.


I also cut the flower from cardstock and used the webbing as a guide to get my pattern started.  Once I had the first few pieces in though, I just eyeballed the space between the pieces.


Even though the cardstock does add a lot of reinforcement, the tiny pieces can still be a bit tricky, so you need a die that has large enough pieces, the petals for the succulent were a perfect size.  The only tricky bits were those teeny tiny pieces in the center.  I just needed to be very careful with those and used craft tweezers to adhere them.

The sentiment is from the Gardenia Blooms Journaling Card set and it was stamped on one of the banners from the Scalloped Dies set.


My next card features the Maple Thanks and Oak Leaf Dies.  I cut the solid shapes from felt and the webbing/detail dies from cardstock and woodgrain paper.

The solid felt shapes were stitched to the card itself along the center line.  Then I used spray adhesive to attach the webbed pieces.


The sentiment, also from the Gardenia Blooms set was stamped on one of the skinny tags from the Classic Tag 2 die set and was then trimmed down and stitched on as well.

I thought it would be fun to dress these cards up a bit, so I cut a Doily Envelope wrap from felt for each of them.


Caveat, this is beautiful, but these doily pieces are very delicate in some sections and so you have to be very careful with them or you'll get some tears.  The felt cuts well, but I think because of static cling the pieces need a little help coming out.  I used a largish needle to just poke the pieces out and that worked pretty well.


I love how pretty the details look in felt!


OK, be sure to leave a comment to be entered to win the Benzie prize and then head over to the Benzie blog where you can leave a comment to be entered to win a $25 store credit to Neat & Tangled.  Come back tomorrow for our final collaboration day!
39

Amy Sheffer December Finale


Happy Friday!

Sadly, our Guest Designer Amy Sheffer is sharing her final projects with us today.  It's been such a pleasure to have here with us this  month, and I know you're going to love what she's prepared today.  Here's Amy with the details:

I'm excited to be back today for my last week as guest designer. A big thank you to Neat & Tangled for having me!


For my first project today, I've paired the sweet cats from Purrfect with the Big Hugs Nice and Neat die. One of my favorite parts in the card-amaking process is adding in all the extra details that make a card extra special. This card is pretty basic and simple, but I've still included a lot of my favorite details.


First, I did some ink blending on the sentiment for an ombre look, leaving the top white. Along the bottom of the letters, I added irregular, random white dots of paint for a whimsical look.


Next, the hearts have been painted with a clear Wink of Stella for some sparkle. One of my favorite ways to add subtle texture is with vellum. Here, I've added a strip of torn striped vellum to the lower border. I also love to add stitching. It's so subtle, but can really make a difference. I had fun coloring these two kitties -- especially the Siamese!


My next card is a quilted take on the Star Cover Plate. I cut five of these -- one in white card stock and the other four from coordinating patterned papers. 


Then I inlaid the various patterns in the star centers and the star points in a quilt fashion. To make the process go a little quicker, I used spray adhesive on a base panel, rather than trying to glue each individual piece. I can't wait to try this in different colors for different seasons and occasions! 


Once I was done with the background, I added a two-layer sentiment using the Merry & Bright dies. To help the sentiment stand out a little more, I added a narrow strip of vellum behind the sentiment. 


And last, I stamped a kraft envelope using the Please Deliver stamp set. I love how easy it is to transform your envelopes into something special with just a few impressions!

Once again, thank you Neat & Tangled for having me as your guest!
5

Advent Calendar Extravaganza with Taheerah Atchia

Hello everyone! Danielle here with a fun card as part of Taheerah's Advent Calendar Extravaganza!
Advent Calendar Extravaganza is -the- festive event of the season! This ‘hop with a twist’ was dreamed up by Taheerah Atchia and features surprise destinations each day! Joining in the fun with Taheerah are ONE HUNDRED special guests - each serving up some fantastic Christmas inspiration! Just like an Advent Calendar, you’ll never know where you’re going to be visiting next until you ‘open the door’!

And that’s not all! With 25 *amazing* sponsors taking part as guests as well, your crafty wish list is bound to get a boost with a chance to win a prize EVERY SINGLE DAY!!

Join in the fun every day at taheerah-atchia.com to see what special surprises await behind the door!

For my card today I used our Merry and Bright Dies, along with my Gansai Tambi watercolors.  This card was very easy to put together, and could easily be made as a set, or mass produced using different colors!  To create it, I simply die cut the larger open shadow die from a 4" x 5.25" panel of card stock. On a second panel of watercolor paper I chose one shade of red watercolor paint, and created a simple gradient background.  Once the paint dried, I adhered the die cut panel on top of the watercolor panel with foam tape. I then stuck on the die cut sentiment, and placed the completed panel on a card front.


It’s not a party without a prize - and with prizes every day there are several chances to win! Today’s prize is generously supplied by Neat and Tangled so you’ll definitely want to win! Simply leave a comment on this post - then head back to taheerah-atchia.com and leave a comment there too! You must leave a comment on Taheerah’s blog as well as mine in order to be eligible to win! Don’t forget to grab the other surprise destinations from Taheerah’s blog and head over to them to leave comments there as well to improve your odds even more! You have until 23:59 EST on 31st December 2016 to enter.

Don’t forget Advent Calendar Extravaganza runs from 1st-25th December inclusive so make sure you visit taheerah-atchia.comevery day for fabulous inspiration and amazing prizes every single time!

Thanks for stopping by!
Danielle


202

November Release Redux Cards by Taheerah

Hey everyone, happy Wednesday! It's Taheerah here today to share some cards featuring the November release!

It seems that my release package wanted to travel the world a bit and got lost in Mexico! I was so sad to miss out on sharing some Release Week projects, but once my replacement package finally arrived I couldn't wait to tear it open and get stuck in! So although I didn't get a chance to join in with the other talented DT ladies, that just means I've got the limelight to share them with you now!


Totally swoon-worthy, right?!

Let's start with the first card:


For this one I used the May Your Holidays Be stamp set and combined it with the girl elf from Elfs And Their Shelf. I threw in an older set too called Happy Ornaments to turn it into a scene!


I cut out the centre of my main ornament and turned it into a fun shaker pocket! And I loved trimming the banner in two so that I could have it loop behind the ornament, and to have that cute little elf perched on it as it swings!


Next up, it was time to take the Scandinavian Prints Christmas set for a spin:


I created my own patterned paper right on my card front, stamping with a non-traditional colour palette!


Little added details for the stars and snowflakes came courtesy of the May Your Holidays Be and Elfs And Their Shelf sets respectively. The sentiment from Santa's Wonderland is the perfect finishing touch!


Speaking of Santa's Wonderland, I really wanted to play with it on its own too, and then I came up with a really cool and unique idea...


I used partial die cutting to create a snowglobe! I die cut most of the circular ornament from the May Your Holidays Be dies, then used the banner from the same die collection to create the base!


I created a fun shaker scene using the penguin, North Pole and snowflakes stamps. It was quite labour intensive to think through and put together, but the end result was so worth it!!


I used the Merry And Bright dies for the sentiment, doubling up my die cuts- one with black on top of gold, and the other reversed! There are so many fun details and lots of dimension in this beauty and I'm so proud of it!


And finally, possibly, my favourite was saved 'til last:


I built a super-fun scene using lots of different sets! Santa's Wonderland, Elfs And Their Shelf, Beary Merry and Into The Woods all feature here, and they go together perfectly!!


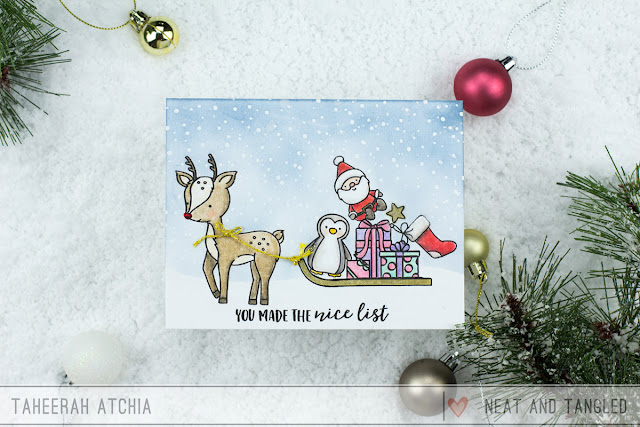
I curved the shelf stamp on my acrylic block to make a sled!! Then I got busy piling on the presents and little extras, and coloured everything with colouring pencils. The deer from Into The Woods makes a perfect Rudolph to tow this sled! I masked off all my images after colouring then ink blended my sky over them, having first heat embossed my snowflakes. Some shimmer, glitter and a gold cord tied everything together perfectly. Whoever gets this card is definitely on the Nice list!


I hope you loved these release projects as much as I loved creating them! The November release is probably one of my most favourite to date, with a few of the new products out of stock currently - so make sure you sign up to notifications for your favourites to know when they're back in stock! Thanks for stopping by!
8
Back to Top