Cheery Rainbow Christmas with Guest Designer Meghan Peterson

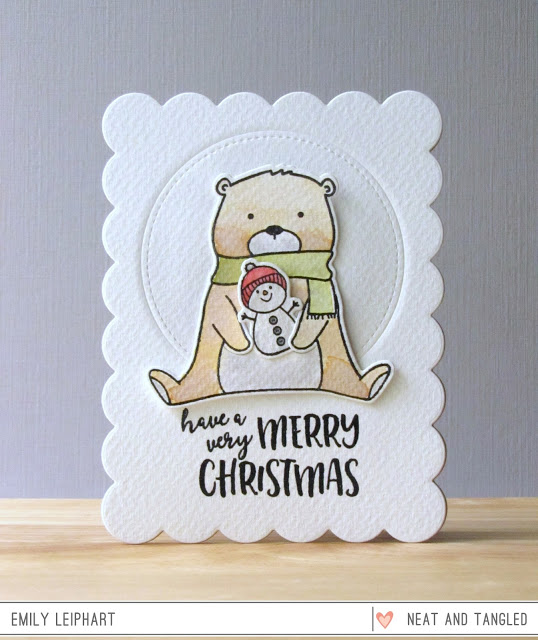
It's the last Friday of the month, which unfortunately means that we're saying goodbye to this month's guest designer Meghan Peterson. It's been a pleasure having her this month, and you're going to love her last project. Here's Meghan with all the details:

Good morning all! Today is my final day at Neat & Tangled as their Guest Designer for this month. It has been such an honor to be a part of this, and thank you all for joining me!


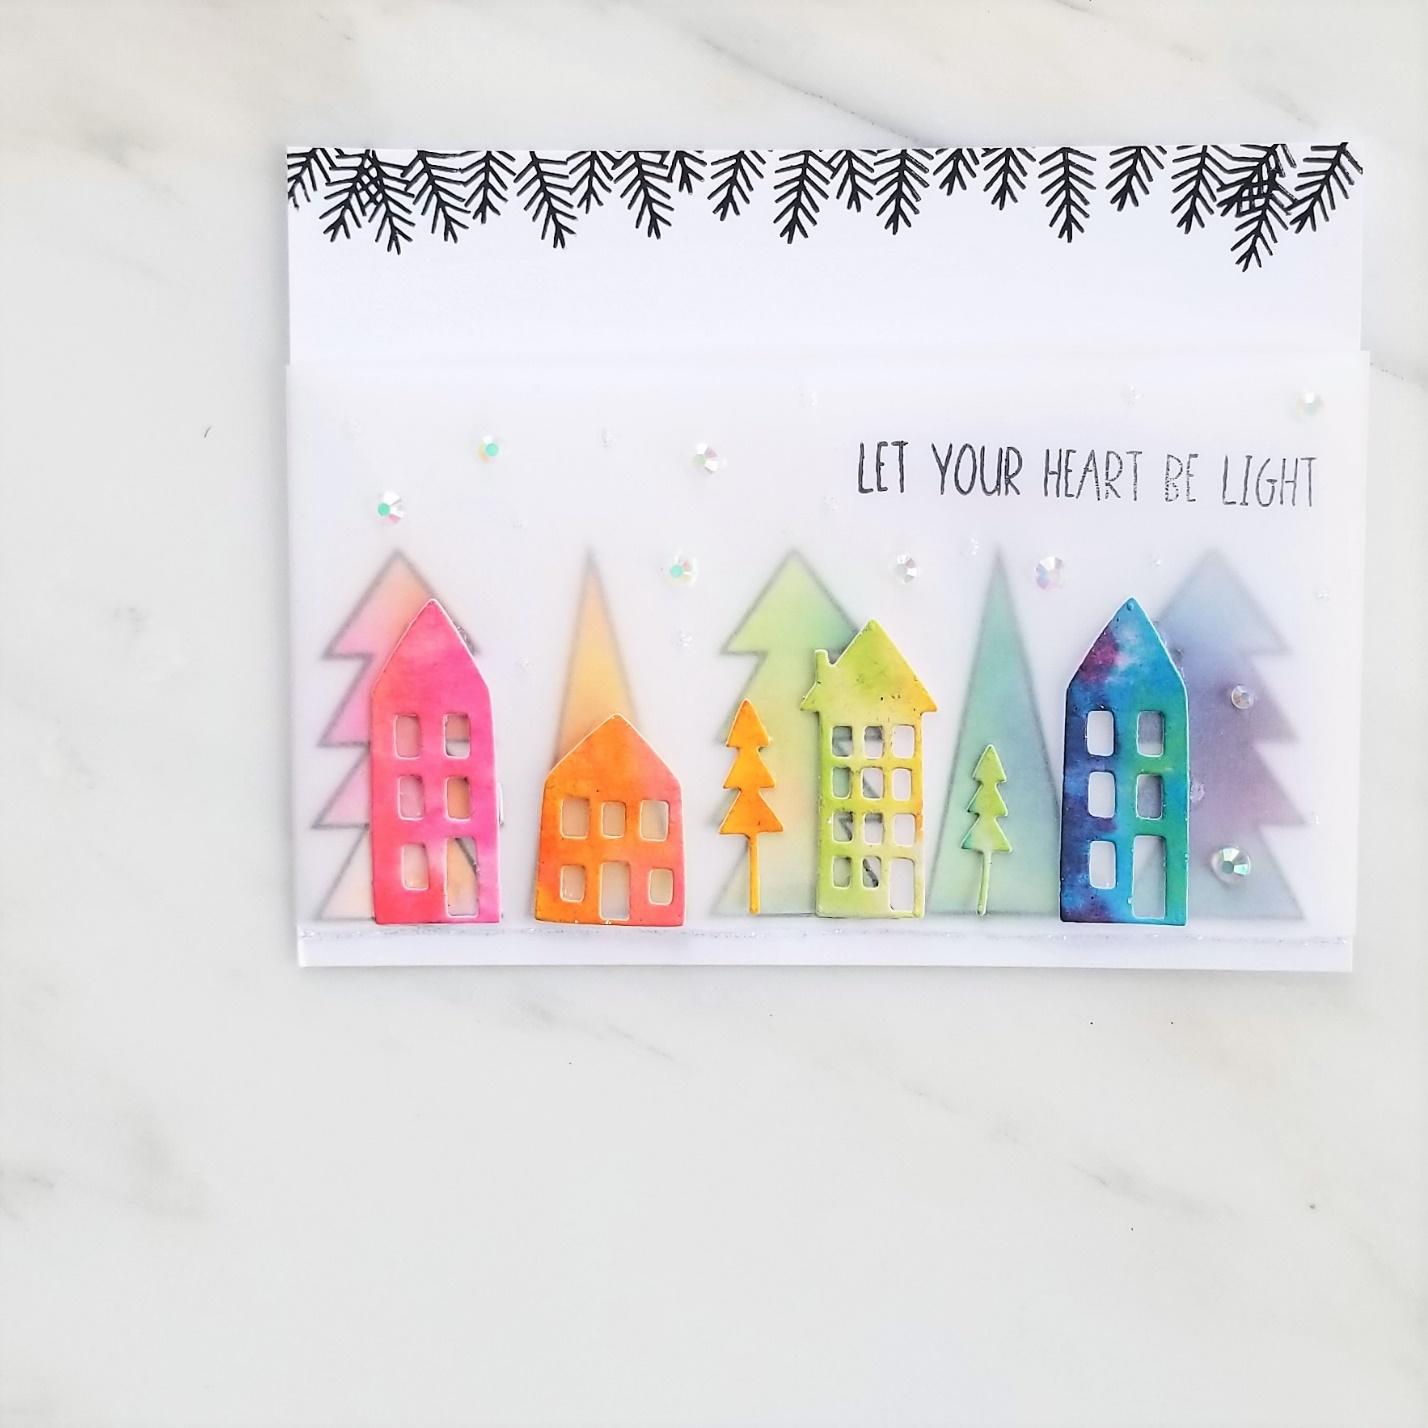
Today I decided that since Christmas is less than a month away (when did that happen??), I would make a true Christmas card. However, I wanted to try it with a twist and to make a rainbow Christmas card. I was skeptical about how it might turn out, but I actually really like the cheery feel of this card.

I started by taking a watercolor paper panel, the size of an A2 card and cut it in half, hot dog style (or vertically if you’d like to be technical ☺). I took my distress inks and smeared the rainbow colors I wanted onto a craft sheet (acetate or shrink wrap would work for this also). I then took one half of my watercolor paper, and smeared heavily and richly my distress inks in rainbow order. I added water to emphasize the watercolor look, and made sure to put the colors closely together so you would get multiple colors in each tree. I put this aside to try.


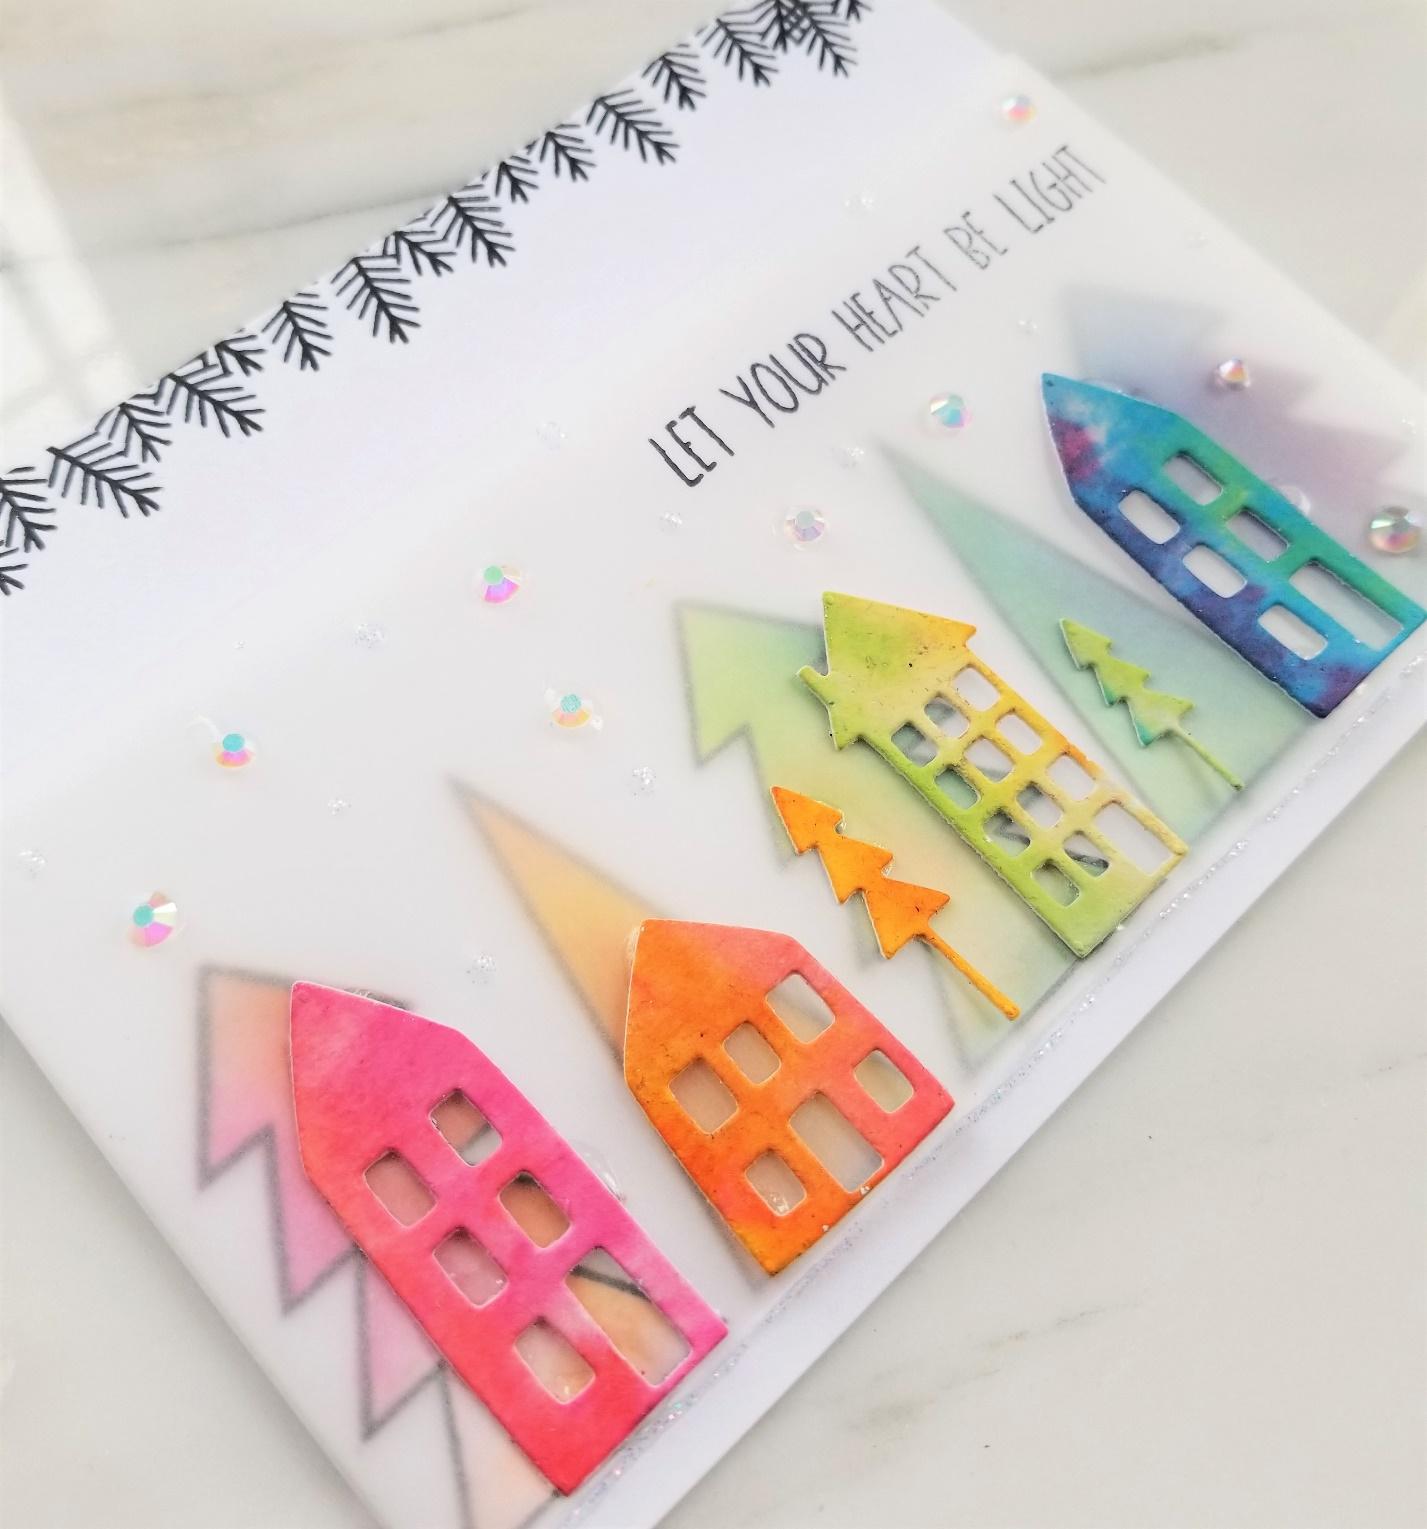
I then took the second half of my watercolor paper and diluted the colors still on my craft sheet with more water, and added more water as I applied them, in the same rainbow order, but not with the exact same color ratio as my first panel. This variance will only add to our piece. After I had a pale watercolor rainbow, I let that try as well.

As they dried, I took my card panel (not watercolor paper), and added sparkly snow falling from the sky, partially using the snow stamp from Neat and Tangled, and then added in more dots where I wanted. I debated heavily with myself about adding color to the top portion as well, but decided I wanted my rainbows to be the color focus and left the top part completely white (unless you count the iridescent sparkle).


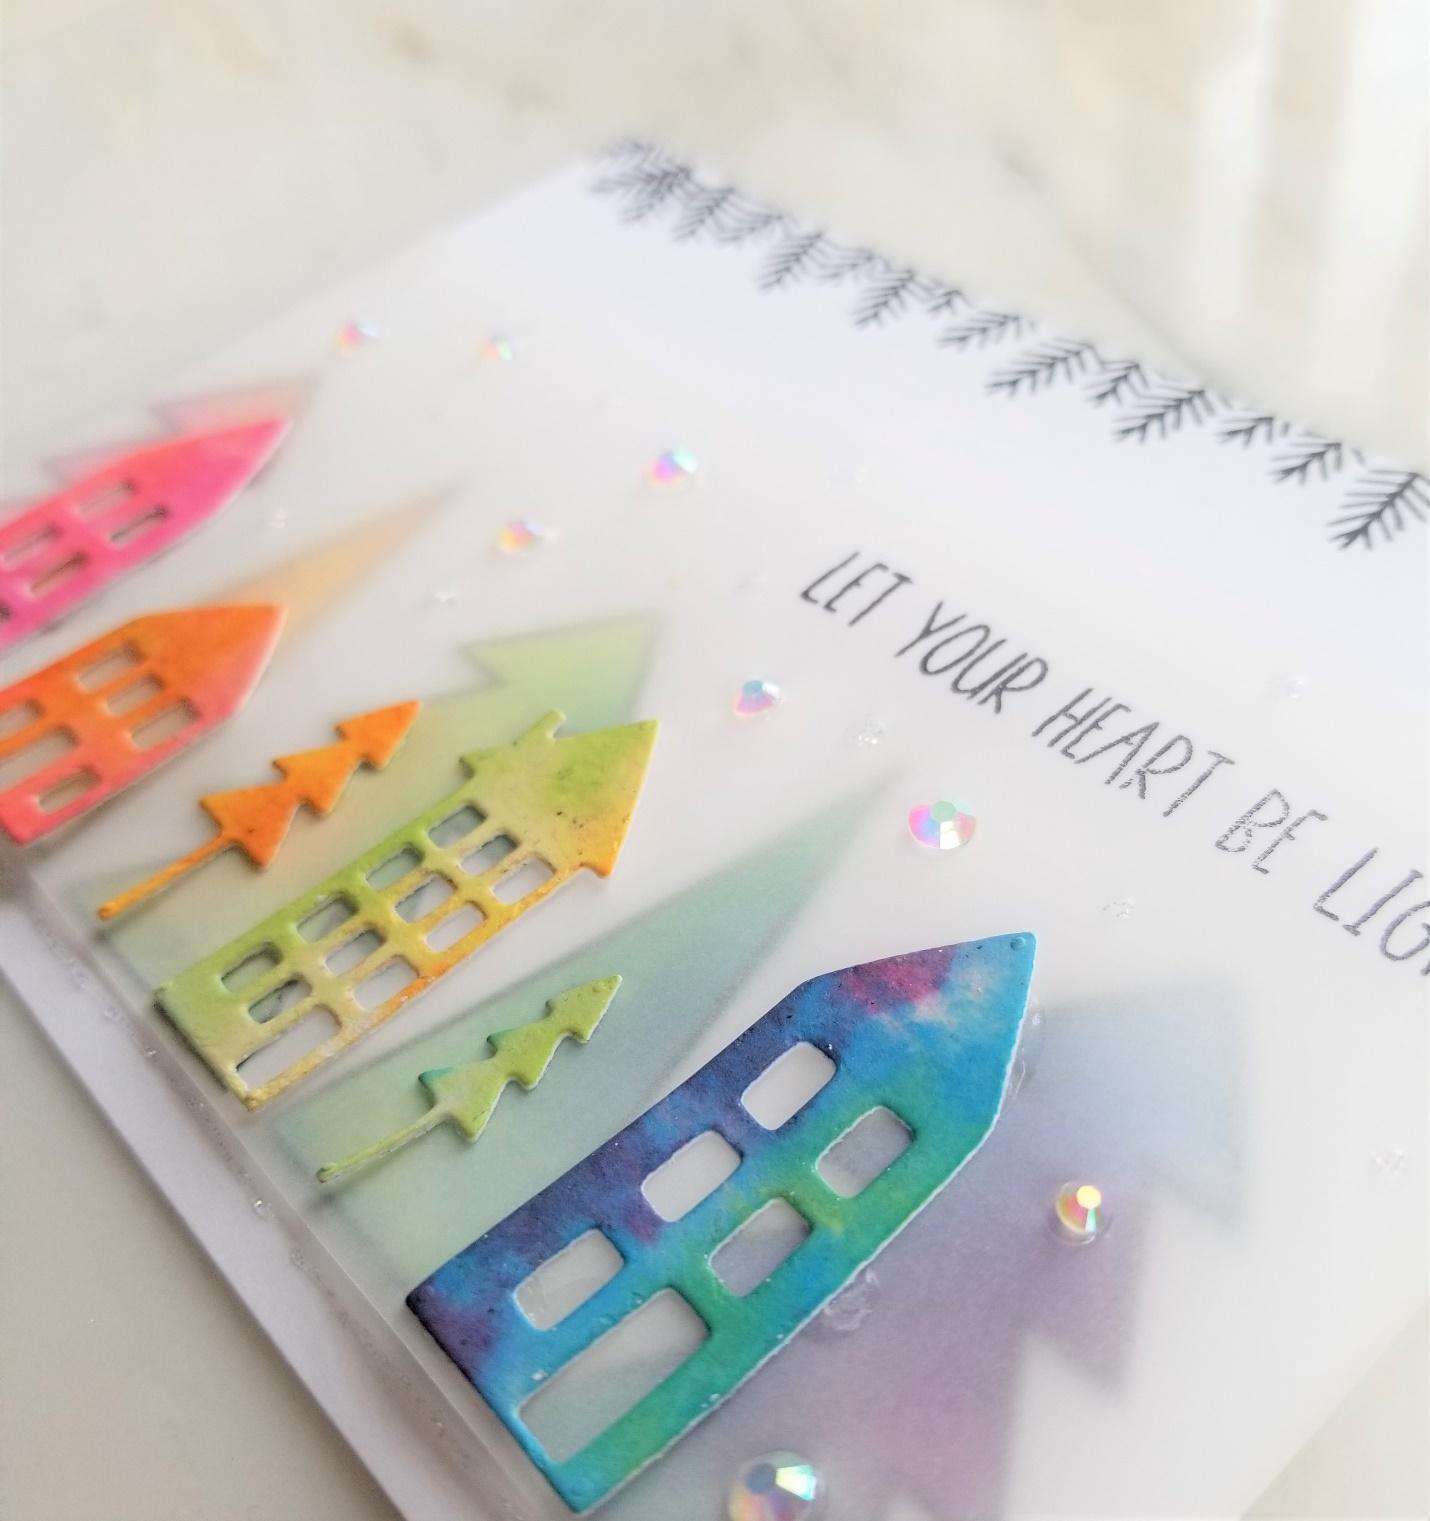
I then die cut my trees (Scandinavian Prints Christmas) and my houses (Warm Winter Scene Cover Plate) from my dried watercolor panels. On the trees, I stamped the black detail stamps for a fresh contrast to the colorful watercolor. I then built up my neighborhood along the bottom with my pale trees in the background behind some vellum and my Christmas village houses in the front.

I stamped my sentiment in black ink over the houses (Scandinavian Prints Christmas), and then some tree branches from . This gives a modern looking card that is still bright and cheery. I’m thrilled with out in turned out.

Thanks so much again for joining me, and I hope you are all having a wonderful holiday season.

Xoxo

Meghan
9

Monochrome Holiday Cards with Daria

Hello-hello Dear Friends!

Daria here, and I have a few cards to share with you today. I missed my November DT package due to  the post mistake (seriously, I was so sad about it). So, for these projects, I've decided to take some oldie but goodie stuff that would work perfectly for the holiday season.  To say the truth, I am really behind on making all the cards I want to send this year...


Having that in mind, I need some simple and fast to make yet pretty idea for holiday crafting. My recipe for that is to take cool cover plate, add themed elements, and finish with season's sentiments.


I was playing with two cover plates: Falling Circles and Warm Winter Scene. Those two are my favourites. The first one is just a perfect backdrop for any winter or holiday themed card. While the Warm Winter Scene cover plate die could be used for so many different occasions - both negative and positive die-cuts.


I went with monochrome looks for these cards. They are pretty simple to make, but I love the look. Hope you do too :) The sentiments are from Happy Holidays Stamp setGet Yeti and Wishing You Love stamp sets.


While making all the die-cutting, I also wanted to use some of the pattern papers I have. That is how the last card was created. It is to show that just by using different colours you may change the feel of the card.


Thanks so much for stopping by, hope you liked that simple ideas and will give them a try.
Have a wonderful day,
D. 
10

Bright Lovely Lotus Card with Sveta Fotinia

Hello everyone!

Today I'm here to share one bright card using Lovely Lotus stamp set along with coordinating dies.
 I stamped the images with black ink and colored them with alcohol markers and then die cut.
Once I placed all flowers in a composition I used press-and-seal wrap to grab them untouched and add adhesive on the back side. 
 I used white gel pen to add some doodles on the card base. And of course added a sentiment from the same stamp set on a white cardstock stripe.
I'm in love with this stamp set and hope you will have as much fun as I did playing with it!
Thanks and have a great day!
4

Snow One Like You with Keeway


Hey there! It's Keeway and I'm thrilled to be here to send over some winter inspirations for your holiday cardmaking and the Stay Cool set is just perfect to help us out today!
I started by stamping a few images from the stamp set in dark brown hybrid ink and colored them with copic markers. Then I die cut the images out with the coordinating dies. I added the fish to the end of the fish line and used a thin copic multiliner to connect it to the fish's mouth.


To frame this little scene, I die cut a circle out of an A2 sized white card stock, offset to the right side. I used the snowflake image from the Stay Cool stamp set and Snow Fun stamp set to create a stamped pattern background.


For the background I laid behind the frame, I ink blended Peacock Feathers, Cracked Pistachio, and Tumbled Glass distress oxide inks. I also die cut a snow drift and blended the edge with Tumbled Glass distress oxide ink. I stamped the image of the hole onto this piece and colored it with copic markers.


I stamped the sentiment from the Snow Fun stamp set in Versamark ink onto kraft card stock, and heat embossed it in white. I used the fishtail banner die in the Triangle box to partial die cut the shape around the sentiment. I added this banner, the eskimo, and the penguin to the card with foam squares to finish it up!

Thanks for joining me today, and see you next month!
3

Hello!

Hello there!

Mayuri here to share a card using the Doily Tag and Hello dies ;-)


This card didn't take too long to put together, especially as I knew I wanted to use up some of my inky panels. I die-cut the Doily Tag shape out of a bright, inky piece, popped out all of the negative bits and pieces and added some foam tape to the back, ready to adhere to my card base.


I noticed that my card base was looking a little bare, so I added some gold paint ink splats for a bit of interest and then foam mounted the Doily Tag to the front. I then die-cut the Hello sentiment several times out of white cardstock and stuck them on top of each other to create a thicker embellishment.


 I adhered the sentiment on top of the Doily Tag and added some gold sequins to finish.


Thanks for stopping by!
1

Warmest Wishes | VIDEO | Natalie Elphinstone

We're quickly hurtling towards Christmas and if you're of the inclination to create some handmade Christmas cards (and I'll hazard a bet that the majority of people reading this probably are!!) then it's well and truly time to start creating your Christmas cards! In fact, I'm sure you already have right? But it never hurts to throw in some new inspiration and maybe I might encourage you to try something you've never tried before.


Did you manage to grab one of the new release stitching dies that Neat and Tangled designed in collaboration with Benzie Design yet? These are changing my perspective on the traditional paper-based Christmas card this year by encouraging me to add some felt embellishments with all the trimmings!


If you notice carefully, the Ugly Sweater Die Set comes with a whole range of small dies for decorating your sweaters with. But don't feel that you have to be limited to just that, when all the pieces can be used as stand-alone embellishments for sooooo many of your Christmas projects. And that's exactly what I've done here. I used the wreath and the poinsetta and the bow to make a kind of banner across my card, and the texture created by cutting these from Benzie Design felt is just incredible.


In my video today I'm going to walk you through the process of creating this card start to finish (including the part where I first finished the card with a whole different sentiment and then changed my mind and used this one instead!!!) I hope you enjoy it, and I hope I've inspired you to add some fabric textures into your next card.


Supplies:

Neat and Tangled with Benzie Design: Ugly Sweater Stitching Dies
Neat and Tangled Merry Kisses Stamp Set
Neat and Tangled Tiny Cuts Die Set
2

Sales, Sales, Sale


Hello friends!  We hope you're recovering from a wonderful Thanksgiving holiday.  The celebration continues all weekend with some of our biggest sales of the year!  There is a different sale each day.  And here's a bit of inspiration for you before you head over to the store:

Featured Products:  Good Vibes

Featured Products: Beavers Eh, Lumberjack Love

Featured Products: All the Sprinkles, Hooray Dies

Featured Products: Medallion Flower Builder

Featured Products: Schoolhouse


Featured Products: Hello Die, Receding Blocks Stencil

Featured Products: Welcome HomeBloom

Featured Products: Beary MerryScalloped dies

Featured Products: Floral Frame, Art Deco


Featured Products: You're a Gem

Featured Products: Koalifications, Classic Tag 2

Featured Products: Into the WoodsScalloped dies

Featured Products: Love Notes stamps and dies

Featured Products: Floral Frame

Featured Products: Flamingo FloatieRice Paddies Stencil

2

8 easy projects with Neat and Tangled November release by Bibi


Hello from Scotland! Is Bibi Cameron here and today I have eight quick and easy Christmas projects to share with you using almost all the products from Neat and Tangled November 2018 release.

Watch the video to see how I made them...


So the first  you will see in the video is how easy peasy is to use  the Penguin Treat Holder 


Depending on how you glue the little arms of the penguin you can fit on them different treats ... even a small tool to send to a crafty friend. 


I'm also crazy about Craft Perfect mirror cardstock. It is great for everything: for die cutting, embossing, heat embossing and to apply alcohol ink blending techniques as well.

You can find Craft Perfect glossy mirror cardstock and satin mirror cardstock on the market and both provide an awesome look and feel to your projects... This paper is perfect for the season.


So I added heat embossed banners on mirror cardstock, I also die cut a whole panel out of satin mirror cardstock and I used mirror cardstock for the Triangle Box below.


I also embossed the mirror cardstock and also standard cardstock using Fa La La Stencil and an embossing mat as an extra decorative element. 


I also did easy ink blending backgrounds to build small scenes on the cards below.


Using Memento black ink, I stamped images from three of four stamp sets in the Neat and Tangled November release and I added colours with Copics.


Distress Oxide inks used for the background: Tumbled Glass,  Blueprint Sketch, seedless preserves


Distress inks used: Fossilised Ambar,  Worn Lipstick and Spiced Marmalade.


Distress Oxide Inks used on the background: Salty Ocean and Lucky Clover.


Distress Oxide inks used for the background: Tumbled Glass,  Blueprint Sketch, seedless preserves.

That's all for today.
Happy crafting
x
Bibi


2
Back to Top