Easy rainbow summer cards + alcohol markers with Bibi


Hello everyone! It is Bibi here,  today I'm sharing creative ways to stretch out your crafty supplies while I walk you through the process of making a couple of  easy, colourful and fun summer cards.

I used Hello Summer die, Night Paint Stamp Set Dimensional Triangles cover plate die from the latest Neat and Tangled release and one of my fav ever: Origami Map die .

Here is the Video.


As you can see in the video I also used Nuvo Creative Pens -  Alcohol Markers with dual tip. I used their broad tip to create a striped pattern on a piece of bristol board paper and I only used the markers to add colours to other images and die cuts on these cards.


This is the first card I'm making the video and I think it is perfect to send encouragement. 


For this card, I trimmed a portion of the large die cut produced by Dimensional Triangles Cover plate die and I made a kite.

The girl image is from Night Paint Stamp Set. In the original image, she has a brush in her hand. I cut it off so it seems like she is holding the kite.

That's all for today!

Many hugs  and happy crafting

x

Bibi

Supplies

3

Patterned Paper Background With Debby


Hi, it's Debby here today. I have a plentiful stash of patterned paper, but often don't think to reach for it as often as perhaps I should. You see although I love all the beautiful patterns, sometimes I get in a rut of making backgrounds in a set way. However, today I brought out the patterned papers to create a pretty backdrop for the images from the Paint Night set.

I stamped the little girl and easel from the Paint Night set in InkOn3 Blackout Ink on Neenah Solar White card. I also added the country scene to the easel too. I used Copic markers to colour and then die cut with the matching dies


For the sentiment, I coloured a piece of card with a Copic Marker so that it matched the little girls skirt and then I stamped the fun phrase from the Paint Night set in Clear Embossing Ink and sprinkled with White Embossing Powder and heat set. 


To create the patterned paper backdrop, I chose three patterns one with a small design, one with a medium design and one with a busier design. I combined the three patterns in differing quantities. I know there's a phrase for how to do this, but it eludes me as I write this post. Something to do with pints, quarts and such. The idea is that you have a larger piece of one design, a medium sized piece of a second design and a small piece of the third design. This is supposed to be pleasing to the eye as the patterns aren't competing for equal measure. 

I added the pieces of paper I had chosen with foam adhesive to a Neenah Solar White card base and then added the images and greeting with more foam adhesive on top. I let some of the images overhand the pink paper to give a movement within the design and prevent it all looking too contained and rigid.

Thanks for joining me today and I'll see you next time!


5

Hooray Card - Two Ways with Daria [Video]

Hello Dears,

Daria here. So glad you are joining me today. Lately, I am trying to give more love to the products I really like but haven't got much time to play with. This time it is about Hooray Die and Stamp sets and Ballon Duo Stencils. Those are one of my all time favorites.


I've started from the background. I applied Distress Oxide inks through Ballon Duo Stencils to make loots of balloons flying in the air. I like transparent balloons with gold confetti inside, so I wanted to mimic that in my card. To make it, I applied Tonic Nuvo Glimmer Paste in Gold through the stencil, but covering each balloon only partially.


 I stamped the large bold and so beautiful Hooray Stamp in Black and then die-cut it with the coordinating Hooray Die; which also could be used as stand alone (wink).


Here is a video to show you how it was done:


I like how turquoise and gold look together and decided to make not such a busy card, but a more clean one.

 So, i stenciled only a few balloons, added Hooray die, and finished it up with a some banners. I die-cut those using Banner dies from Scalloped die set and different paper (grey, lilac and gold). I also stamped a little Happy Birthday sentiment from So Many Sentiments Stamp set.


There will be a short video on making that card over Neat&Tangled Instagram. Be sure to subscribe and check it out.

I hope you liked that simple ideas and will give them a try. Be sure to tag us in social media. It is always so rewarding to see what you create. 

Hugs, Daria. 

***
Neat&Tangled Products used: 


For a full supplies list please visit my blog
3

Solar prints turned into cards

Hello there!

Mayuri here to share a set of cards that I've made using some solar prints I created a few weeks ago, when we had some amazing weather and lots of sunshine!

©Candles in the Garden. Neat and Tangled May 2018

Solar prints are created using special paper which reacts to the sun. You carefully place objects onto the paper, and expose it in the sun for about 5-10 minutes, depending on how sunny it is. When the exposed areas turn white, you remove the objects and immerse the paper in a water bath to allow the print to 'set'. Where the objects were laid is where you get the almost ethereal, ghostly images. I decided to experiment with Neat & Tangled stencils, die-cut pieces as well as leaves and flowers.
 
©Candles in the Garden. Neat and Tangled May 2018 ©Candles in the Garden. Neat and Tangled May 2018
©Candles in the Garden. Neat and Tangled May 2018

After I'd exposed several sheets of solar paper in the sun, I'd hung them up to dry for around 15 minutes. I then die-cut several rectangle panels out of them, slightly smaller than an A2 card base to use for my cards.

©Candles in the Garden. Neat and Tangled May 2018

For this first card, I began by stamping a sentiment from No Words in the centre of one of the panels with Versamark Ink. I then stamped supporting images from Friendly Florals in the form of a wreath, again with Versamark Ink. I sprinkled with white embossing powder and heat set. I added a bit of sparkle by colouring some of the open areas in with gold paint.

©Candles in the Garden. Neat and Tangled May 2018

For my second card, I took huge inspiration from a set of cards that Ruby from A Rare Ruby had created - she mentioned in her post that there was lots of doodling ideas on Pinterest and so I literally doodled onto one of the panels with a white gel pen. I added a sentiment from So Many Sentiments to finish off.

©Candles in the Garden. Neat and Tangled May 2018 ©Candles in the Garden. Neat and Tangled May 2018

For my third and fourth cards, I adhered a panel of the exposed solar paper to a piece of cardstock to make it more sturdy and then run it through my die-cutting machine with the Warm Winter Scene Cover Plate. I was able to use both the positive and negative pieces to create two cards!

©Candles in the Garden. Neat and Tangled May 2018 ©Candles in the Garden. Neat and Tangled May 2018

I hope you feel inspired to used your stamps and dies in different ways!

Thanks for stopping by ;-)
8

Hello Lovely with Rebecca Luminarias


It's the last Friday of the months which means, sadly, it's our last week with this month's guest designer 
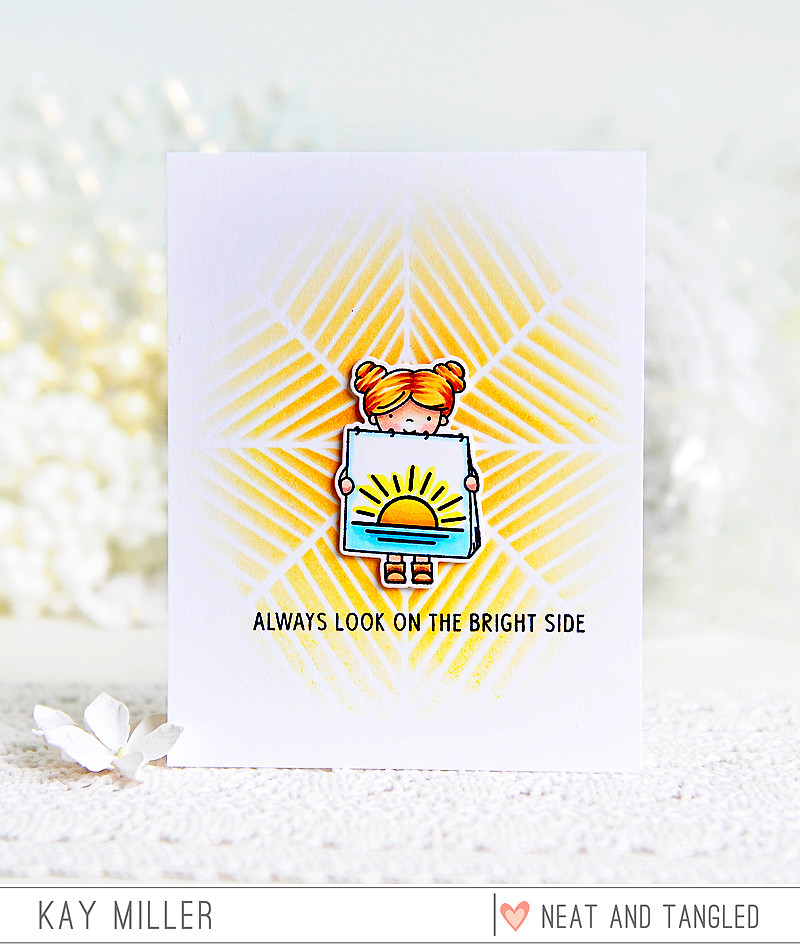
Rebecca Luminarias. Today's card is clean and simple, but packs a punch. Take a look:

Hi everyone! It's Rebecca Luminarias back one last time with a different approach to a one-layer card. Inspired by the Hand Stitched stamp set, I decided I'd make stitching a main element of my card design. All I needed was the perfect stamp. This cute flower center, or sun burst, from Scandinavian Prints was more than I could have hoped for!

I chose my floss, which is an ochre-hued yellow (DMC 3820). First, I stamped several of the images in a similar ink all over my card. You don't have to match the color exactly since you'll be stitching over it, but try and get as close as you can, just in case parts of the image show through.


With a paper piercing tool (or a needle if you don't have one of those), I carefully poked holes in the center and at the end of each outer point of the bursts. After that, I stamped my sentiment, which was "hello lovely" from Hand Stitched. Since I was stitching, I thought the dashed letters were a fun choice!


After all my holes were made, it was time to get stitching! Embroidery floss is 6-ply, but I pulled it apart and used only 2-ply for this design. The thickness of the lines in the stamps determined that; if they were thicker, I'd have gone with more strands; thinner and I would have only used one, or plain sewing thread. Use your best judgement.


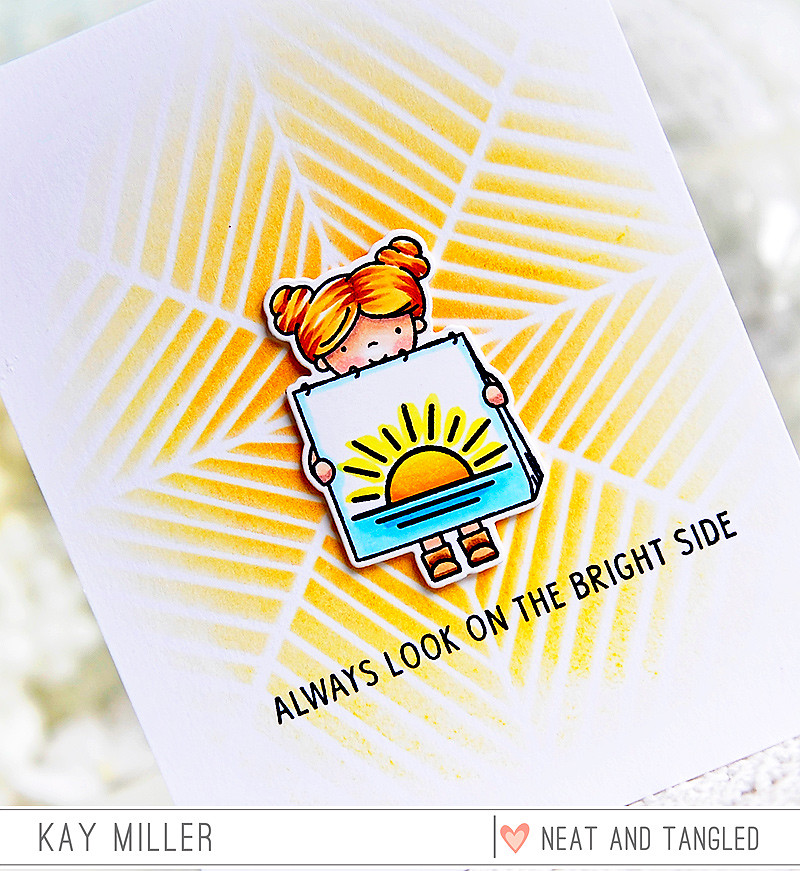
I straight-stitched each line in the image, coming up through the center, and going down through each end point until I was done. Then I moved onto the next one, and soon, I had a whole lovely card full of sun-bursts! And this card is just one layer, but still has texture, thanks to the stitching.


One of my favorite things about using embroidery floss is how saturated the colors are, so the yellow against the plain white cardstock background really stands out.


You can try this technique with all kinds of stamps. I'm still somewhat new to embroidery so I haven't mastered many of the different stitches yet--or small curves in the designs! But I definitely love the way this card turned out so it's one I'll try again and again in different thread colors.


Is this something you've done before? Is it something you might try in the future? Or are you a master-embroiderer? I'm hooked! Thank you so much for having me this month, Neat & Tangled--it has been so much fun!
5

You're the Prettiest Portrait with Keeway

Hi friends! It's Keeway chiming in today to bring you a rainbow full of happiness to your day!
The latest release has got me all inspired to use tons of color and lots of rainbow goodness to my card today. I have stamped the little girl and the portrait on her painting from the Paint Night stamp set in hybrid ink, and colored them with copic markers. I then die cut the image out with the coordinating dies.

For my background, I created a rainbow ink blended frame using Candied Apple, Salty Ocean, Cracked Pistachio, and Squeezed Lemonade distress oxide inks. I gave it a spritz of water and also some colored ink splatter.

I stamped the the sentiment onto the background and colored in the the outlined 'prettiest' in alternating colors matching my ink blended background. I finished the card by adding the girl with foam tape. Hope I sent some colorful inspiration your way!
3

You color my world card with Sveta Fotinia

Good day everyone!

Sveta is here today with a new card. I'm so happy to be back to work after my baby Eva's arrival! I think that this card shows my feelings for her just perfectly: it's an amazing world filled with new beginnings.

For this card I used two new stamp sets from the May 2018 Release: Paint Night and Layered Landscape.

I covered one of the mountain image layers with watercolors making a rainbow, and stamped it on a card. Then I used my black liner pen to highlight the edge.


I repeated the same color combination when coloring the letters of the sentiment above the rainbow mountain.


And of course  I colored the little girl with a brush using watercolors.  Also I added a little yellow sun and some accents with clear sequins and glossy glue. 


Hope you got inspired today! Wishing you lots of sunshine!

3

On the Bright Side with Kay


Hi there! I have a card to share with you today using some of the fun new products from the May Neat & Tangled Release along with a couple of my favorite older products!


For my card today, I have used an image from the adorable Paint Night stamp set and Paint Night Dies, Hello Summer, along with a sentiment from So Many Sentiments and my all time favorite stencil, Radiating Star.


So I created the pretty background for this cute little girl by stenciling some orange and yellow ink using the Radiating Star Stencil.  For the little girl, I stamped the sunshine image from the Hello Summer stamp set onto her pad of paper, colored it all with Copic markers and cut it out with the coordinating die. 


I stamped the sentiment form the So Many Sentiments stamp set along the bottom, then adhered the little girl with foam tape. 

I hope you have enjoyed my card today!


Thanks so much for stopping by!


Kay :)


6

Mermazing Glitter Paste Panel with Cheiron


Hi there crafty friends! It's Cheiron here and today I have a fun and easy card that's made even more special with a glitter panel I created using the Geometric Blooms and blended glitter paste. You could make one big glittery panel and cut it up to use on a few cards!


To make the glittery panel, I placed the Geometric Blooms stencil down onto a piece of paper, and then placed a small dab of Golden Crystal paste in the center of each bloom and spread it out a bit. Then I place a bigger dab of Peridot Green paste around each bloom and spread it with a palette knife so the two colors blended. I made sure to wash my stencil right away to get the paste off. I let the panel dry overnight, then cut it to fit my card. I topped it off with the mermaid from the Mermazing set and a coordinating sentiment. The panel is a quick and easy addition to the card, and it adds SO much sparkle and texture.

SUPPLIES: 
4

Scandinavian Prints Tags with Rebecca Luminarias


Happy Friday!  Our May guest designer Rebecca Luminarias is back with us today sharing a set of beautiful tags.  Here she is with all the details:

Hi everyone! I'm so happy to be back guesting for Neat & Tangled again on this TGIF! Today I have a set of tags that I made using the Scandinavian Prints dies.

The concept is fairly straightforward; I arranged the dies to make a flower (or 2) on the tag, then cut it out. I made 2 tags with the negatives and 2 tags from the pieces I cut out.


They're both very simple, but I love the folk-inspired outcome. They almost remind me of my mom's quilts.


For the tags where I used the negatives, I added some patterned paper behind the tag. It's a pink and navy blue floral print and offers a bold contrast against the white cardstock.


On this tag, I chose a pink ink to stamp "thank you" (from the Sweet Treats Sentiments set), with the little flourishes stamped in blue. I also added some lace and glitter elements, finishing off with navy blue seam binding.


The next tag is similar, but I used a different flower shape and a different "thank you," this one included in the Scandinavian Prints stamp set. While there are the textural elements, I chose to keep the tags minimal otherwise so that the focus would be the cut-out flowers themselves.


After completing those 2 tags, I took the white cut out pieces and made two more tags with them. I actually really liked the plain white shapes against the plain white stock, but in the end, I decided to add in some color. I stamped each flower bloom with a matching stamp in pale pink. I tested out the darker pink ink, too, but in the end, I just liked the soft pink better against the backdrop of navy tulle.


I did keep the stems and leaves plain white in order to draw more attention to the blush blooms. I stamped "thank you" again and cut it down to a small strip of paper, which I adhered to the tags using 3-dimensional foam dots.


It's always fun to use the dies in a slightly unexpected way. When I started this project, my idea was to cut out a bunch of flowers and piece them together to make the tags, not unlike the last two tags. But almost by accident, I cut out the single flower just perfectly to inspire the cut-out tags. Adding the paper behind them really made them pop, too, and this project took a slight detour. But you know what they say about the road less travelled...


Thanks for having me again today! Happy making!
3
Back to Top