Hello With Kay


Hi there! I hope you are enjoying your summer! I have a fun card to share with you today featuring some beautiful products from Neat & Tangled!

Today my card uses the beautiful Friendly Florals stamp setFriendly Florals DiesHello There die and The Doily Envelope Nice and Neat die.


For the background, I blended some Worn Lipstick Distress Ink onto watercolor paper and sprinkled with water and blotted.  I cut the Doily Envelope die out of white card stock, added foam tape to the back and adhered this to my background. I cut the Hello die out of white card stock as well, and adhered it right above the doily with liquid adhesive.


The floral cluster was colored with Copic markers, cut out with the coordinating die, and adhered to the doily with foam tape.

Products used for this card:


I hope you have enjoyed my card today!

Thanks so much for stopping by! 

Kay :)

4

Life!

Hello there!

Mayuri here to share a card using the Life's a Game stamp set and co-ordinating dies!

©Candles in the Garden. Neat and Tangled JULY 2018

There's so many ways you could go with this set, but I wanted to go clean and simple! So I die-cut the main sentiment 'LIFE' out of some white cardstock and set all the pieces aside. I took the die-cut panel and stamped the supporting sentiment and tiny gaming images with Versafine Onyx Black ink.

©Candles in the Garden. Neat and Tangled JULY 2018

I then took another panel of white cardstock and swiped some colour using the ZIG Clean Color Real Brush Pens, starting with a pink and finishing with a blue. I used a bit of water to blend the colours together and then adhered the panel to my cardbase.

©Candles in the Garden. Neat and Tangled JULY 2018

I then simply foam mounted the die-cut piece onto the card base, allowing the colour gradient to peek through the aperture.

©Candles in the Garden. Neat and Tangled JULY 2018

I also foam mounted the letters back into place onto the card base, and finished by adding various sequins.

©Candles in the Garden. Neat and Tangled JULY 2018

Thanks for stopping by!
5

Help Me Out - Take Our Survey!

Hello friends!

Danielle here with a special request!

At Neat and Tangled I am always looking to provide you with products and content you most want to see! In order to help guide me with product and content development for the near future, I'd love if you could take a few minutes to complete a short survey to help me out!  Do you want to see us do paper? ink? paint? online classes? kits? special guests? Now is your chance to tell me! I need as many of you as possible to respond so I can get a true reading about what our fans want!

As a thank you for helping me out, when you complete the survey you will be given a $5 off coupon code good to use on a future order. Just click HERE to get started! The survey will close on Monday. I truly appreciate your feedback!


Hope you're having a great weekend!
Danielle

SaveSave
2

Masked cards with Lydia Fiedler

I went on a bit of a masking spree last weekend. It's weird how certain techniques stay around for a week or two, and then flit off to be replaced by something else. 

This week it was masking.

I decided to do two different versions of masked ink blending for my final spot with Neat & Tangled this month.

First, I wanted to do a layered image that would remain uncolored, with an ink blended background.


Layered masking is a challenge for me - figuring out which image to stamp and mask first, etc. I usually pile the stamps on top of each other and then take a few notes about what goes first. I know it comes more naturally to some people. But I'm a problem child. :)

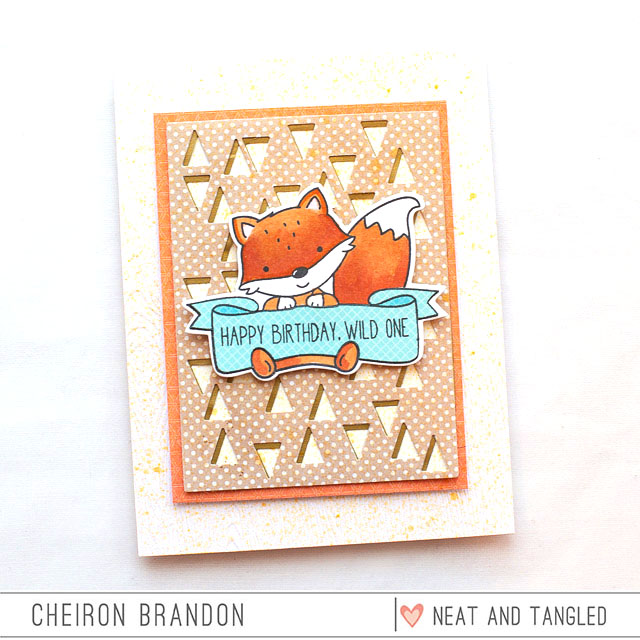
So for this first card, I put the mammoth down, then sat the boy on him, and positioned the talk bubble. So that showed me that the first image stamped and masked had to be the little boy, because he would be blocking out the wooly mammoth image. I actually picked up the whole stack on my MISTI once I got the boy positioned right, and then just removed the mammoth that was stuck underneath. Then I stamped the boy, and stamped him again on masking paper, cut that out and covered him. Then I did the same with the talk bubble and the mammoth. I used my brushes and Peach Bellini, Key Lime, Sea Glass and Lovely Lavender inks for a soft rainbow background. Then when that was done, I brushed on a little shadow with Kraft.

I removed all the masks and left the images white to let the background be the star, and stamped the sentiment. The images and sentiment are from this set, below.


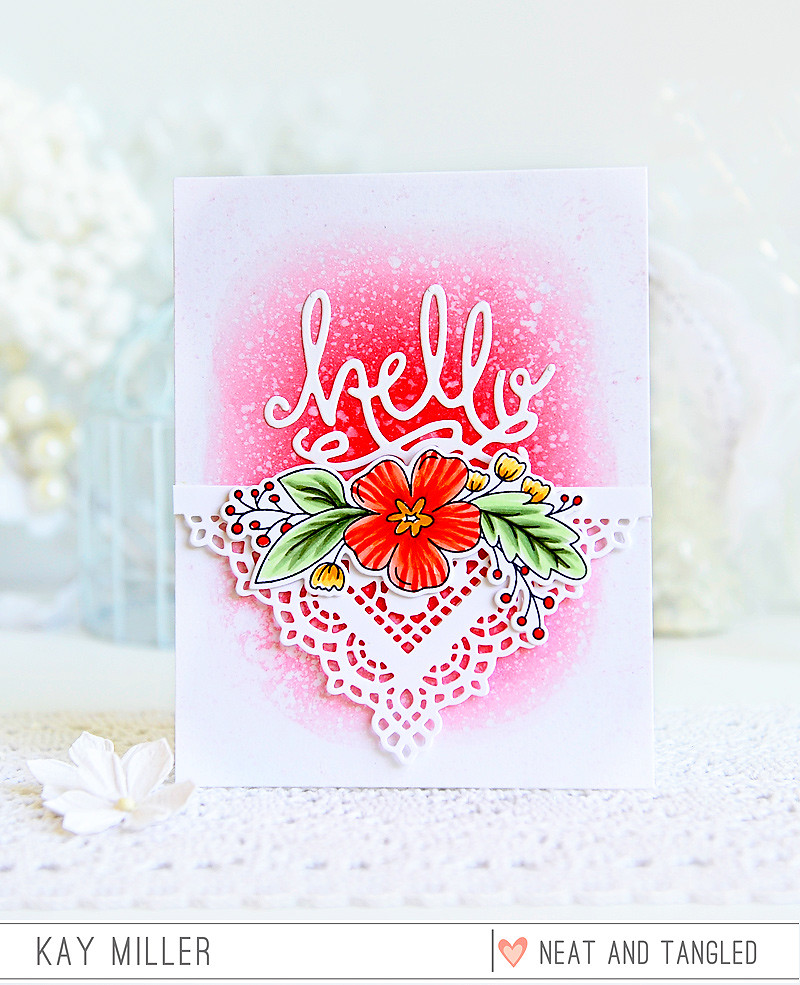
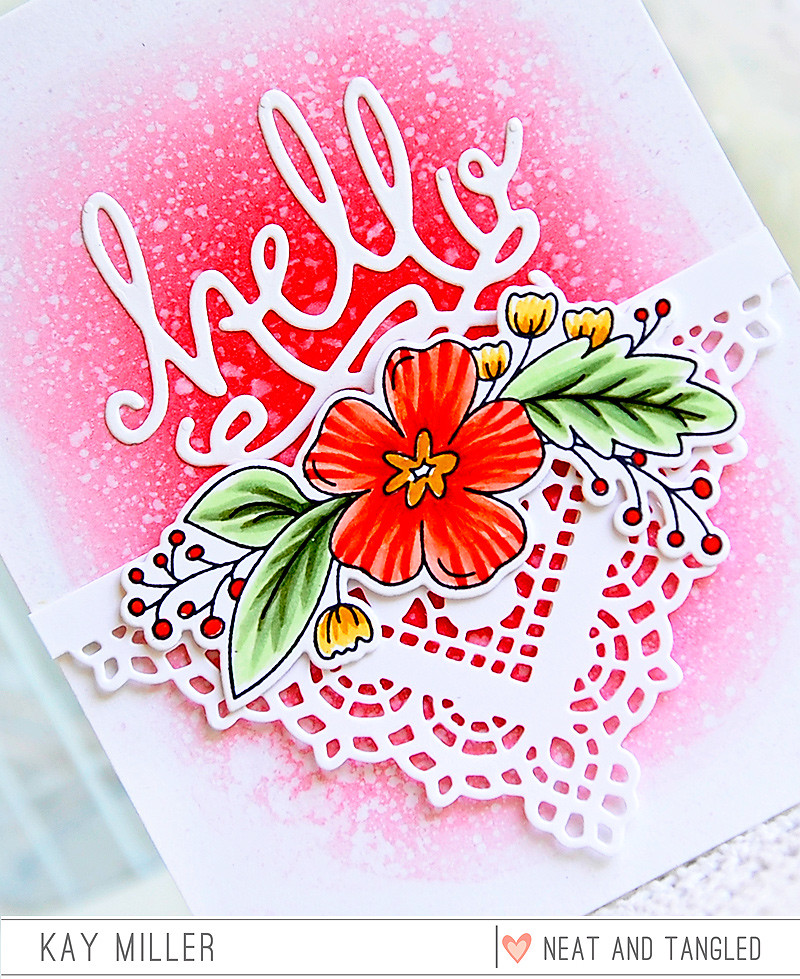
For the second card, I wanted to have a colored image on blended background, so I stamped this image in Morning Mist, stamped a second one on masking paper, and masked it. Along the side, I stamped these florals in the same ink, and cut masks for them as well. Yes, even those teeny berries. I'm crazy like that. Then I brushed on Sea Glass ink in a swath across the larger image, and then closer to the image, I added Blue Raspberry.

The reason I did that first, is so that if I spent 30 minutes coloring the main image and then somehow messed up the ink blending, I wouldn't be mad. I'd rather do my coloring last, as I'm a very slow colorer.

I colored the image with Blick Studio pencils, which are sort of my go-to these days. The cardstock is Neenah Solar White. I think that this set - it's hard to choose - is my favorite Neat & Tangled set. The sentiments are funny and the images are so incredibly sweet. I don't consider it just a fall set - I use it all year. The sentiment is from the floral set I used.

My friends at Neat & Tangled are still offering you a discount for shopping from my blog - so don't forget there are only a few days left to shop with my code.

It's been so much fun guesting with them this month, and as I said - Danielle is a stellar human, a hardworking mother of young kids, and I love any opportunity to support her with a shopping spree.
7

Later Alligator - Two Simple Cards with Daria.

Hello Dears,

Daria here. So glad you are joining me today. Do you like our latest addition to the critters family from the July release - Alligators and Crocodiles? Actually, I do not know the difference (have to google it, lol), but I do think that Elena's creations are so fun and playful. Plus, I have a friend of mine, who just loves crocodiles. So, of course, I had to play with the set.


I've come up with two cards, and have an idea for the third. It is always like this with me. I start to play with the set without any plan, and inspiration just come from the product. Eventually, I don't always have the time to make them all...

I took a slightly off-white paper with little fibre inserts in it (hope it is seen on the photos). I filled the panel with lots of images from Later Alligator stamp set, then, colored one of the Crocodiles with colored pencils. To finish this card, I used the bakers twine. I like the organic feel of this card.


For the second card, I've decided to go for a more clean look. I used only the portions of images from the same set: stamped, die-cut and then foam-mounted them on a front panel. I also used the patterned paper from Essentials by Ellen line - Modern Graphics by Julie Ebersole as a backdrop. Smile sentiment is from So Many Sentiments stamp set. It was super fast to make. To make it look more busy and less clean, you may also try to add more critters around the panel border. I think it would also look fun.


I hope you liked that simple ideas and will give them a try. Be sure to tag us in social media. It is always so rewarding to see what you create. 

Hugs, Daria. 

***
Neat&Tangled Products used: 

6

So Glad I Found You with Keeway


Hi there! It's Keeway and I'm so glad you're here with me today because I have the cutest alligators in love shared on this card.  In our recent July Release, we introduced the new set Later Alligator. This adorable set had the cutest little reptiles, and I borrowed those alligators create a little romantic card by combining a few different sets.

I stamped the alligators from the set Later Alligator, and the heart from the set Floral Heart. The images were stamped in dark brown hybrid ink and colored with copic markers. Then I used the coordinating Nice and Neat dies to die cut the images out.
I created a simple layout and simply created a radial ink blend of Worn Lipstick and Tattered Rose distress oxide inks. This was to add a focal point and a little bit of a dreamy feel to the pair. I splattered with the same inks. Then, I selected a sentiment from the A-mazing stamp set which I also stamped in the same dark brown hybrid ink.
And finally,  I adhered the floral heart and then alligators to my card with foam tape. It just looks like the left alligator is running towards his love for a nice big hug! Thanks for joining me today and hope to "see" you again soon!


5

Happy Birthday, Wild One


Hi there crafty friends, it's Cheiron here and today I am using the So Foxy set to create a masculine card that would be perfect for your favorite little wild one!


To create this card, I cut out the tiny triangles die, once from polka dot paper and again from gold paper. The papers were offset and mounted onto a white panel. This panel was then mounted onto a piece of white woodgrain card stock and I then placed the triangles on top of it and sprayed the entire panel with gold spray. Once the spray was dry, I assembled my card by gluing the panel onto a card base and adding my colored fox.


Super simple and easy to create. I love the bit of interest that the offset triangles gives to the card. I hope you will try layering some dies like this to create a similar look.

SUPPLIES:

5

The art of paper layering | VIDEO | Natalie Elphinstone

I come from a scrapbooking background, and have patterned paper stashed up for days (actually, to be honest, it will be years!) and rather than just sit back and admire them all I have this ongoing desire to try and actually use them! Shock!!


I feel like sometimes in the cardmaking arena we focus on lots of stamping and colouring and fancy ink techniques ... all of which I love.... but it doesn't whittle away my giant pile of paper!! So you may have noticed that I've been trying lots of ideas lately to achieve the best of both worlds - incorporate lots of patterned paper, but still highlight the cute stamped images.


Not satisfied to simply use a single piece of patterned paper as my background (that wouldn't use up nearly enough of my stash!) I am perfecting the art of paper layering. It's a technique I use with abandon when I'm making my tags, but one I rarely turn to when making cards. But no reason why I can't try a similar thing here, and so I followed my own made-up rules to success and I think it's turned out quite lovely.


In my video today I share the process of how this card was made, and I let you in on all my keys to success when it comes to choosing which papers to use and how to layer them. I hope you enjoy it!


Supplies Used:
Neat and Tangled Later Alligator Stamp Set
Neat and Tangled Later Alligator Die Set
Neat and Tangled Ride With Me Stamp Set
Neat and Tangled Classic Tag 2 Die Set

10

Mixed Media Magnolia with Lydia Fiedler


Hey everyone - Lydia here for my second guest post - I'm happy to be here! I have some mixed media goodness for you today!

I've been working on creating structure in my prints with some experiments in masking, and I finally got it to where I wanted it and could recreate what I was doing, so that is what I have for you today.

First, a card with the technique. I stamped the Magnolia image and die cut it with the matching dies. Then I cut a circle from glitter paper to go behind it. 

I had used this stencil in the Gel Press printed background, and it was perfect for curving a small sentiment from this set on my MISTI and stamping in one of the openings. As you'll hear me say in the video, the white space is important for making this technique work. I love the zentangle look of this stamp set - it's bold and perfectly suits a bold, colorful background.

Here is the video on how I did the background.


3

Adventure is Calling Copic Coloring with Kelly Latevola

Hello Crafters! 

I'm so excited to share a different kind of scene card with you guys today! 


I used the Topography background stamp to create a fun backdrop for the new So Fly stamp set. They seemed just perfect for each other. 


The entire card was done with Copic markers which may sound kind of intimidating but the stamp makes it super easy! Just use your markers to do color blocking no blending required! 


I really wanted to use the coordinating dies for the stamps but unfortunately I misplaced them in the move. Don't you hate when that happens?!
Fortunately, they did turn up but it was after I fussy cut everything of course!

You can watch the entire card come together below and hear my random thoughts on various topics haha.


I just love this set! I think it's super versatile just by switching up the sentiments!

Thank you guys so much for joining me! 


Supplies: 

Neat & Tangled TOPOGRAPHY
Shop at:
Neat & Tangled
Neat & Tangled SO FLY
Shop at:
SSS | Neat & Tangled
SO FLY  NICE AND NEAT DIES
SO FLY NICE AND NEAT DIES
Shop at:
SSS | Neat & Tangled
Memento TUXEDO BLACK MARKER Dual Tip Tsukineko
Shop at:
SSS
Sakura WHITE GELLY ROLL Medium Point Pens Set
Shop at:
SSS
EK Success WRITING PEN FINE TIP
Shop at:
SSS
Neenah Classic Crest 80 LB REAM Smooth Solar White Paper Pack 250 Sheets
Shop at:
SSS
Fiskars PREMIUM CUT LINE Paper Trimmer 12 Inches
Shop at:
SSS
Tombow MONO MULTI Liquid Glue
Shop at:
SSS
3M Scotch DOUBLE-SIDED FOAM TAPE Permanent
Shop at:
SSS
Simon Says Stamp LARGE GRID PAPER Pack Pad
Shop at:
SSS
Precision Heat Embossing Tool Gun
Shop at:
SSS
Tsukineko Versamark EMBOSS INK PAD
Shop at:
SSS
Inkadinkado EMBOSSING MAGIC Powder Bag
Shop at:
SSS
Simon Says Stamp EMBOSSING POWDER WHITE Fine Detail
Shop at:
SSS
Simon Says Stamp Premium Ink Pad INTENSE BLACK
Shop at:
SSS
ZIG Wink of Stella GLITTER CLEAR Brush Tip Marker
Shop at:
SSS
MISTI PRECISION STAMPER Stamping Tool Kit
Shop at:
SSS
MINI MISTI PRECISION STAMPER Stamping Tool Kit
Shop at:
SSS
We R Memory Keepers TRIM AND SCORE Board
Shop at:
SSS
Simon Says Stamp Card Stock BLACK Black
Shop at:
SSS
Simon Says Stamp Dye Ink Pad BARELY BEIGE
Shop at:
SSS
Neenah Classic Crest 80 LB SMOOTH SOLAR WHITE Paper Pack 40 Sheets
Shop at:
SSS
Copic Sketch Marker E50 EGG SHELL
Shop at:
SSS
Copic Sketch Marker E53 RAW SILK
Shop at:
SSS
Copic Sketch Marker E55 LIGHT CAMEL
Shop at:
SSS
Copic Sketch Marker E59 WALNUT
Shop at:
SSS
Copic Sketch Marker C1 COOL GRAY
Shop at:
SSS
Copic Sketch MARKER C3 COOL GRAY
Shop at:
SSS
Copic Sketch MARKER C5 COOL GRAY
Shop at:
SSS
Copic Sketch Marker BG11 MOON WHITE
Shop at:
SSS
Copic Sketch Marker YG01 GREEN BICE
Shop at:
SSS
Copic Sketch Marker YG03 YELLOW GREEN
Shop at:
SSS
Copic Sketch Marker YG17 GRASS GREEN
Shop at:
SSS
Copic Sketch Marker YG67 MOSS
Shop at:
SSS
Copic Sketch Marker V0000 ROSE QUARTZ
Shop at:
SSS
Copic Sketch MARKER B06 PEACOCK BLUE
Shop at:
SSS
Copic Sketch Marker B02 ROBIN'S EGG BLUE
Shop at:
SSS
Copic Sketch Marker W1 WARM GRAY
Shop at:
SSS
Copic Sketch MARKER W3 WARM GRAY
Shop at:
SSS
Copic Sketch Marker W5 WARM GRAY
Shop at:
SSS
Copic Sketch MARKER W7 WARM GRAY
Shop at:
SSS
Copic Sketch Marker R32 PEACH
Shop at:
SSS
Copic Sketch Marker R35 CORAL
Shop at:
SSS
Copic Sketch Marker R29 LIPSTICK RED
Shop at:
SSS
Copic Sketch Marker R59 CARDINAL
Shop at:
SSS
Copic Sketch MARKER YR24 PALE SEPIA
Shop at:
SSS
Copic Sketch MARKER b04 TAHITIAN BLUE
Shop at:
SSS
Copic Sketch Marker B00 FROST BLUE
Shop at:
SSS
Copic Sketch Marker B0000 PALE CELESTINE
Shop at:
SSS
Copic Sketch Marker RV00 WATER LILY
Shop at:
SSS
Copic Sketch Marker E57 LIGHT WALNUT
Shop at:
SSS
1
Back to Top