
*So happy to have my friend Jess from A Simple Kind of Life taking over my blog today! She's not a paper crafter, but she is one of the craftiest DIY people I know, so I'm sure you will love what she's come up with for you today! Be sure to head over to her blog to check out all her other amazing projects and show her some love!*
Hi everyone! I’m Jessica and I’m taking over Danielle’s blog for the day to give her some time to snuggle with that new little love of hers.
When Danielle asked me if I would guest blog, I was incredibly flattered, but my initial thought was that I’m not a paper crafter, so what could I do? I think I do pretty well in the DIY department, so I decided to do something a little crafty for the home.
A few months back while shopping with my mom, I stumbled across these cute owl shaped silverware holders.

So adorable and only $1.99! I considered buying a set of six. They were so cute and such a great addition to any Fall table setting. The more I thought about it, though, I realized that I could make these on my own for less than $1.99 each. So I bought this one to use for inspiration and got to work.
The supplies I used were simple:
- Felt
- Embroidery thread
- Buttons
- Scrap paper to draw out some ideas

The felt was $.23 per sheet from Michael’s. I bought several in various fall-themed colors and had tons leftover when I finished. The embroidery thread cost only $.39 each. I bought four and have leftover. I also needed a pack of needles, $1.69 - 40% coupon = $1.01.The buttons cost nothing as they were from my stash I keep from clothes that I’ve bought that come with spare buttons.

First things first, I cut out the body of the owl. You can do this freehand or find an easy template online. You will need two silhouettes per owl holder in order to create the pocket.
Once you have your shapes ready, the next step is to decorate the cutout that you plan to use as the front.
I used various methods: felt shapes for eyes, wings, belly, etc., buttons for eyes, embroidered accents, and so on. Pretty much how ever you want your owl to look. You can use ribbon, fabric, anything you may have lying around.


I used hot glue to attach the accents pieces that I didn’t embroider directly to the felt.
Next part was the trickiest: sewing the back and front together to create the pocket for the silverware.


Now, I’m not a sewer. I have owned a sewing machine for three years and have yet to use it. I sort of self-taught myself this embroidery edge by looking up various tutorials on Google and YouTube. (like this blanket stitch tutorial: http://www.youtube.com/watch?v=eXkSE2TTF4s)

Once finished, you simply tie it off in a knot.
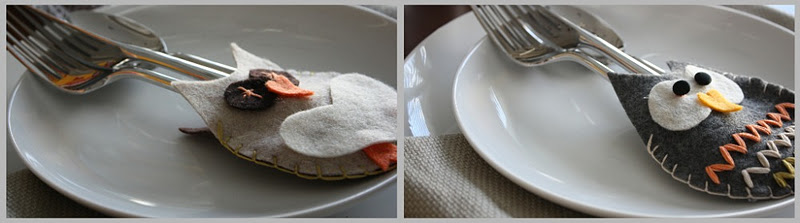
Then your owl looks like this:


Once finished, I simply slipped my silverware inside and set my table.


Big thanks to Danielle for letting me take over her blog for the day!
Happy crafting! J


I think your owls are are cuter than the original. I especially like the one with zigzags on his belly and the one with scallops on his belly! Thanks for sharing this super cute project!
ReplyDeleteCute project and I agree that your
ReplyDeleteversions are much cuter than the
store bought one.
Oh your projects are SO much cuter than the stores... I would buy yours in a heartbeat!
ReplyDeleteoh my goodness they are ADORABLE!!! I love the crazy eyes!
ReplyDeletewell done indeed!
i agree- these are much cuter than the ones that were in the store! very cute! you're so creative.
ReplyDeleteThank you all so much! They were so fun to make and super easy (and inexpensive!)
ReplyDeleteOMG, love!! You did a fabulous job, they turned out awesome. And I've been trying to figure how to do the blanket stitch. I've seen some cool things made with it and now I know how! Thanks!!
ReplyDelete