Showing posts with label scored shapes dies. Show all posts

Neat & Tangled / Tonic Collaboration - Day 1

Happy Monday!  You are all in for a treat this week.  We are collaborating with Tonic USA and not only will there be some pretty fantastic inspiration for you each day on both the Neat & Tangled and Tonic USA blogs, there are also two big prizes to be won.

Here at Neat & Tangled we'll be selecting one lucky comment from our collaboration blog posts to receive a $75 credit to spend at Tonic. AND, Tonic will select a commenter from their blog to win a $75 credit to the Neat & Tangled store.

Now for some inspiration, today Debby and Miriam are here to share.  First up is Debby:


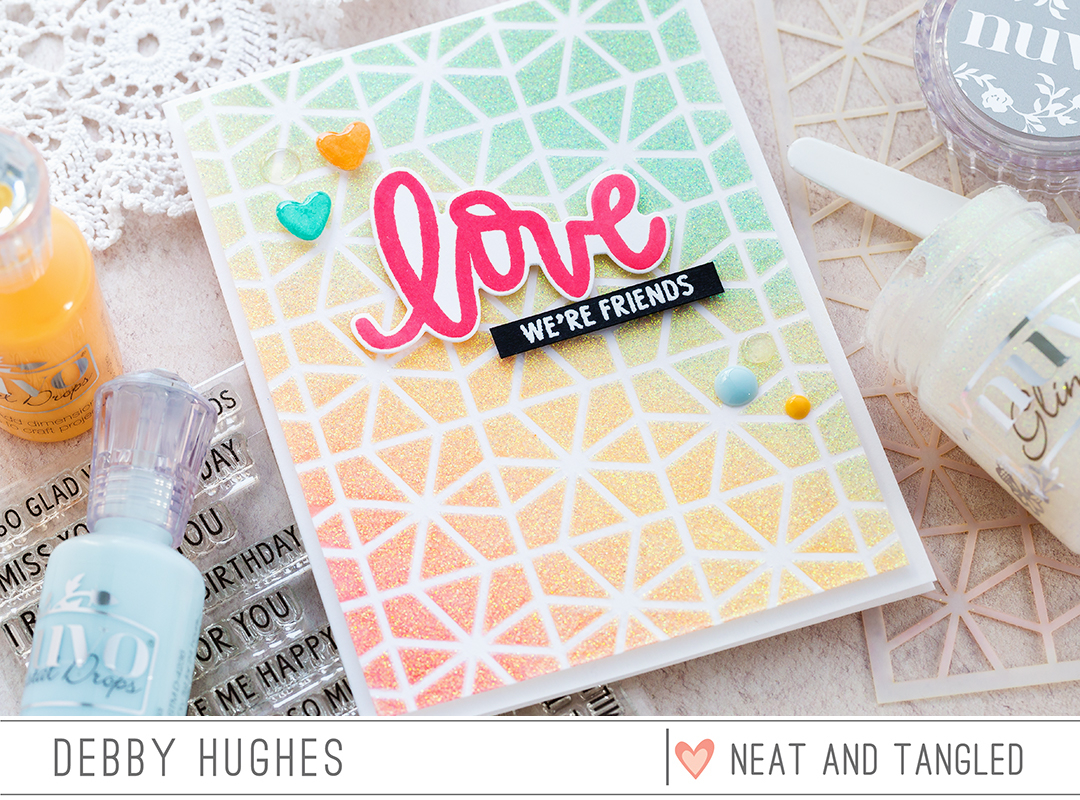
Hello, it's Debby here today, and I'm delighted to be joining in with this week's Tonic collaboration! I already have a fair few Tonic products in my stash as I love the quality of their tools and original embellishment products to name just a few. However, I've not yet had the chance to play with the Nuvo Glimmer Pastes or try out the Tim Holtz Stamping Platform. 

I knew immediately I wanted to use the Moonstone Glimmer Paste to bring sparkle and texture to an ink blended stencil design. I pulled out the Interlocking Geo stencil from the new February release and blended a sherbet rainbow diagonally across the card using Hot Lips, Melon, Duckling, Mint and Spring Rain inks. Keeping the stencil in place, I then used a Ranger palette knife to spread the Glimmer Paste over the ink blended background. It's a bit like spreading butter I think! It never gets old to lift the stencil to reveal the design and I was delighted at how adding the Moonstone Glimmer Paste really brought this sherbet toned background to life with a million sparkles catching the light. 


I put the background to one side to dry while I worked on the sentiment and embellishments. Using the Tim Holtz Stamping Platform, I stamped the love from Love Notes in Hot Lips inks. For me, stamp positioning tools have been a game changer for my stamping, and Tim Holtz's one lives up to all that I hope from a stamp positioner - strong, sturdy, well designed and makes stamping a breeze. I used the included magnets to keep my paper in place while I stamped the image a second time to ensure I had a good intense colour and even stamping. I used the matching https://ldli.co/e/3rx79x to die cut the sentiment and then paired it with a partially stamped sentiment from the So Many Sentiments set. I carefully cut the 'we're friends' part of the sentiment away from the rest, stamped it with clear embossing ink on Black card and white heat embossed before trimming to a skinny strip. 


I added the background to a white card base and the two sentiment pieces to the background with foam adhesive and then accented with hearts cut with a die from the Love Notes set. I covered the hearts with Spring Rain and Melon inks, followed up with Glitter Gloss and then finally Crystal Glaze for a beautiful sparkly and glossy finish. I also added Crystal Glaze, Duck Egg Blue and Sugared Almond droplets as final accents. 

Next up is Miriam:

Hi everyone!  This week Neat & Tangled is collaborating with Tonic USA.  I was so excited to be able to work with their products, and created two cards to share.


For this first card, I die cut our Punchinella die from cream cardstock.  Then I used some liquid adhesive to essentially pain across the bottom of the die on a diagonal.  Once the glue was dry, I used the Radiant Gold Gilding Flakes to embellish the bottom of the die cut.  I then tacked the die cut piece down in a couple places over a piece of patterned paper.

Those dimensional hearts are from the Scored Shapes Dies set.  I cut the hearts from both patterned paper and vellum.  I rubbed the vellum hearts with Powder Blue embellishment mousse to give it a little shine and subtle color. 

Those were then stitched to the punchinella/pattered paper as well as a sentiment strip with a sentiment from the So Many Sentiments set.


I also added a vellum mat.  Just as with the vellum hearts, I rubbed the top and right edges of the mat with some embellishment moussse, this time using Pure Platinum mousse.

Everything was adhered to the card base and then I added a few sequins as well as a few dots of White Blizzard Glitter Drops to finish it off.


For my next card, I used the Embellishment Mousses in a different way.  I was a little surprised by the texture of the mousse when I first used it.  I expected it to be more like a paste that you used for stencils, but it had more of a clay consistency.  You can still use it in that for for stencils, but you have to kind of work it into the openings.  Or, you can soften it into more of a paste form by adding some water.

You can also add water to create a type of paint, which is what I did.  I just used my palatte knife to put a bit onto a craft mat, added water to create a paint consistency, and than painted onto a watercolor panel using the Powder Blue and Pure Platinum embellishment mousses.

I then added some stamping using the Landscape Textures stamp set and the Tim Holtz Stamping Platform.  I placed the stamp in the middle of the platform so that I could move the panel around underneath to create the random stamping.


Then I added some gilding by 'coloring' some dots on the panel using my glue pen.  And then adding the Radiant Gold Gilding Flakes.

Note - make sure your ink is totally dry before you do this.  I managed to smudge a bit of black ink when I was brushing away the excess gold flakes.

I die cut the You Can Do Anything sentiment and gilded it as well.  To give it a little more strength, I did add a second layer and then adhered the entire piece to my panel.

Now it's time to head over to the Tonic USA blog to see what their team created.  Be sure to leave comments here and there to be entered to win the giveaways.  See you back here tomorrow for Day 2!
65

June Guest Designer Janna Werner with a 'lucky' layout


It's Friday and our June guest designer Janna Werner is her for her third and final post of the month.  It's been a pleasure having her, and I know you are going to love today's project.  Here's Janna with all the details:

Hello everyone, this is Janna. I am here with my third and last post as guest designer for Neat And Tangled. Working with the beautiful stamps, dies and sequins was so much joy and I hope I was able to inspire you with my layouts and cards.

For today, I created another layout, using summerlike and happy colors and floral motives to emphasize the happy theme of the page. It is about one of our dogs, Luzie. She is a lovely and happy dog and very sweet (and she knows!). The title is German and means 'luck is furry'.


I worked with the Medallion Flower Builder stamp set to highlight the title and subtile and to add the dots on the page. The heart on the bottom of the scrapbooking layout was cut out with the Scored Shapes dies, as well as the circle in the back of the heart on which I stamped with the Heart Of Gold stamp set. 


The lovely light blue sequins give the finishing touch.


Thanks to everyone for stopping by today, please make sure to browse the Neat And Tangled blog for more inspiration from the amazing Design Team. Have a crafty day!

Lots of greetings,

Janna
2

Introducing June Guest Designer - Janna Werner


Happy Friday!  Can you believe that it is already June?  Today we are introducing this month's guest designer, Janna Werner.  Janna is scrapbooker, teacher, and mixed media artist.  She has a wonderful, fresh, clean style, we are in for a treat this month!  Here's a little more about Janna:

My name is Janna Werner. I am a 38-year old mixed media creative & online teacher based in Northern Germany. I've been scrapbooking since 2011, have been a member of different design teams, and have taught many online classes and workshops throughout Europe. I published a book called 'Paper Art' in 2014, have co-published a scrapbooking magazine, and designed scrapbooking products.

I have always been a big fan of stationery and paper. Then a friend introduced me to scrapbooking...it took about 3 months until I got hooked. I enjoy scrapbooking a lot, working with paper and embellishments is my kind of meditation. But I also like to create other crafty & artsy projects, such as paperflowers, gift wrappings, drawings, mixed media canvases or Artist Trading Cards. I call myself a mixed media creative as I love to mix materials and techniques.

social media links:
website http://jannawerner.de
blog http://jannawerner.blogpost.de
instagram http://instagram.com/jannawerner
youtube http://youtube.com/user/uchtelmuchtel
big picture classes https://www.bigpictureclasses.com/users/Janna_Werner
bloglovin https://www.bloglovin.com/blogs/janna-werner-papiersalat-2226406
facebook https://www.facebook.com/papiersalat/

Now that you know a little more about Janna and where to find her, check out this week's project:


Hello crafty friends, I am excited to be Neat and Tangled's guest designer in June, I hope to inspire you with my creations.


The first project I would like to share is a scrapbooking page. As you can see, it is clean and simple with stamping, die cutting and heat embossed highlights.


I started by stamping the Falling Hearts onto white cardstock, added golden embossing powder and used a heat gun to melt the powder. Afterwards I attached the white onto a rose cardstock. The other stamp sets I used are Medallion Flower Builder and Heart Of Gold. The hearts and circles are cut out with the Scored Shapes Dies, I punched the shapes from patterned paper and from a stamped image, the big heart from the Heart of Gold set.


I cut some of the stamps apart, that is so convenient about polymer stamps... you do not damage them when cutting words and images apart - you get an even bigger variety like that.

Hope you liked today's inspiration!
See you soon,
Janna
2

Cosmo Cricket Week - Day 4


Here we are on Day 4 of our Cosmo Cricket collaboration week!  Each day this week we're sharing projects featuring Cosmo Cricket and Neat & Tangled.  We hope that you are enjoying the projects as much as we have been enjoying the products!

Every good collaboration need a couple prizes, right?  We've got a great bundle of Cosmo Cricket goodies to share with one of you.  Just leave a comment on each post this week and we'll pick a winner and announce them next week.

Cosmo Cricket also has a prize to share, so be sure to stop by and check them out on Facebook and Instagram.

Today Nina-Marie, Taheerah, and Mayuri are sharing with us.  First up is Nina-Marie:

Hi friends, it's Nina-Marie here with you, sharing a fun set of cards that feature the gorgeous Cosmo Cricket Art Deck papers, along with some of the newest Neat & Tangled stamps and dies!

I created three different cards using the Art Deck papers and I even have a video tutorial for you, showing how I did it! Each card shares the same technique, which is shimmer watercoloring with Distress Inks.

In the video below, I'll be showing you how I created my own shimmer watercolors to paint over the emboss-resist patterns that are printed onto the Art Deck papers.

This first card features this stunning flower, which looks amazing once colored in with the watercolors.


I paired the flower with the new Doily Tag die and a sentiment from the Celebrate stamp set (both new products from Neat & Tangled).

My second card showcases the fun "dream big" constellation-styled sentiment that had a ton of gold dots surrounding it. This immediately made me decide I needed to create a galaxy background for this paper.

I paired this paper with the Scored Shapes dies from Neat & Tangled... the dimension of these stars popping off the galaxy looks fabulous! 

My final card features this encouragement quote that has some beautiful gold foiling on some of the letters. 


To see how all of these cards came together, be sure to watch the video below! If you enjoy, please give it a big thumbs up and subscribe to our channel for more inspiration!  For a complete supply list, please stop by my blog.  


Now it's over to Taheerah for a quick and easy card featuring one of the pieces from the Art Deck Papers, paired together with stamps from Painted Hello and Faceted:


Some very quick watercolouring and splatter over the LOVE panel brought it to life, and then I stamped the solid hello sentiment with Versafine ink.


The card base also got some love to match it with the letters. I stamped the base with the large facet stamp from Faceted, heat embossed it with white embossing powder, then watercoloured it with watered down gold mist for a complimentary finish that doesn't distract from the main panel.


But check out that shimmer! :)

And last but not least, Mayuri has a project to share:

The Pixie Paint bottles of coloured powder pack a huge punch and I had so much fun playing with them:


I began by creating a fun background panel - firstly, I spritzed a piece of lightweight watercolour paper with water, then laid down the Geometric Blooms stencil on top before tapping out some of the Harbor coloured Pixie Paint.


The paint reacted beautifully with the stencil and the water - I removed the stencil and spritzed a little more water to move the paint around a bit more, and heat set the panel when I was happy.


I trimmed the panel down and foam mounted to a white card base before stamping the skunk from the Little Stinker set with Versafine Onyx Black ink, all ready to colour in!


I used some ZIG Clean Color Real Brush Pens to colour in the little animal, stamped a sentiment from the same set, trimmed him out and foam mounted him to the card front. To finish off, I added some sequins from the Gold Mix selection.

So much wonderful inspiration today!  

Be sure to leave a comment and come back tomorrow for the final day in our collaboration.  At the end of the week one lucky commenter will win a Cosmo Cricket prize pack!
47

Splatter Background + Multicolored Die Cuts


Well hello everyone! It's Nina-Marie here with you today with a couple of fun techniques and a video tutorial showing how I created this set of colorful cards!

I love the look of ink splatters and thought this would make for a fun background on a card. And this technique is so simple that no matter your artistic level, you can recreate this technique on your own with ease!


For my watercoloring, I've used Prima Watercolor Confections (the Tropical set), but you can use any types of watercolor paints you prefer. I also have used Neat & Tangled's You Can Do Anything and Scored Shapes die sets. Would you believe this card set involves NO stamping?? That's a rarity in my world!


So to see how I've created these cards, be sure to check out the video below, or over on the Neat & Tangled YouTube channel. And be sure to subscribe to our channel to see more videos like this from all of our design team members!


I hope today's cards have inspired you to try some ink splattering and multicolored die cutting of your own! Thanks so much for stopping by and I'll see you again soon!
xoxo, Nina-Marie

SUPPLIES

If you are interested in any of the products used in this post, I have them all linked below to Simon Says Stamp. Affiliate links used when possible.

3

So Grateful for You, Valentine!

Hello friends!

Danielle here with a special Valentine :) I sure hope my husband isn't reading this blog post because this is what he will be seeing on Sunday! haha

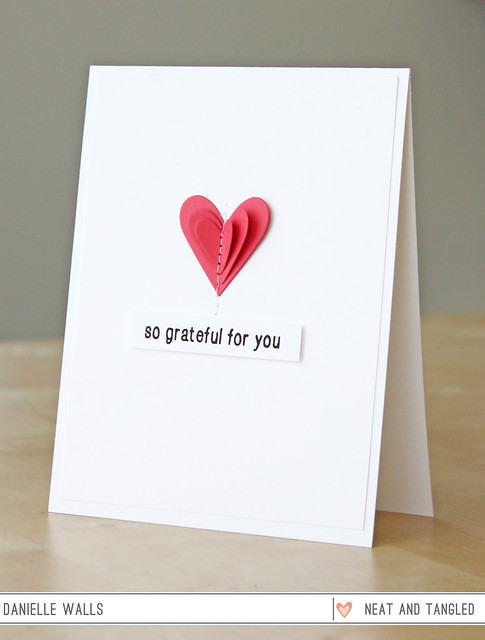
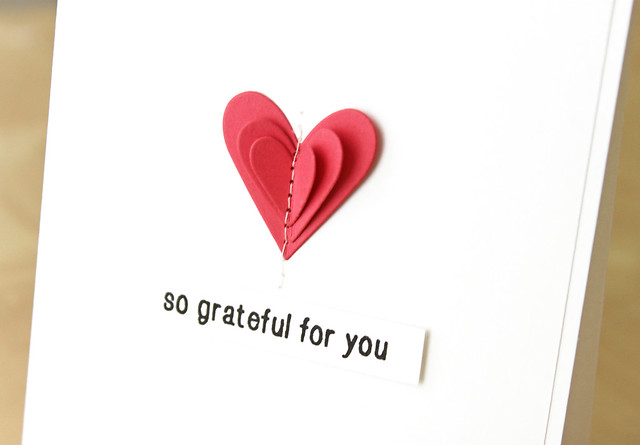
This is a super easy card I made for Valentine's Day. I used our Scored Shapes dies and a sentiment from a new stamp set you will see in March! These dies are perfect for stacking different sizes of traditional shapes! Plus they are scored, so you can add lots of interest and dimension!
grateful for you
I simply die cut the three different hearts, and stitched them onto my card base.  To add dimension I gently folded up the sides of the hearts, which was so easy since they are scored!

so grateful


Thanks for stopping by! Be sure to come back tomorrow to see who our February guest designer will be!

xo
Danielle


5

Neat & Tangled / My Sweet Petunia Collaboration Week - Day 5

I can't believe that today is our last day with My Sweet Petunia!

My Sweet Petunia manufactures the MISTI (Most Incredible Stamp Tool Invented), which was one of the Hot Product winners at this year's CHA.  Our team has been loving using their new MISTIs and all this week we've been showcasing how the MISTI simplifies (and makes foolproof) the stamping process as well as techniques that it enables.

There are some amazing prizes up for grabs.  Comment all week on our collaboration posts to be in the drawing to receive your own MISTI, and be sure to stop by the My Sweet Petunia blog.  We've divided the team up this week, some will be posting here and some will be posting there.  Comments left on the My Sweet Petunia blog will put you in the running for a $100 Neat & Tangled credit!

To wrap up the week, we've got both Taheerah and Sveta are sharing today.  

Hey everyone! Taheerah here, ready to see out this collaboration in style! What an amazing week of projects we've had - and we've had a great chance to see just how awesome the MISTI is! I wouldn't be without mine!!

For my card today I went with a Star Wars theme, featuring A Long Time Ago and Time Warp:


So fun! See the white lines on the panel? I was able to overstamp the same stamp three times for a really saturated white - impossible to do by eye without the placement being off! Never a problem with MISTI!


I also use my MISTI to help plan the layout of a card. Here you can see how I positioned some stamps to get them straight and in the right place.


I changed my mind on which sentiments to use and was able to use the gridded lid to get my placement and layout perfect before stamping down!


The final card could easily be replicated again and again, with perfect results every time! All hail the MISTI - truly one of the best inventions our industry has ever seen!

And here is Sveta:

I'm so thrilled to take a part in this collaboration and share my impressions of using MISTI tool! I never thought stamping can be so easy!  It's perfect!  You can make geometric backgrounds with non-background stamps, get bold and clear images from large solid stamps, use layered stamps with ease, achieve even coverage with dye inks, easily stamp after die cutting, try unique techniques, and you can even use the it as a grid mat!


For my card I used stamps from our latest release: the Perfect blend and the Ornate Frames and the Ornate Frames dies.  I made a video tutorial that will show you a several ways of how MISTI makes creating a card much easier!  I'm sorry that you will not hear my voice with comments, because I have a sore throat, but if you are interested in details - please head to my blog!


OK, now head over to the My Sweet Petunia blog to check out what Miriam created.  Here's a little sneak peek for you:


We want to send out a HUGE thanks to Iliana at My Sweet Petunia.  This collaboration has been such a treat for the team, we LOVE our MISTIs!  
92
Back to Top