Showing posts with label Tonic Studios. Show all posts

Neat & Tangled / Tonic Collaboration - Day 5

Can you believe we are already at the end of our week-long collaboration with Tonic USA?  All week we have been sharing projects featuring N&T and Tonic products on both the Neat & Tangled and Tonic USA blogs, there are also two big prizes to be won.

Here at Neat & Tangled we'll be selecting one lucky comment from our collaboration blog posts to receive a $75 credit to spend at Tonic. AND, Tonic will select a commenter from their blog to win a $75 credit to the Neat & Tangled store.  We'll announce the winner on Monday, so you still have time to get your comments in.

Today, Daria and Keeway are sharing with us.  First we have Daria:

Hello Dear Friends, happy to join this fun collaboration today, and to see you here. 


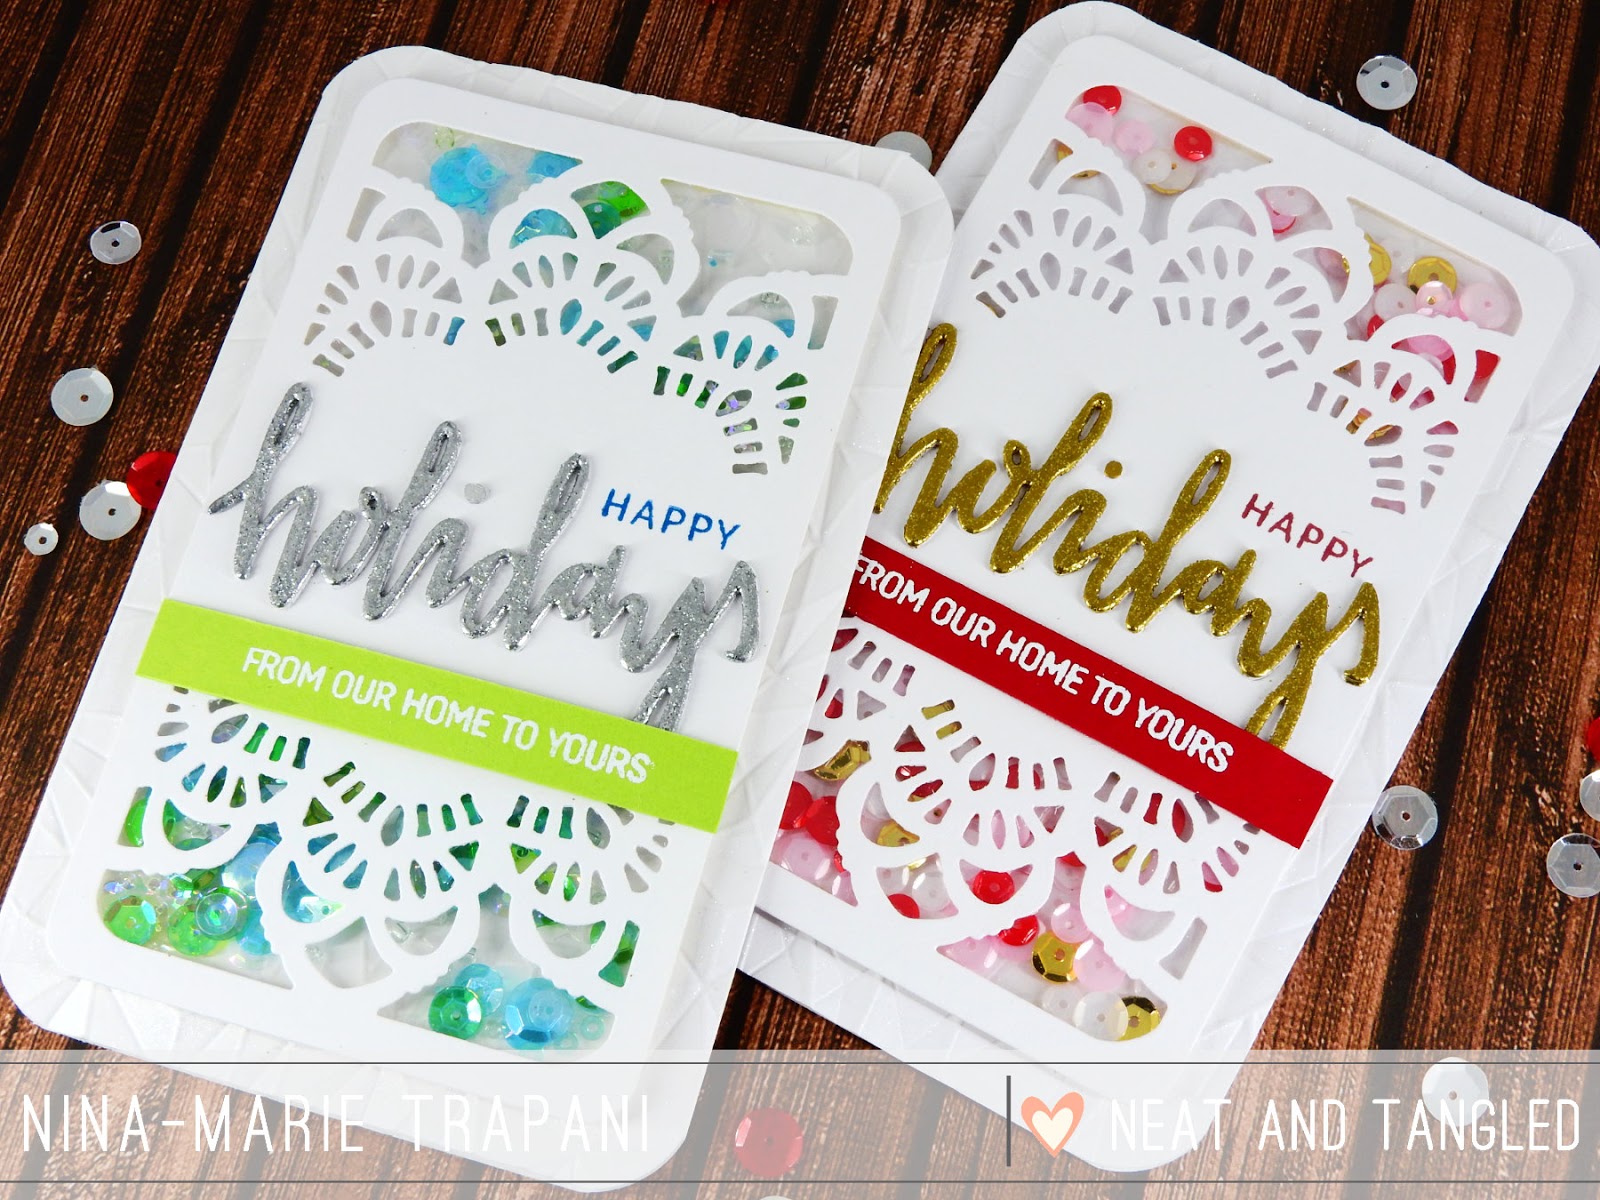
I've wanted to try out gilding flakes for some time. SO, when I've got a chance, I came up with to backgrounds and two cards.


I free painted a heart for one and just scribbled for another one with a Nuvo Glue Pen. Combined with Gilding Flakes in Gold they became a perfect background for my projects. You probably know how much I love gold accents...


Look at all the shine...


I used the Geometric Circles cover plate to make two flowers for one, and I used just a part of the die-cut cover plate for the other. Love from the Love Notes die took a central part as a sentiment.


Next is Keeway:


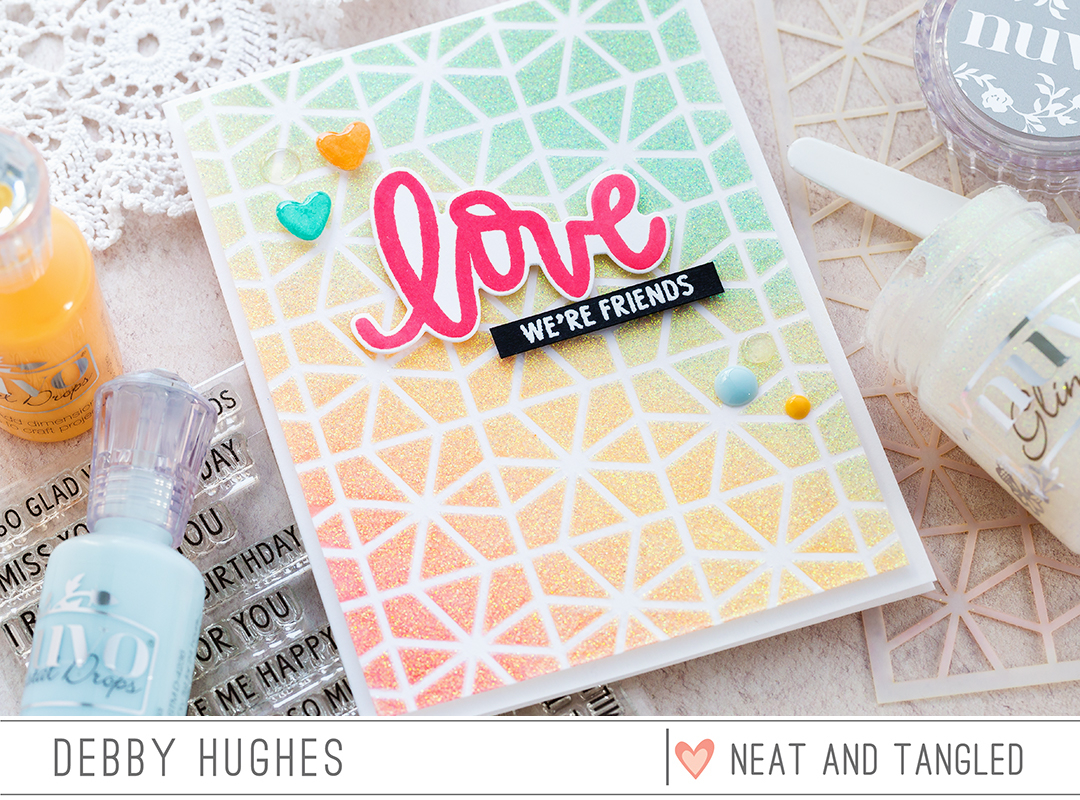
Hi! Its Keeway and I made a fun AWESOME card for our collaboration with Tonic Studios. I personally use several of Tonic products including their embossing paste, embossing powders, and their stamping platform in so many of my projects frequently, but this is my first time trying out the Nuvo Embellishment Mousse and I have to say I absolutely LOVE it!


I knew that I wanted to use something out of our stencil collection, so I picked one of my all-time favorites, the Geometric Blooms, to work with. I started my project by blending a bright and warm background with Candied Apple and Spiced Marmalade oxide inks. Then, I laid my stencil on top of my blended background and spread the Mother of Pearl mousse with a palette knife. I made sure the mousse filled out the open areas from the bottom but gradually lessened the amount the mouse as I worked upwards. 


The mousse was so easy to work with! The hardest part was letting it sit and dry since I was so eager to complete the project. But, I was patient, and I came back to my project in less than 30 min. For my sentiment I heat embossed a sentiment picked out of the So Many Sentiments stamp set in white onto a peach/pink card stock I found in my scrapbox. Then I replaced the word 'awesome' in the sentiment with the large die cut 'Awesome'. I die cut the word 4 times, and the backing once out of red card stock. The strong colors really bring out the word even with such a shiny and bright background. Hope you have an awesome day!

And that's a wrap!  We really hope you enjoyed this collaboration, our designers definitely did!  Remember you have through the weekend to leave comments on this week's posts to be entered to win a $75 credit to the Tonic store.  Don't forget to leave comments on the Tonic USA blog too to be entered to win the $75 credit to the N&T store.  
44

Neat & Tangled / Tonic Collaboration - Day 4

It's already Day 4 of our collaboration with Tonic USA!  Each day this week we are sharing projects featuring N&T and Tonic products on both the Neat & Tangled and Tonic USA blogs, there are also two big prizes to be won.

Here at Neat & Tangled we'll be selecting one lucky comment from our collaboration blog posts to receive a $75 credit to spend at Tonic. AND, Tonic will select a commenter from their blog to win a $75 credit to the Neat & Tangled store.

Today Elena and Bibi are sharing with us.  First we have Elena:

Hi there, Elena here with my card using the Tim Holtz stamping platform:


To me, these images look like a little children's book illustration, and I was determined to create a one-layer panel using the cuties from Ride With Me.

I took *a few* step-by-step photos to show you how I did it using the stamping platform.

First, stamp yourself a bear, but wipe the ink off of his butt and back leg before closing the press:


Create a mask for him and place it on top before stamping the bike (but again, wipe off a bit of the ink from the top of the basket before closing the lid.


Next, stamp yourself a hedgehog. Figuring out the placement is so easy with the stamping platform!


We're almost done! Mask the hedgehog and then stamp the bike again, to get all of the basket detail back.


The last step is to re-stamp the bear, while keeping the mask in place. That way, you'll get his back leg in the picture.


Stamp the bunny in the backseat, draw in any disconnected lines with a black copic-friendly pen and color the image!


Thanks for stopping by!

Next is Bibi:


Hi there, It is Bibi here and I made 5 easy and quick projects for you today using the new Panda Die, So Many Sentiments stamp set and Geometric Circles Cover plate, together with a cupcake, an envelope, and a banner die sets by Tonic Studios. 

I'm  sharing a video over the  Neat and Tangled Youtube Channel here with details about all these projects, and I also wanted to share about other fantastic products by Tonic Studios such as the Tangerine Die Cutting Machine, adhesives, the maxi Guillotine and the Tim Holtz Platform. All of them are a treat and make the crafty work a joy. 

I was thrilled when I heard about this collaboration as for me this was the perfect marriage because  I also have the honour to be part of the  British Tonic Studios Desing Team! Yay! 


The main project in the video is a cute Panda Cupcake Box and in the video,  I walk you through the process of making the box while showing you supplies by Tonic I use in a daily basis and I also love.

You can customize this box using the Panda Die to create different animals by changing the cardstock colour and adding different embellishments.

I keep it simple for you today so I stick to black & white projects with a hint of pink.


The cupcake box dies also have a die to create an insert to perfectly fit a cupcake inside. You can also use this cute Panda box as a goodie bag .. it is stinking cute, isn't it? 

I love it! 

Make sure to watch the video with tips and ideas here.


OK, leave a comment here to be entered to win a $75 credit to the Tonic store, and then head over to the Tonic USA blog to see what their team created.  Tomorrow is the last day of our collaboration and you definitely don't want to miss it, see you then!
39

Neat & Tangled / Tonic Collaboration - Day 3

It's time for Day 3 of our collaboration with Tonic USA!  Each day this week we will be sharing projects featuring N&T and Tonic products on both the Neat & Tangled and Tonic USA blogs, there are also two big prizes to be won.

Here at Neat & Tangled we'll be selecting one lucky comment from our collaboration blog posts to receive a $75 credit to spend at Tonic. AND, Tonic will select a commenter from their blog to win a $75 credit to the Neat & Tangled store.

Today Cheiron and Nancy are sharing with us.  First we have Cheiron:


My card today uses everything sparkly and metallic! I started off by cutting a piece of watercolor cardstock backed with adhesive foam using the Geometric Circles Cover Plate die. Then I colored over the panel using my Dual Ended Blender Brush to apply Embellishment Mousse in Mother of PearlIndian Gold and Fresh Copper to create my background starting with the lightest color around the outside and the darker colors inside. This mousse is so easy to blend! 


Then I cut out the Seeing Stars die and embossed it with the Gold Enchantment Glitter Embossing Powder. This is probably one of the sparkliest gold embossing powders I have ever used. I also had a piece of paper that was cut with the Embellishment Circles die and I covered it with Radiant Gold Gilding Flakes and added that on top of the stars to give another layer of dimension. 


Once those layers were adhered, I cut the Hooray die from another piece of paper that I colored with Fresh Copper Embellishment Mousse and added it to the Hooray outline that was cut from white cardstock. Once all the layers were glued down, I added some Nuvo drops in Copper Penny. I sure hope I know someone celebrating something soon, because I can't wait to give them this card!

Next up is Nancy:

Let's get messy with some Nuvo Embellishment Mousse by Tonic Studios! To create this card I used the Punchinella Steel Die to create a mask. Then I dipped into the Aquamarine Mousse and started spreading this beautiful frosting up at the top of the card. Next, I used the Spring Green Mousse at the bottom and overlapped the colors creating a beautiful transition shade in the center.


The Embellishment Mousse is very light and easy to spread. It cleans up really well too. I love that you can mix colors to create different shades.


The Prehistoric Pals Stamp Set was perfect for this textured background. The dino images were watercolored and placed on foam to give them a little lift. Don't forget to give your embellishment mousse some time to dry. It's pretty quick to dry and was ready to go after 15 minutes.


Try the Nuvo Embellishment Mousse and Punchinella Steel Die to create texture backgrounds with a splash of color!

Don't forget to leave a comment here to be entered to win a $75 credit to the Tonic store, and then head over to the Tonic USA blog to see what their team created.  We'll be back tomorrow with more inspiration for you!
46

Neat & Tangled / Tonic Collaboration - Day 1

Happy Monday!  You are all in for a treat this week.  We are collaborating with Tonic USA and not only will there be some pretty fantastic inspiration for you each day on both the Neat & Tangled and Tonic USA blogs, there are also two big prizes to be won.

Here at Neat & Tangled we'll be selecting one lucky comment from our collaboration blog posts to receive a $75 credit to spend at Tonic. AND, Tonic will select a commenter from their blog to win a $75 credit to the Neat & Tangled store.

Now for some inspiration, today Debby and Miriam are here to share.  First up is Debby:


Hello, it's Debby here today, and I'm delighted to be joining in with this week's Tonic collaboration! I already have a fair few Tonic products in my stash as I love the quality of their tools and original embellishment products to name just a few. However, I've not yet had the chance to play with the Nuvo Glimmer Pastes or try out the Tim Holtz Stamping Platform

I knew immediately I wanted to use the Moonstone Glimmer Paste to bring sparkle and texture to an ink blended stencil design. I pulled out the Interlocking Geo stencil from the new February release and blended a sherbet rainbow diagonally across the card using Hot LipsMelonDucklingMint and Spring Rain inks. Keeping the stencil in place, I then used a Ranger palette knife to spread the Glimmer Paste over the ink blended background. It's a bit like spreading butter I think! It never gets old to lift the stencil to reveal the design and I was delighted at how adding the Moonstone Glimmer Paste really brought this sherbet toned background to life with a million sparkles catching the light. 


I put the background to one side to dry while I worked on the sentiment and embellishments. Using the Tim Holtz Stamping Platform, I stamped the love from Love Notes in Hot Lips inks. For me, stamp positioning tools have been a game changer for my stamping, and Tim Holtz's one lives up to all that I hope from a stamp positioner - strong, sturdy, well designed and makes stamping a breeze. I used the included magnets to keep my paper in place while I stamped the image a second time to ensure I had a good intense colour and even stamping. I used the matching https://ldli.co/e/3rx79x to die cut the sentiment and then paired it with a partially stamped sentiment from the So Many Sentiments set. I carefully cut the 'we're friends' part of the sentiment away from the rest, stamped it with clear embossing ink on Black card and white heat embossed before trimming to a skinny strip. 


I added the background to a white card base and the two sentiment pieces to the background with foam adhesive and then accented with hearts cut with a die from the Love Notes set. I covered the hearts with Spring Rain and Melon inks, followed up with Glitter Gloss and then finally Crystal Glaze for a beautiful sparkly and glossy finish. I also added Crystal GlazeDuck Egg Blue and Sugared Almond droplets as final accents. 

Next up is Miriam:

Hi everyone!  This week Neat & Tangled is collaborating with Tonic USA.  I was so excited to be able to work with their products, and created two cards to share.


For this first card, I die cut our Punchinella die from cream cardstock.  Then I used some liquid adhesive to essentially pain across the bottom of the die on a diagonal.  Once the glue was dry, I used the Radiant Gold Gilding Flakes to embellish the bottom of the die cut.  I then tacked the die cut piece down in a couple places over a piece of patterned paper.

Those dimensional hearts are from the Scored Shapes Dies set.  I cut the hearts from both patterned paper and vellum.  I rubbed the vellum hearts with Powder Blue embellishment mousse to give it a little shine and subtle color. 

Those were then stitched to the punchinella/pattered paper as well as a sentiment strip with a sentiment from the So Many Sentiments set.


I also added a vellum mat.  Just as with the vellum hearts, I rubbed the top and right edges of the mat with some embellishment moussse, this time using Pure Platinum mousse.

Everything was adhered to the card base and then I added a few sequins as well as a few dots of White Blizzard Glitter Drops to finish it off.


For my next card, I used the Embellishment Mousses in a different way.  I was a little surprised by the texture of the mousse when I first used it.  I expected it to be more like a paste that you used for stencils, but it had more of a clay consistency.  You can still use it in that for for stencils, but you have to kind of work it into the openings.  Or, you can soften it into more of a paste form by adding some water.

You can also add water to create a type of paint, which is what I did.  I just used my palatte knife to put a bit onto a craft mat, added water to create a paint consistency, and than painted onto a watercolor panel using the Powder Blue and Pure Platinum embellishment mousses.

I then added some stamping using the Landscape Textures stamp set and the Tim Holtz Stamping Platform.  I placed the stamp in the middle of the platform so that I could move the panel around underneath to create the random stamping.


Then I added some gilding by 'coloring' some dots on the panel using my glue pen.  And then adding the Radiant Gold Gilding Flakes.

Note - make sure your ink is totally dry before you do this.  I managed to smudge a bit of black ink when I was brushing away the excess gold flakes.

I die cut the You Can Do Anything sentiment and gilded it as well.  To give it a little more strength, I did add a second layer and then adhered the entire piece to my panel.

Now it's time to head over to the Tonic USA blog to see what their team created.  Be sure to leave comments here and there to be entered to win the giveaways.  See you back here tomorrow for Day 2!
65

His & Her Holiday Cards with Nina-Marie


Hello crafty friends, it is Nina-Marie here with you today, sharing a set of cards that are perfect for that special him or her on your Christmas list this year!

Most card designs can be adapted to fit either a feminine or masculine feel, and this set is a great example of how simple that can be.

I love making shaker cards, and our Doily Tag die is a perfect window to put in front of an assortment of pretty sequins, don't you think? I started off by die cutting the tag from white cardstock and applied a piece of acetate behind it to be my window. I then cut small strips of foam tape to place around the outside edges of the doily tag die; this creates the shaker well for all the sequins I place inside.

The sequins I used for the shaker are from the Phosphorescence and Caribbean Dream mixes from Lucy's Cards, and also the Full of Love mix and Gold sequins from Neat & Tangled.

I popped the shaker up off of a white card base that I embossed with a faceted We R Memory Keepers
embossing folder; the texture on the white card adds the right amount of detail without being distracting.


On both cards I die cut the word "holidays" from white cardstock four times and adhered them together to be more dimensional. For some color and sparkle, I heat embossed them with silver and gold embossing powders from Tonic Studio's Nuvo product line. The holidays die cut and the coordinating sentiments are from Neat & Tangled's Happy Holidays stamp and die set.

To fit the two different genders, I used a red and pink color scheme for the feminine card and green and blue for the masculine version.


Finally, I used some Wink of Stella clear glitter and added it over top of the white card base... the extra shimmer is an optional detail but I think it really adds that perfect finish to the card.


I hope this has inspired you to see how easy it is to switch colors around on a card to make it fit for either a guy or a girl! Thanks so much for spending some time with me today and I will see you again very soon!

SUPPLIES


10
Back to Top