Neat and Tangled Sequin Series: Hidden Sequins

*Go HERE for Day 1 of the Sequin Series* 

Hi friends! Laurie from Soapbox Creations here today with a fun card using sequins. This is a nice way to keep them loose, no time spent sticking them all down. It sort of looks like a little party in that bag :) Also nice because the recipient could re-use the sequins!

First, I took the chevron stamp from Little Tangles and stamped it down most of the card base using Versamark.  I took a little glassine bag (also from Neat and Tangled) and heat embossed the "hello" sentiment on the front with white embossing powder.  Next, I gave the top of the bag a scalloped edge then I added several colors of sequins to the bag and sealed it with adhesive.  I finished it off with some washi tape and twine for a little decoration.  

Thanks for stopping by!
5

Neat and Tangled Sequin Series: DIY Sequin Bracelet!


Hi friends! Danielle here, and yes, that's right ladies, a whole week dedicated to sequins! Each day there will be a different designer with a different approach to using sequins. I feel I should also let you know that all sequin colors and styles have been restocked! Find them HERE.

So without further ado, I am up!  You know, I actually made 3 projects using sequins, and a 4th is in the works but I thought I'd hang on to a few of them for next week's May Release!

Today I am here with a photo tutorial showing you how to make a super simple and super inexpensive (for the amount of supplies I used it was probably around $1.00!) bracelet. This was quick, and so fun! Reminded me of making friendship bracelets when I was young! The great thing is that are also a million other ways you could go with this basic idea!

First up, here is what you will need:

supplies
scissors, embroidery floss, flat matte gold sequins, needle, fray check
Now, you can use whatever color floss and sequins you want! I opted for the flat matte gold sequins and a off white/beige floss.

Step 1: Cut 4 long pieces of floss. Wrap a piece around your wrist to see how long it should be, and than double it at least (I admittedly went way over board with the length of mine and made it like 4x as long and that was unnecessary)

step1

Step 2: Tie knot at one end, leave enough so that you can tie it around your wrist once finished.

step2
Step 3:  Next I tied the floss onto this little basket, you just need to tie it on something that isn't going to move when you pull on the floss.

step3
Step 4: Take 3 of the strands of floss and braid them. Check periodically to see if the braid is long enough to wrap the full length around your wrist.

step4
Step 5: Once your braid is long enough, tie it off loosely at the end (you will need to untie this later)

step5
Step 6: Thread the one remaining piece of floss through a small needle (it will need to fit through a sequin center)
step6
Step 7:  Tie a knot in the thread close to the top, where the braid begins.

step7
Step 8: Thread floss through 1 sequin, pull it all the way up until it touches the knot.

step8


Step 9: Continue the trend of tying a knot and threading a sequin until you have gone the same length as the braid. You can space your knots and sequins. however you like! Close together, farther apart, equally spaced, clustered...whatever look you're going for! Here is what mine looks like, you can see the trend of knot, sequin.

step9


Step 9: I forgot to take a picture, but you untie the end of the braid, and then tie all 4 strands (the 3 from the braid and the 1 with the sequins) together in a knot at the end of your bracelet. Cut off the excess, but be sure to leave enough so you can tie the two ends together around your wrist. If you're worried about the ends of your floss fraying, you can use some Fray Check!

step11
Step 10: Ta-Da! You have a sweet, custom, trendy, little bracelet!

step10
You can wear it with the braid and sequins sort of twisted

bracelet1
Or separate

bracelet2

bracelet3
Just imagine what you could do! I'm already putting some more of my hoarded embroidery floss and sequins to use! I was also thinking you could also add in beads, maybe twine or hemp instead of floss! If you give this a try be sure to share on our Facebook page or Flickr group
12

Party Day with Neat and Tangled

_DSC0001

Hey there! It's Suzanne here today with a fun scrappy card that I made using a sentiment from Sketchy Cupcakes along with Crate Paper's Party Day collection.

_DSC0009

One of my favorite things to do with my sentiment stamps is reconfigure them to fit the space that I am stamping in. This stamp is actually designed with the words "Happy" and "Birthday" on separate lines, but you can see how I selectively inked the image to fit the words on this word window from the Party Day ephemera pack. I just love Danielle's handwritten font!

Thanks for stopping by! Have an awesome day,
Suzanne


9

Happy Birthday, Cupcake

Happy Friday, friends! It's Mary Dawn here, with a cute cupcake card. 


I have recently come to the conclusion that everything is happier if it has a mustache. This card just might prove it. 

I stamped the solid cupcake wrapper/bottom and the happy birthday sentiment from Sketchy Cupcakes in a light grey ink. I stamped the cupcake icing in Memento London Fog and colored it with my Spectrum Noir markers. I stamped the cupcake eyes and smile separately, selectively inking first the eyes and stamping and then the mouth and stamping. I needed room for my cupcake's tiny grey mustache. I added the fussy-cut icing to the white panel with dimensional adhesive and added rock candy distress stickles as a final touch. 

Have a great weekend! --Mary Dawn

4

I love your Muffin Top

Hi Friends! It's Chari here today with a fun card featuring the Sketchy Cupcakes set.

MuffinTop

I constructed my little muffin on white card stock, using some masking for the cherry, and then colored with copics.  I applied picket fence stickles to the muffin top with my finger to look like a sugary topping.  The polka dots on the muffin cup are made with white enamel accents to match the washi tape.  I adhered my images with foam adhesive to raise them up from the card base and accented with butter cream and mermaid's tail sequins.

Thanks for stopping by, hope you all have a wonderful day!
7

Happy Birthday

Hey there!!!  Amy K. here and I have a masculine birthday card to share.
I know masculine cards are very difficult for many of us but I have a quick and fairly easy card here using the woodgrain image from the set On the Strip 2!  If you don't have this set and it's counterpart, On the Strip, you are missing out!  These two sets alone give you ENDLESS options for cardmaking!
 
Here I've stamped the woodgrain strip with brown ink over and over again until my kraft panel was filled.  Every time I would ink the stamp I would move it across just a bit to give it a more realistic look.  My sentiment was stamped on a scrap strip using a sentiment from Sketchy CupcakesTucking a few woodgrain buttons under the sentmemt strip was the final touch for my masculine card.   
 
happy birthday2


What do you think? Masculine cards.......are they hard or easy for you?  Thanks for stopping by!!!


3

Clean & Simple: Thinking of You

Don't look down on Neat and Tangled's mini stamp sets! There may be less stamps in the set, but there are just as many possibilities as a full set! Today, I'm working the Just Thinking of You mini stamp set for a simple one layer card.

I stamped the little heart from the mini set a couple times in the lower right hand corner in a five different colors. Then I stamped the sentiment from the same set on top in black. To make the sentiment stand out, I used a white gel pen and gave it some shadows to accent the words. Finally, I blinged it up with some rhinestones.

Thinking of You

Want even more inspiration on using this mini set? Check out our March release post on Just Thinking of You!

--- Pamela
5

On the Strip 2: Strippin'

Hi!

So when the gorgeous Danielle first sent me her On the Strip 2 set, I kind of panicked. Its lovely, don't get me wrong, I could only imagine the incredible cards that the other DT ladies would come up with. But me?? Meh, not so much.

I couldn't get past the fact that they were basically LINES. I don't do graphic cards (more like, CAN'T do), I love them. I see what others make and think 'wow, that looks so amazing' but then when I try, it comes out looking more like poop. Lines--what could I do with lines to make them look like anything other than exactly what they are?! So I just never made anything with them. Till now.

Anyway, I decided enough was enough, I had to give On the Strip 2 a go. Get past the fact that I couldn't colour it in etc, and use it for what it was. LINES.

So today I've got four cards to share with you that use only 2 of the stamps, but I kept them simple and used the stamps exactly as what they are. Lines. And you know what? I think I won this round :)


I thought it would be cool to stamp the smallest strip in various Memento colours, and cover them with stickles. I love the effect! Kind of reminds me of streamers or (for some reason) fireworks as they fall back down to the ground after exploding.I used the Swiss Dots embossing folder on the cardbase.

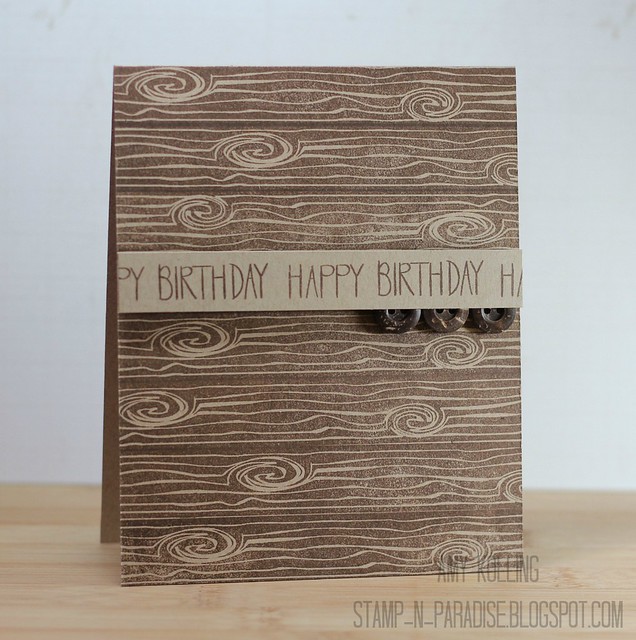
For this next one, I wanted to make something masculine but that still had a hint of prettiness to it. I used an embossing folder on the bottom half of the card, and the thinnest strip from the stamp set stamped twice. Once in Colorbox white ink, once in Hero Arts Cup O' Joe ink.


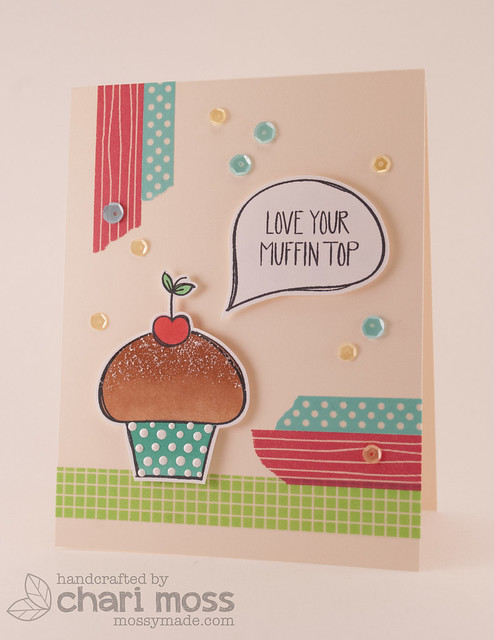
For this next one, I wanted to use the strip as a line, but not just as a line. I tried to think of places we see strips/linear forms in real life and a sunburst seemed fitting. (We're just on our last days of sun here in Australia). I added some Clearsnap smooch to the sun rays to give a hint of glimmer, and some n&t sequins to give it some bling :)


Lastly, while I had my neenah desert storm cardstock out from the card earlier, I thought I'd use the wider multi-stripe strip and try my hand at heat embossing in different colours.

This went really well until at the last second I tapped the back of the card to get the excess EP off, and almost all of it came off. I had to re-stamp and re-powder. It's not a perfect result, but I'm still happy with it. A guy wouldn't even notice the lack of perfection, so that's who this card is going to heehee.


Well there you have it!

I used the different kinds of embossing on almost all of my cards today, to get you in the mood for the current Little Tangles challenge,


which has already started! you've got until April 28th to enter for a chance to win a prize--a Neat and Tangled stamp set of the winners choice!

Hope to see you again soon!

Till then, keep craftin!

Linda xx


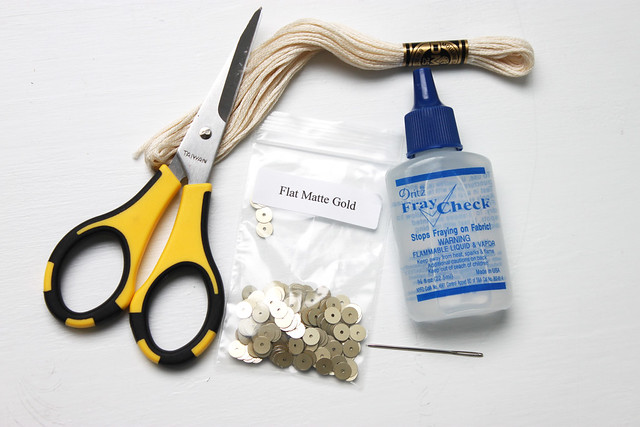
Below are the goodies you'll need if you want to try to recreate any of the above cards :)

2
Back to Top